Frequently Asked Questions
Find answers to some of our most Frequently Asked Questions
Essential, Enhanced, or Professional - Which SimpleCitizen package is right for you?
Understanding SimpleCitizen's three package tiers.
Our goal with SimpleCitizen is to make your entire process as simple as possible. Part of that is helping you get the level of support you desire and that your case needs. Choosing between various packages can feel daunting, so let's look through what each of our package offerings include and help give some guidance to consider as you select the package for you!
Essential Package Overview:
As the lowest-tiered package that SimpleCitizen provides, the Essential package is an excellent option for those who are confident in their ability to provide the necessary immigration information but want some extra support along the way. This support from SimpleCitizen includes the following:
- SimpleCitizen account: An intuitive platform that guides you through entering the information for your USCIS application.
- Translations: Document translation of official, government-issued documents required by USCIS.
- Legal review: A detailed legal review of your entire immigration application by a member of our network of partner attorneys.
- Application printing and instructions: A finalized application is printed and mailed to your door with detailed instructions to help you successfully submit it to USCIS.
Enhanced Package Overview:
The enhanced package is an excellent option for people who feel their case is fairly straightforward but want the extra benefit of meeting with an attorney to receive guidance on how to be the most successful as they prepare their application and the peace of mind that if USCIS requests more information, they will receive help responding to the request.
In addition to the Essential package offerings, this Enhanced package includes:
- One attorney consultation: One 30-minute consultation with the partner attorney assigned to your case. Typically, customers find this call to be the most helpful as either a kick-off or post-attorney review consultation.
- Additional document translation: Document translation of up to 5 additional pages of evidence.
- Request for evidence support: Legal support and guidance if USCIS requests more evidence.
Professional Package Overview:
SimpleCitizen’s Professional package aims to provide additional opportunities to connect with licensed attorneys while being affordable and accessible. This is a great option for users who want to connect one-on-one with the attorney assigned to their case at various points of the process. It gives opportunities to address concerns and review their case recommendations.
In addition to the Essential and Enhanced offerings, the Professional package includes:
- 3 total consultations, typically used at the following points:
- Kick-off Consultation: Receive feedback on how to be successful in completing your case and to help answer your questions.
- Post-Review Consultation: A consultation with the reviewing attorney to discuss their feedback following their review. This consultation is a chance to go over any questions you have, and the attorney will also go over the updates you have made to ensure your case is on track;
- Interview/Case Finalization Consultation: A video consultation with the reviewing attorney to help prepare you for your USCIS interview and the next steps after application approval.
- Expedited Shipping: Two-day express shipping of your application so you can submit to USCIS sooner.
- USCIS Interview Preparation Kit: Receive a kit delivered to your door that will help you prepare for your interview with USCIS.
Common Factors Used to Determine Package Choice
The decision between which package works best for you is personal, but we know that many of our customers often consider similar factors to make their decision. Here are some common reasons to consider:
Features and Services:
Some defining differences between the three packages are direct access to a licensed attorney and support if USCIS needs additional evidence or information. While some people's confidence in continuing with an attorney having reviewed their application is sufficient, others feel a desire to meet the reviewing attorney face to face to talk through their case at various points throughout the process.
The Complexity of Your Case:
One of the most common reasons people choose their package is the complexity of their case. But sometimes, it can feel overwhelming to determine if your case is complicated or not. Here are some things to consider:
- Finances: One of the forms that often receives the most scrutiny by USCIS is the affidavit of financial support. People with limited historical, current, or self-employment income often benefit from being able to talk through their options with an attorney.
- Immigration Status: Individuals with more complicated immigration history often report enjoying the ability to discuss their immigration history with the attorney to get guidance on what needs to be presented in the application.
- Relationship Evidence: One of the key factors to getting a marriage-based green card is proving that a relationship is legitimate and in good faith, not for immigration benefits. However, there are many cases where, for various reasons, there is limited relationship evidence. It can be helpful to go through the evidence the couple has and discuss other potential options that can be added as evidence.
- Cases where it is common for USCIS to have extra scrutiny: Here are some of the flags that may cause a case to receive extra scrutiny from USCIS:
- Large disparity of age
- The inability of petitioner and beneficiary to speak each other’s language
- A vast difference in cultural and ethnic background
- Family or friends unaware of the marriage
- Marriage arranged by a third party
- A marriage contracted immediately following the beneficiary’s apprehension or receipt of notification to depart the United States
- No cohabitation since marriage (even if there are valid reasons)
- The beneficiary is a friend of the family
- The petitioner has filed previous petitions on behalf of aliens, especially alien spouse
Future Needs:
Consider what you hope your case looks like post-submission to USCIS. While SimpleCitizen continues providing legal information and updates on both packages, the enhanced and professional packages also get additional attorney support to answer USCIS requests for further evidence. Request for Evidence (RFEs) are standard practice at USCIS, but answering thoroughly is key to an applicant not getting a case denied. In addition, many people state that the USCIS interview causes them a lot of stress, and they benefit from knowing that they can meet with an attorney to go through their case and discuss anything causing anxiety.
Personal Comfort Level:
Another significant factor is how you feel about the level of support you’d like. Some people feel more comfortable with personalized guidance that comes from multiple attorney consultations, while others are comfortable with largely self-guiding their process. Choose a package that aligns with your preferred level of involvement.
Get Started Today!
Whether you choose the Essential, Enhanced, or Professional package, our mission remains the same: streamlining and simplifying your process through the US immigration system. You are our highest priority. We can’t wait to help make your immigration dreams become a reality. You can click here to get started!
We’re happy you’re here!
What is a FOIA Request?
We explain what a FOIA request is, what they are used for, and when they should be submitted
Have you ever needed to reach out to a government agency for help with a previous or current immigration request? If so, you may be familiar with what are called FOIA requests! In this article, we'll explain what a FOIA request is, what they are generally used for, and when they should be submitted.
What is a FOIA Request?
If you are trying to get personal documents from a government agency, you may have heard of a FOIA Request. FOIA stands for Freedom of Information Act. Passed in 1967, the Freedom of Information Act states that the public has the right to request records from the government. As long as the information is not protected by one of the specified nine exemptions or three exclusions, the government is required to provide it. Since FOIA was passed, each government agency has developed a method for the public to submit requests for documents through their agency. Typically, FOIA requests are not needed to file for an immigration benefit. However, they can be useful in situations where an individual needs more information about a previous immigration application or needs to request information to help with a current one.
The Nine Exemptions and Three Exclusions
Government agencies are only allowed to withhold information if it is protected by one of the nine exemptions or three exclusions. These exemptions are designed to protect information such as classified documents, trade secrets, or information that unreasonably violates the privacy of other people. For a full list of the exemptions and exclusions, see this link.
When Should I Submit a FOIA Request?
You can submit a FOIA request to a government agency anytime you need specific information from them that is not readily available through other means.
Here are some examples of reasons someone might submit a FOIA request to USCIS:
FOIA Requests can also be submitted to other government agencies as well. Here are some examples of reasons someone might submit a FOIA request to another agency as a part of their immigration application:
Please note: If you are requesting a FOIA because you are in deportation proceedings, it is a good idea to consult an immigration attorney. If you need help finding an immigration attorney, AILA’s lawyer search can help locate attorneys living in your area.
How Do I Submit a FOIA Request?
- Step 1: Determine Needed Documents. The first step in submitting a FOIA request is to determine what documents are needed. Requesting a lot of documents, such as a whole file from an agency, can result in longer wait times. Knowing exactly what documents are needed can help make the process faster and more successful.
- Step 2: Identify Relevant Agency. Once you have determined the documents needed, the next step is to figure out what agency has these documents. If you are not sure what agency has the documents you need, a quick Google search can usually help determine this. Foia.gov also has a list of agencies that you can explore.
- Step 3: Locate FOIA Procedure for Selected Agency. After determining what documents are needed and what agency has them, the next step is to find the procedure for submitting a FOIA request to that agency. Each agency handles its own FOIA requests and has its own procedure for doing so.
- If you are submitting a FOIA request through USCIS, you can find the full instructions for doing so here. Requests are made through the applicant’s USCIS account, and there is a link included in the instruction page.
- For other agencies, you can find information on how to submit a FOIA request by searching that agency here by clicking “Start Your Request”
FOIA Request Fees: Sometimes, fees are associated with FOIA requests. These fees vary by agency. They are usually based on the amount of time (in hours) it takes to process the request or the number of copies required. USCIS does not charge for the first 2 hours or 100 copies but does start to charge after that. If the fees are anticipated to cost more than $250, they may contact you in advance of completing the request.
Conclusion
Feel free to reach out to our live chat with any additional questions you may have about FOIA requests. If you would like additional support and a full review of your documents by a licensed attorney after completing your FOIA request, we would be happy to help you with your application! You can sign up for one of our application packages here, and we will help guide you through the application process. We're happy you're here!
Understanding the US Naturalization Test & How to Prepare
Understanding what to expect and how to prepare for the US naturalization test.
Finally getting the opportunity to take the US Naturalization Test (also referred to as the Citizenship Test) is an exciting time for immigrants and can be the finish line of a long and difficult road. This article will discuss the Naturalization Test, including the eligibility requirements that must be met first to take the test, the contents of the test, and the interview process. All of this happens prior to taking the Oath of Allegiance and (finally) being sworn in as a US Citizen!
Prior to the Citizenship Test
Before someone can take the Citizenship test, there are a number of steps that must be taken:
Step 1: Verify that they meet the eligibility requirements to apply for citizenship. These eligibility requirements usually depend on the amount of time a person has had legal status in the United States.
Step 2: Complete and Submit Form N-400, Application for Naturalization, with the required government filing fees.
Step 3: Attend the Biometrics Appointment. Sometimes, USCIS will apply biometrics from a previous application and not require the applicant to attend an appointment but is done on a case-by-case basis.
Step 4: Receive a scheduled date for the naturalization interview and Citizenship Test.
Step 5: Prepare the requested documents and study for the Citizenship Test.
Naturalization Interview and Test
Typically, the Naturalization Interview and the Citizenship test both occur during the same appointment. Let's break down what you can expect during that appointment:
What to Expect: Interview Portion
It is important to bring all of the required immigration documents, including vital records, immigration documents, and any legal documents affiliated with your personal and immigration records. USCIS will include a list of the required documents in the interview notice indicating what they require to be brought to the interview.
After you have arrived at the USCIS field office and checked in at the front desk, you will then be called back for your appointment. The officer will first conduct the interview, asking any number of questions that are on the N-400. There is a long list of questions in Section 9 of the N-400 that should be studied, understood, and prepared for so that an applicant can answer these when asked by the USCIS Officer. It is important that the applicant’s answers on the N-400 are the same as what they plan to provide to the USCIS Officer in an interview.
NOTE: There are certain exceptions to the English speaking and comprehension requirements that are outlined on Form N-400 and its connected instructions.
In addition, the officer will typically ask other general questions about immigration history, the applicant’s marriage (if naturalization eligibility is dependent on that relationship), etc.
What to Expect: Naturalization Test
The USCIS Naturalization test takes place at the Naturalization interview, and except for certain exemptions, it includes an English proficiency test and a civics test.
English Test
The first of the two tests given in the Naturalization interview is the English test. The USCIS Officer will first provide the applicant with 3 sentences on a tablet, and they must choose one to read out loud in English.
Then, the USCIS Officer will read the applicant 3 sentences in English, and the applicant must listen to the sentences and write them down. The applicant will be permitted to write all three sentences down, but they only need to write one correctly in order to pass.
(This portion will be done on a tablet and written with a stylus, so it is important to learn how to write with a stylus in preparation to complete the writing portion.)
Throughout the interaction, the officer will also continuously assess the individual’s ability to speak and understand English.
Civics Test
The other test that happens during the interview is the Civics Test.
Effective September 18th, 2025, USCIS will administer the 2025 Naturalization Civics Test to [immigrants] who file their naturalization applications on or after October 20, 2025.” Immigrants who filed their naturalization application prior to October 20, 2025 will be administered the 2008 Naturalization Civic Test.
2008 Naturalizations Civic Test:
The other test that happens during the interview is the Civics Test. For applicants who submitted their naturalization application PRIOR to October 20, 2025 with be administered the 2008 Civics Test. This test includes 100 different questions about United States history, civics, and governmental processes. As a reminder, applicants should learn, understand, and memorize the “100 Questions” and their answers prior to their appointment.
For the test, the USCIS Officer will ask future U.S. citizens 10 questions from the 100 questions, to which they will have to respond verbally in English. The applicant must answer at least 6 of these 10 questions correctly. According to USCIS, "a system randomly selects the test questions, and an officer administers the test orally. The standardized civics test contains 10 questions. The officer stops the test when the applicant correctly answers the minimum number of questions required to pass the test.” USCIS has practice tests that go through the questions.
Some examples of these questions are…
- What does the Constitution do?
- How old do Citizens have to be to vote for President?
- What did Susan B. Anthony do?
- Who was President during WWI?
- Where is the Statue of Liberty?
- What is the Name of the National Anthem?
- Why are there 13 stripes on US Flag?
- What did Martin Luther King, Jr. do?
- What happened at the Constitutional Convention?
- Who wrote the Federalist Papers?
Remember, there are 100 questions, so this is only a select few. Make sure to review all questions as you prepare, as there is no guarantee of what questions you will be asked!
2025 Naturalization Civics Test:
For immigrants who submitted their naturalization application on or after October 20th, 2025, USCIS will use the 2025 Civics test which includes 128 different questions about United States history, civics, and governmental processes. As a reminder, applicants should learn, understand, and memorize the “128 Questions” and their answers prior to their appointment.
For the test, the USCIS Officer will ask future US Citizens 20 questions from the 128 questions, to which they will have to respond verbally in English. The applicant must answer at least 12 of these 20 questions correctly. Similar to the 2008 test, the system randomly selects the test questions for the interview and the USCIS officer administers the test orally. The standardized civics test contains 20 questions. USCIS has a Study Guide to help immigrants prepare.
Some examples of questions in the new 2025 Civics test are:
- The Nation’s first motto was “E Pluribus Unum.” What does that mean?
- When did all women get the right to vote?
- Name one example of an American innovation.
- What is the capital of the United States?
- Where is the Statue of Liberty?
- Why did the United States enter the Persian Gulf War?
- What major event happened on September 11, 2001 in the United States?
- Name one U.S. military conflict after the September 11, 2001 attacks.
General Information about Preparing for the Civics Test:
Many of these questions from both tests have multiple possible answers, so studying and understanding them is important! It is well-advised to avoid simply memorizing the questions and their answers. Knowing what the questions and answers mean is very important to be able to answer in the interview.
Many local community centers and English schools specialize in helping immigrants study for the Citizenship test - the 100 Questions and the Interview. Take advantage of these resources - many of them are free!
If any of the test sections are not passed, the USCIS policy manual states that USCIS will reschedule them for a second interview where they are tested only on the test(s) that were not passed in the original interview. This second interview will be rescheduled 60-90 days after the original interview. If the applicant does not pass any of the tests in the second interview, their application will be denied.
Please note that for applicants who are 65 years of age or older and have lived in the U.S. as lawful permanent residents for at least 20 years (ie applicants with special considerations), USCIS will continue to give a civics test consisting of 10 questions drawn from a special set of 20 questions, taken from either the 2008 or 2025 Naturalization Civics Test.
What to Expect: Finalization
Typically, the USCIS Officer lets the applicant know that they have passed the test portion of the interview during the interview. However, passing this test portion does not automatically guarantee they will be granted Citizenship.
If, based on the interview and tests, the officer determines that the applicant is eligible for Citizenship, USCIS will send a confirmation in the mail that the applicant passed the interview. Once this comes in the mail, the applicant must attend a Naturalization Ceremony to become a citizen.
What to Expect: Naturalization (Oath) Ceremony
The final step in becoming a US Citizen is the Naturalization Ceremony, where future US Citizens will join together to take the Oath of Allegiance! Once this is done, Citizenship is granted!
Here, you will find USCIS’s outline of what to expect and what the Naturalization Ceremony will look like:
1. Receive a Notice to Take the Oath of Allegiance
You may be able to participate in a naturalization ceremony on the same day as your interview. If a ceremony is unavailable, we will mail you a notice with the date, time, and location of your scheduled naturalization ceremony on Form N-445, Notice of Naturalization Oath Ceremony.
If you cannot attend your scheduled naturalization ceremony, return the notice, Form N-445, Notice of Naturalization Oath Ceremony, to your local USCIS office, along with a letter requesting a new date and explaining why you cannot attend the scheduled naturalization ceremony. Failing to appear more than once for your naturalization ceremony may lead to a denial of your application.
2. Check-in at the Ceremony
Once you arrive at the ceremony, check in with USCIS.
A USCIS officer will review your responses to the questionnaire, Form N-445, Notice of Naturalization Oath Ceremony. Please complete your responses to the questionnaire before you arrive.
To see what items are prohibited on federal properties, you can check the Federal Protective Service’s frequently asked questions web page.
3. Return your Permanent Resident Card
You must return your Permanent Resident Card to USCIS when you check in for your naturalization ceremony. This requirement is waived if you provided proof during the naturalization interview that the card has been lost and you have attempted to recover it, or if, because of your military service, you were never granted permanent residence. You will no longer need your Permanent Resident Card because you will receive your Certificate of Naturalization after you take the Oath of Allegiance.
4. Take the Oath of Allegiance
You are not a U.S. citizen until you take the Oath of Allegiance at a naturalization ceremony. You will receive your Certificate of Naturalization after taking the Oath of Allegiance.
5. Receive a Certificate of Naturalization
Carefully review your Certificate of Naturalization and notify USCIS of any errors before leaving the ceremony. You may use your Certificate of Naturalization as official proof that you are a U.S. citizen.
If you lose your Certificate of Naturalization, you may request a replacement by filing Form N-565, Application for Replacement Naturalization/Citizenship Document.
Get Started Today!
If you’re currently waiting for your Naturalization interview, studying for Citizenship should be fun and exciting! This should be a time to celebrate the end of a long road in the United States. We’re so excited for you!
If you are ready to start the naturalization process and file the N-400, SimpleCitizen would love to be part of your journey. Take our eligibility quiz to find out if you’re eligible to apply today!
SimpleCitizen is excited for those who are finally at this stage of their immigration timeline. We’re happy you’re here!
What is an A-Number?
This article aims to provide a clear explanation of what an A-number is and who typically has one.
The United States Citizenship and Immigration Services (USCIS) assigns a unique identifier called the Alien Registration Number, A-Number, or USCIS Number to non-citizens who are in the United States and have a lawful immigration status. This A-Number, which is a 7, 8, or 9-digit number, helps USCIS keep track of an individual's immigration history and status. It can be found on important immigration documents such as visas, green cards, and Employment Authorization Documents. So, if you're a non-citizen in the United States, your A-Number is an important identifier that helps ensure your immigration information is accurately tracked and managed.
This article aims to provide a clear and comprehensive explanation of what an A-number is and how to find out if you have one. Whether you are seeking to apply for a visa, green card, or citizenship, understanding the role of A-numbers in the immigration process will help you stay informed and better navigate the complex landscape of U.S. immigration.
Where can I find my A-number?
You can find your Alien Registration Number (A-Number) on several immigration documents, such as:
- Visa Stamp: The A-Number can be located on a visa stamp and is shown as the red number in the lower right-hand corner. If the A-Number on the visa stamp is fewer than 9 digits, a zero is inserted after the “A” and before the first digit to create a 9-digit number.
- Green Card: If you are a lawful permanent resident, your A-Number will be included on the front of your green card. The USCIS# found on a Permanent Resident card is the A-Number .
- Employment Authorization Document (EAD): If you have been authorized to work in the United States, your A-Number will be included on the front of your EAD. The USCIS# found on a Permanent Resident card is the A-Number .
- Check previous communications from USCIS: If you have corresponded with USCIS in the past, your A-Number may be included in any communications you received from the agency. This could include an Immigrant Data Summary, USCIS Immigrant Fee Handout, or Form I-797.
What if I have more than one A-Number?
It's not uncommon for USCIS to issue multiple A-numbers to individuals over time. When completing immigration forms, it's important to list all A-numbers that have been issued. While individuals may have multiple A-numbers, the most recent one issued is typically considered their "primary" A-number and should be used.
Not sure if you have an A-Number?
If you are still determining whether you have an A-Number or need assistance in finding it, you can contact USCIS customer service for assistance. Call 1-800-375-5283 or visit https://www.uscis.gov/ to use their live chat via Ask Emma.
If you are a non-citizen or permanent resident, it is possible and completely normal that you do not have an A-Number, and you can leave that part blank in the immigration forms.
Conclusion:
In conclusion, the Alien Registration Number, A-Number, or USCIS Number is an identifier for non-citizens who are in the United States and have a lawful immigration status. If you have been issued an A-number, it is important to keep track of your A-Number(s) and ensure that it is correctly included on all immigration documents. Doing so helps USCIS track and manage your immigration records. If you are unsure whether or not you have been assigned an A-Number, it is recommended to contact USCIS customer service to inquire about your immigration record.
If you have questions or concerns about your A-Number or any other aspect of your immigration status, we encourage you to reach out to our team of experienced immigration professionals. Our platform provides a comprehensive suite of tools and resources that can help simplify the immigration process and put you on the path to success.
With SimpleCitizen by your side, you can achieve your immigration goals and build a future in the United States. We may be able to help prepare your immigration application! Get started today. We’re happy you’re here!
Tips and Tricks for Uploading Documents to Your SimpleCitizen Account
Here are a few tips that may help you upload documents to your SimpleCitizen account.
With every form submitted to USCIS, supporting documentation must be provided. The following article outlines some tips and tricks to ensure that the supporting documents accompanying your application will be clear and easy to read and will give you ideas for uploading them as efficiently as possible.
Why do I need to upload supporting documents?
USCIS requests supporting documentation for most of its forms. For some forms, this documentation can span 5-10 pages of important identifying documents [such as copies of an applicant’s passport, visa, I-94, and EAD (work authorization), if applicable]. For other forms, the documentation required can be as many as 100-200 pages or more! Whether you are uploading a few pieces of supporting documents or many pages, we want to help you upload documents as quickly as possible and in a way that will allow USCIS to see and read clearly everything you are providing.
What kinds of file types are accepted by the SimpleCitizen system?
Uploading files saved as a PDF is often best since it preserves the documents' quality, allowing for them to be clear and easy to read. However, if a PDF option is unavailable, the SimpleCitizen system accepts the following file types: JPG, JPEG, PNG, PDF, and TIF.
Many free resources can help you to convert an existing file into a PDF, such as Adobe’s PDF Converter or PDF Converter - Convert files to and from PDFs Free Online. Some email servers also provide resources for creating files and exporting them as PDFs. Please research to ensure that you use a resource that you feel is safe and reliable.
Tips and Tricks for uploading government-issued documents:
Many USCIS forms require you to add multiple government-issued documents to an application as supporting documentation. The following list gives examples of some of these documents:
- A birth certificate
- Marriage certificate
- Marriage Termination documents (if applicable)
- Passport
- Visa
- I-94 from most recent arrival into the US (if applicable)
- Driver’s license/ Green Card/ Certificate of Naturalization or Citizenship (if applicable)
- Receipt notices from previously filed petitions, such as Form 797C
USCIS must receive clear and easy-to-read copies of these identifying documents. To provide a quality scan of these documents, please aim to:
- Ensure that all edges of the document are visible
- Include a scanned copy that is saved as a PDF when possible
- If taking a picture of the document, please ensure no other visible distractions are in the background. You can do this by photographing the document against a white background.
- Reduce the appearance of shadows and obstructions
If the scan you are uploading does not meet these requirements, consider replacing them with scans of better quality. In some cases, requesting new copies of government-issued documents may be beneficial to provide scans of the best quality possible.
Tips and Tricks for organizing and uploading large amounts of evidence:
In many cases, USCIS asks for robust documentation that can span 100-200+ pages. Such is often the case for Marriage-Based petitions that require relationship evidence or applications that require proof of financial support.
Here are a few tips that may help you upload large amounts of evidence at once:
- Merge Files: Applicants are welcome to upload individual photos and documents to their application if they like. However, doing this may exhaust the limit of individual uploads allowed by the SimpleCitizen system. It may be beneficial to consolidate multiple pages/documents into a single file type, such as a PDF, to prevent this from happening. A “Merge” feature may also be helpful if wishing to combine multiple files into one document. Please research to ensure that you use a resource that you feel is safe and reliable.
- Add Multiple files to a Document and Save as a PDF: Once you upload documents to your SimpleCitizen account, there is limited ability to edit and rearrange them. Suppose you prefer more control over the order in which your relationship evidence/financial documents appear in the final application. In that case, you can paste your photos and documents into a Word Document/Google Doc or Powerpoint/Google Slides. Then, save that file as a PDF and upload it as one.
Pro tip: Powerpoints/Google Slides can be particularly helpful for rearranging pages of photos since Powerpoint/Google Slides pages are much more straightforward to rearrange than Word/Google Doc pages. - Upload Files as PDFs: Please upload any word-heavy documents (such as letters of support, screenshots of emails, bank statements, etc.) as PDFs, not as JPEGs. Uploading them as JPEGs will decrease the image quality and make it very difficult to read the information. We recommend using a resource that can help you convert your file into a PDF when possible, such as Adobe’s PDF Converter or PDF Converter - Convert files to and from PDFs Free Online. Please research to ensure that you use a resource that you feel is safe and reliable.
- Label Files: Another strategy that can be helpful is clearly labeling files before uploading them to the SimpleCitizen.Doing so makes it much easier to make adjustments later in the process, which can come in handy.
The file I want to upload will not upload to my SimpleCitizen account. What can I do?
Your SimpleCitizen account has a limit on how many individual files can you can add to a single upload category. If you add too many separate files, the system may not allow you to add any more. In these cases, it may be beneficial to consolidate multiple pages/documents into a single file type, such as a PDF. A “Merge” feature may be helpful in this case. Please research to ensure that you use a resource that you feel is safe and reliable.
Additionally, your SimpleCitizen account limits the size of a file to 12MB. If your file is larger than 12 MB, it will not upload to the SimpleCitizen website as is. However, some easy solutions can help you bypass this limit!
- A quick solution to uploading a file over 12 MB is to reduce the file size. To do so, we recommend “compressing” a file. You may use a resource of your own or one like Adobe’s PDF Compressor or Compress PDF: Reduce File Size Online for Free to compress or reduce the “size” of a file without having to remove any of the contents of the file. Please research to ensure that you use a resource that you feel is safe and reliable.
- If you cannot compress a file, it may be necessary to separate it into 2 pieces (or more, if necessary) so that its size is under 12 MB, and you can upload it to your SimpleCitizen account. You may use a resource of your own or one like Adobe’s Split a PDF or Split PDF - Extract pages from your PDF to split a PDF file without removing any of the contents. Please research to ensure that you use a resource that you feel is safe and reliable.
Following these tips and tricks will help you ensure that the supporting documents attached to your application are clear and easy to read when USCIS processes them. If you have any additional questions or experience issues while uploading a document to your SimpleCitizen account, don’t hesitate to Contact Support or reach out to us in our live chat (open Monday - Friday, 9 AM-5 PM MST).
SimpleCitizen Processing Timelines
Summary of the steps involved in SimpleCitizen’s online immigration services and their timelines.
Welcome to our guide on SimpleCitizen timelines! In this article, we’ll discuss the steps involved in using SimpleCitizen’s online immigration services and provide an overview of the timeline for each step in the process after signing up.
Step 1: Fill out the questionnaire
To get started with SimpleCitizen, you begin by filling out a questionnaire and uploading your documents to your account. Filling out the questionnaire takes about 2-4 hours to complete. The time it takes to complete this step will depend on how quickly you can gather and upload all the necessary information and documents. Filling out the questionnaire and gathering all of the required documents together to upload them can take a few days to a few weeks.
- Call Out Box: Pro Tip: Collecting all of your documents before sitting down to start filling out the questionnaire can help make this step go faster. Please check out the following article to see some of the general documents that are usually required.
If you need to have any of your documents translated, please allow 1-2 business days after uploading them. We offer translation of USCIS-required documents, such as Birth Certificates, Marriage Certificates, Final Divorce Decree, and Military Records. You can read more about the translation of documents here. Any other documents in foreign languages not explicitly asked for by USCIS are not translated as part of the SimpleCitizen purchase, but you must provide a translation if you would like to include those documents.
Step 2: Attorney Review
Once you have submitted your application for review, our independent partner immigration attorneys will review your application. The attorney review process will take approximately 5-10 business days. Once the review has been completed, you'll be assigned a SimpleCitizen case support team who will contact you with the attorney's feedback.
Step 3: Implement updates
Once your SimpleCitizen case support team sends you the attorney’s feedback, you should carefully implement the suggestions. The SimpleCitizen case support team will work with you to ensure that any feedback from the attorney is implemented correctly. This process can take a few days to a few weeks, depending on the extent of the feedback and how quickly you can make the necessary updates.
Step 4: Review the Final PDF
Once your case support team has confirmed that you have implemented all of the attorney’s recommendations correctly, we will send you a PDF draft of your application for you to review. During this review process, you will need to check that all of your personal information and translations are accurate. If you notice any errors or need to make any updates, you should check your questionnaire to ensure that the information was entered correctly. If it was entered correctly in the questionnaire but is showing up wrong on the application, please inform your case support team. It is normal for there to be a few rounds of revisions before the application is ready to be printed. This step in the process usually takes 1-2 business days, depending on how quickly you are able to review the application and provide feedback.
Step 5: Print and Ship the Application
After you've made all necessary updates and approved a final pdf of your application, it will take 1-2 business days to print and 3-5 business days for the shipping provider to ship the application to your home. You'll need to sign the forms, attach the required application fee payments and passport-sized photos, and mail the application to the USCIS.
**Please note that SimpleCitizen is not responsible for any shipment delays or issues caused by the shipping provider
Our Process
We hope this guide helps give you a better understanding of the timeline for using SimpleCitizen’s immigration services. It's important to note that this timeline is specific to SimpleCitizen and may not apply to other immigration assistance services. If you have an urgent timeline and are unsure if we can help you, please reach out to our live chat. We’re happy to work with you in whatever way we can.
Additionally, the overall timeline for the immigration process can vary significantly depending on the specific circumstances of each case and the type of immigration application being submitted. You can look up USCIS processing times here. The U.S. immigration process can be complex, so it's always a good idea to carefully review the requirements and timelines for your specific situation and to be prepared for potential delays. Let us know if you have any questions, we're here to help!
Tax Documents for the Green Card Application
Understanding which tax documents are needed for Form I-864.
All people applying for a family-based green card are required to provide the financial information for a Sponsor to show that they will have access to financial support in the US once they receive their green card. In most family-based cases, the petitioning family member is the primary sponsor for the application. This sponsorship is done by filing Form I-864, Affidavit of Support.
In order to be eligible to sponsor, the petitioner (or Joint Sponsor, if applicable) must show that they met the income requirements for their household size for both the current year and the most recent tax year. To verify whether they met the requirements for the most recent tax year, USCIS asks for the sponsor’s tax documents. These tax documents can be difficult to navigate, however, so we have put this guide together to help you understand exactly which documents are required, and how you can locate these documents.
What tax documents does USCIS require?
The documents needed will vary depending on whether the sponsor filed their taxes Married Filing Jointly or not. The list below shows the options for tax documents based on their filing status:
Married Filing Jointly
If they filed their taxes Married Filing Jointly, they have two options:
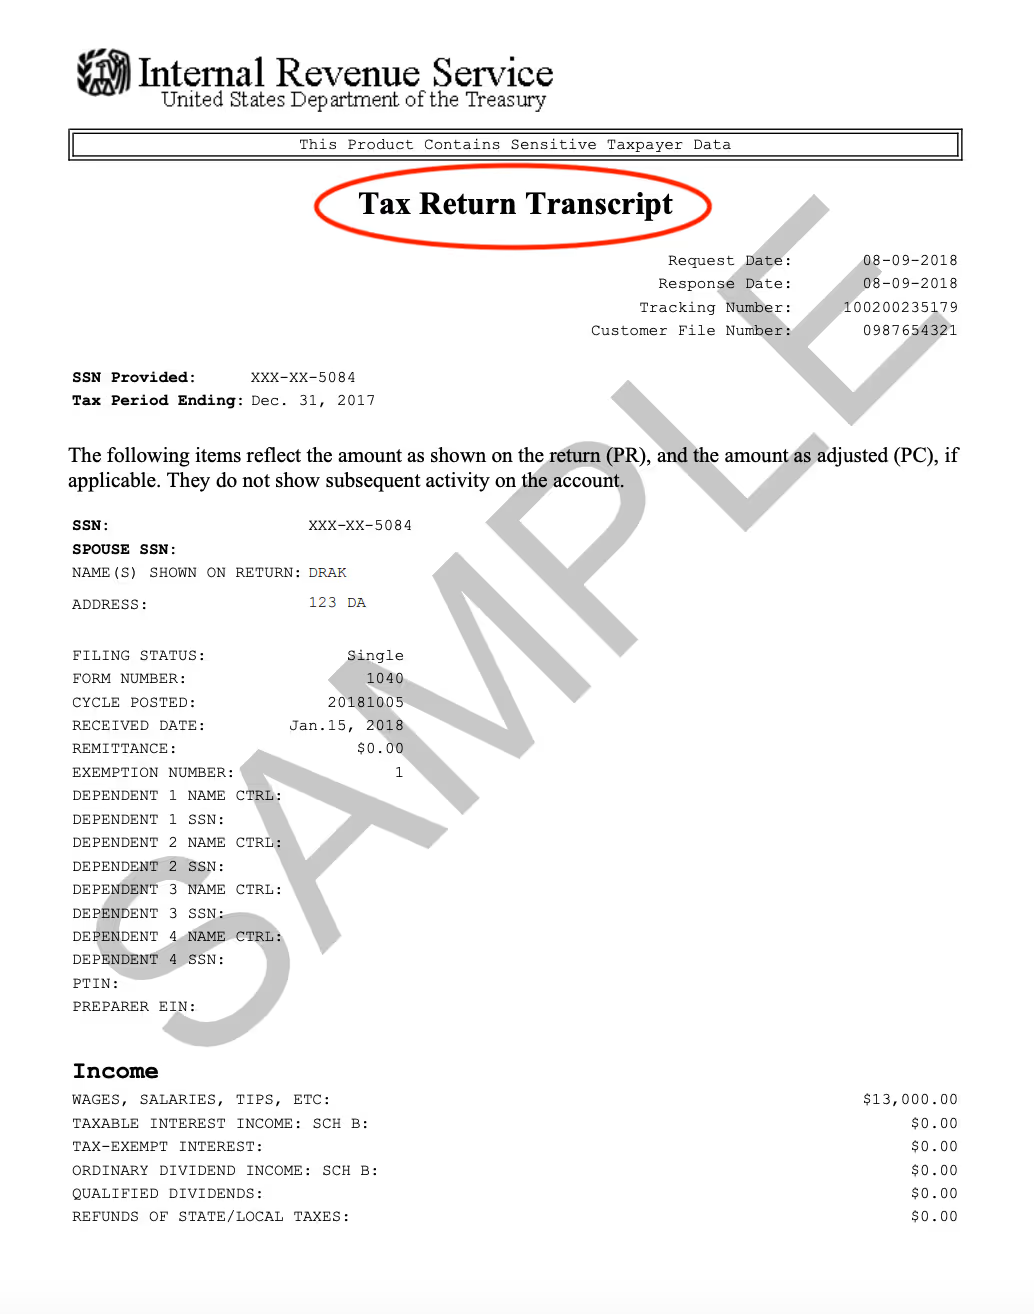
- Option 1: Upload the IRS Tax Return Transcript (request it for free here) and any associated W-2s and/or 1099s for each year.
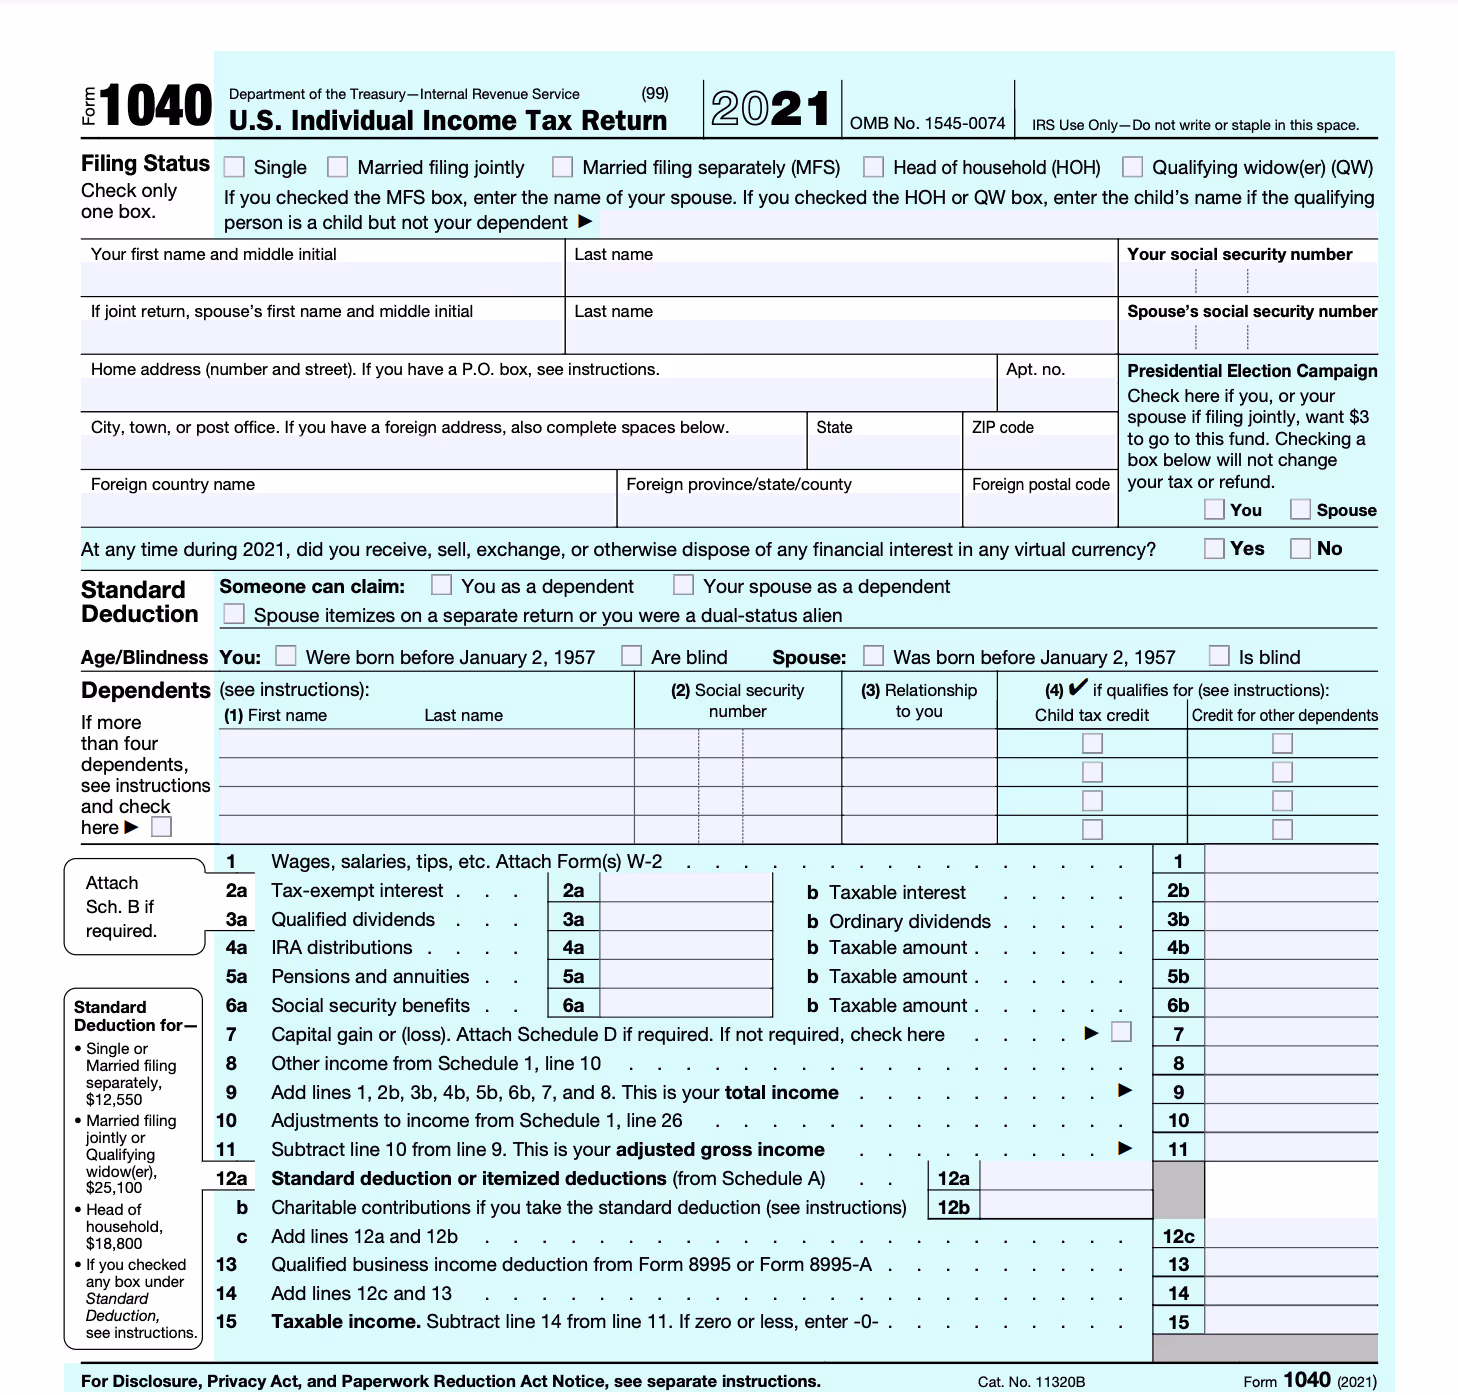
- Option 2: Upload the Federal Tax Returns (Form 1040 and ALL Federal Schedules) and any associated W-2s and/or 1099s for each year.
Single, Married Filing Separately, or Head of Household
If they filed their taxes Singly, Married Filing Separately, or Head of Household, they have two options:
- Option 1: Upload the IRS Tax Return Transcript (request it for free here) - W-2s are not required
- Option 2: Upload the Federal Tax Returns (Form 1040 and ALL Federal Schedules) and any W-2s and/or 1099s for each year
Pro-tip: The Tax Return Transcript is shorter, and includes all of the necessary information in a single document, which makes it easier for you to provide and for USCIS to process. By contrast, the Federal Tax Returns most people get from their accountants or online filing software tend to be very long, and full of unnecessary pages. Sorting through these pages to find the important ones can be confusing and stressful. Including the extra pages in the application increases the chances that the USCIS officer will miss something important. Because of this, it can make your tax document shorter and more clear by adding the Tax Return Transcript whenever possible.
Tax Document FAQs:
Do I need to provide tax documents for the last 3 years?
Providing USCIS with the income information for the last three years from the Total Income line of the tax returns is required. However, providing actual copies of the tax returns for the second and third most recent years is optional. Please keep in mind that sponsors must indicate (either on the form itself or in the SimpleCitizen questionnaire) whether or not they plan on including these optional tax documents.
Providing photocopies of your tax returns for the second and third most recent years establishes steady income. This can be helpful if the sponsor:
- Is retired
- Is self-employed
- Just barely met the income requirement for the most recent tax year, and wants to prove that they have consistently met the requirements for the last three years.
Aside from these instances, providing the tax return documentation for the 2nd and 3rd years is completely optional. It will not affect USCIS’ processing of your case. However, they must include either both or neither. In other words, an applicant is not able to submit the 3rd most recent tax year but not the 2nd most recent tax year or vice versa. Providing copies for the most recent tax year is required.
I got an extension on my taxes, can I leave my most recent taxes off of my application?
Before the regular tax deadline has passed for a given year, the tax returns for that year are not required. Once that deadline has passed USCIS requires the returns from that year, even if the IRS has granted an extension. Choosing to submit without the tax returns after the deadline has passed will result in a Request for Evidence (RFE) that can extend the processing of the application by 3-6 months.
Pro tip: Sometimes, USCIS will still require tax docs even if tax day has not passed yet. It is best practice to submit with the newest tax year if submitting within about 2 months of tax day.
What if I didn’t file taxes for one of the years?
Petitioners who didn’t file taxes for one of the years because they didn’t make the required income amount are not required to provide their tax documentation for that year. This can be indicated in the form, and a brief explanation can be provided that includes which years the petitioner was not required to file taxes and why.
Please note: If the sponsor did not make the required income amount for the most recent tax year, they are likely not eligible to sponsor on their own, and will most likely be required by USCIS to add a Joint Sponsor or the income of a household member.
If a sponsor made the required income amount for one of the years, but did not file taxes for another reason, there is a very good chance that USCIS will issue a Request for Evidence requiring the tax returns from that year. To avoid this, the sponsor may consider working with a CPA to get any issues with previous years resolved before submitting.
What if I have an issue with my previous tax returns and need to refile/amend them?
Any discrepancies or issues with the tax returns may result in a Request for Evidence from USCIS. This can be avoided by resolving any issues on tax returns before they are submitted. If you are not sure how to do this, you may consider working with a CPA to get all issues amended.
What if I am on a tax payment plan?
Petitioners on a tax payment plan will need to provide the following:
- Proof of the payment plan
- The payment schedule
- Proof of the most recent payments
Additionally, the petitioner will also need to add a Joint Sponsor or a Household Member to also support the application.
Examples of the tax documents
If you don’t know if you have the correct document, please refer to the images below for examples:
Tax Return Transcript:
Important Note: Please be sure that the title of your document is Tax Return Transcript. The Wage and Income Transcript, and Tax Account Transcript are not accepted.
Federal Tax Returns:
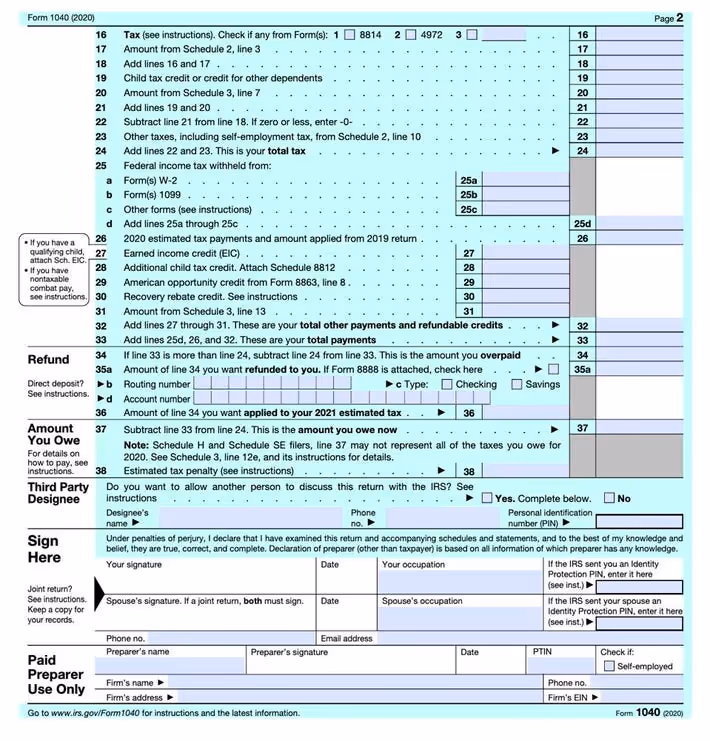
Form 1040: The form 1040 is generally 2 pages long, and looks like this:
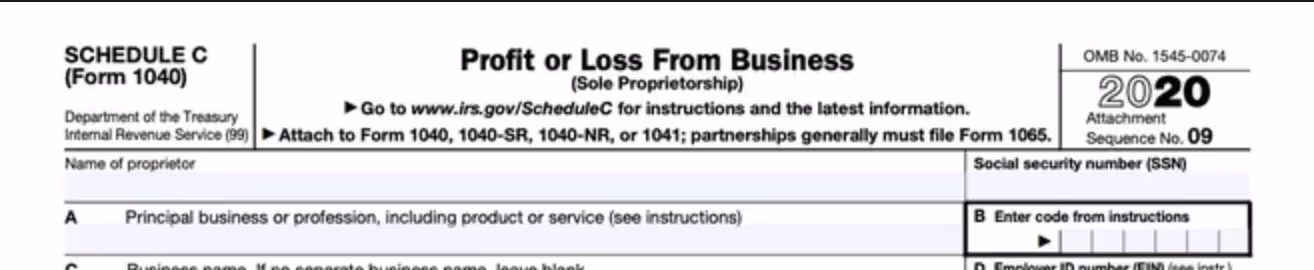
Federal Schedules - Federal Schedules have titles like “Schedule 2,” “Schedule D,” “Schedule SE,” “Form 8995” etc. They are usually located directly after the Form 1040 in the tax return. State taxes, and any pages titled “worksheet” should not be included.

If you have any questions about your tax documents as you prepare your application, please don’t hesitate to reach out to our live chat! If you would like more specialized support, all of our green card application packages come with a full attorney review. During the review, the attorney will double-check all of your documents, and let you know if anything is missing. You can sign up for one of our application packages here.
Understanding USCIS’ Race and Ethnicity Questions
Explore the definitions of race and ethnicity, how USCIS defines them, and how customers use them.
On many applications USCIS requires people to declare both their race and their ethnicity. In this article, we are going to explore the definitions of race and ethnicity, how USCIS defines them, and examples of how some people have chosen to interpret and respond to these questions in the past.
What is the difference between race and ethnicity?
Race is a concept that usually refers to the phenotypical (physical) characteristics of a person and it can be self-identified or not. On the other hand, ethnicity takes into account the cultural components of a person’s upbringing, and it doesn’t typically refer to physical characteristics of that person. For example: Two people that both identify as Hispanic as their ethnicity may choose differently for their race, one White, another Black, or a mix of both.
How does USCIS define the different options?
On their applications USCIS usually has 2 questions about Race and Ethnicity:
- The first one that asks for a person’s ethnicity: The question simply asks if you consider yourself Hispanic or Latino OR Not Hispanic or Latino
- The second one asks for a person’s race and you can answer by marking one or more boxes. The options are: White, Asian, Black or African American, American Indian or Alaska Native, Native Hawaiian or Other Pacific Islander.
Here is the definition of the different race options directly from USCIS instructions:
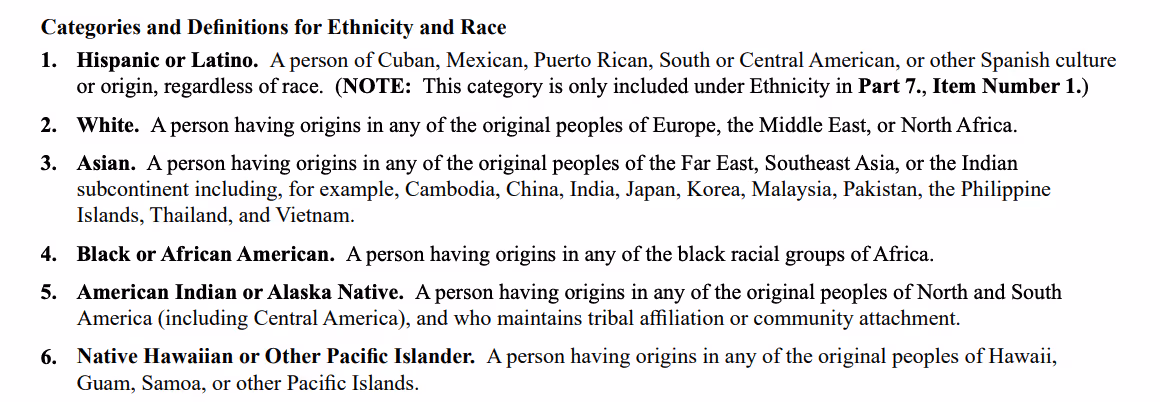
"When choosing between the race options, please make sure to carefully read through the USCIS definition of each of the options first.”
How should I answer if I am Hispanic/Latina/e/o/x?
Because USCIS considers Hispanic or Latino to be an ethnicity instead of a race, many people that choose the option “Hispanic or Latino” have different responses in the race question. Due to the multi-racial category that is Hispanic/Latina/e/o/x, many people choose between the options of White, Black, American Indian (if they have maintained tribal affiliation or community attachment as USCIS instructions show) or choose to mark more than one box.
How should I answer if I identify with more than one race/I Identify as biracial or multiracial?
The race question asks to mark *all applicable boxes*, so if you are a multi-racial person you can choose to mark all the boxes that apply to you.
Conclusion:
Please take into account that there isn’t a wrong or right answer for these questions. However, understanding USCIS definitions for race and ethnicity as well as a more clear understanding of how they define the various options within those questions, will hopefully help you answer this question more confidently and accurately.
Employment Verification Letter (EVL) 
Learn what an Employment Verification Letter is, why it's important and what it should include
What is the purpose of an employment verification letter?
When going through the immigration process, it is crucial to prove that the sponsor, and when applicable, the joint sponsor, meet the necessary financial requirements for their household size. In addition, USCIS will want to see proof of their current employment status. Both of these things are accomplished, in part, through an employment verification letter (EVL) that is submitted as evidence along with Form I-864. The employment verification letter provides evidence of both current employment and income.
Please note that an employment verification letter is different from an offer letter. An offer letter proves that employment was offered and an employment verification letter proves that employment is ongoing.
The employment verification letter is needed in addition to tax returns, pay stubs, and other financial documents. It is meant to strengthen the case by supporting the sponsor’s claim that they are able to provide adequate financial support to the applicant.
Who needs an employment verification letter?
The sponsor and, when applicable, any joint sponsor on a green card application will need to provide an employment verification letter. If the applicant is using their qualifying income to help meet the income requirements, they too will need to include an employment verification letter. The letter(s) will be required as evidence for Form I-864.
Creating an employment verification letter:
Who should issue an employment verification letter?
The employment verification letter should be issued by the company's HR department or the direct supervisor of the sponsor.
What type of paper should the letter be on?
The letter should be on official company letterhead.
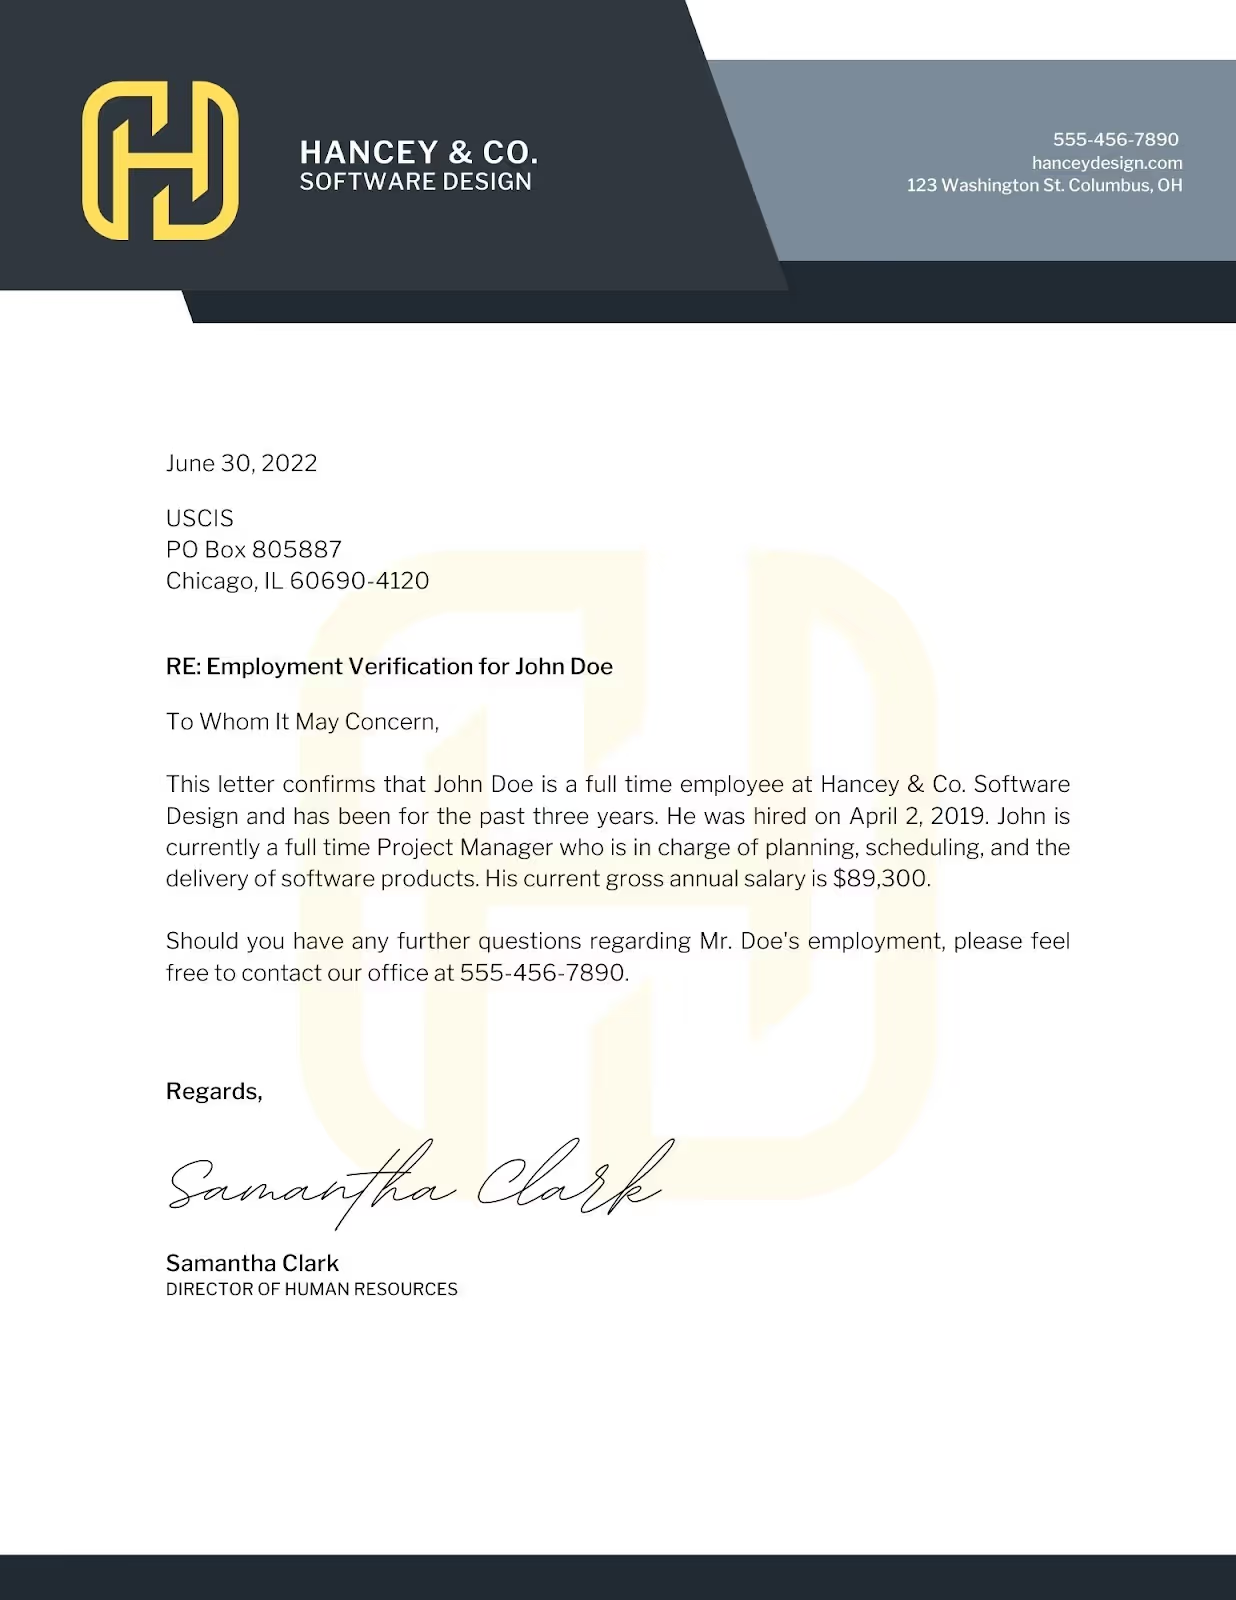
What information should be included?
- The date that the employer is writing the letter. This should be within 2-3 months of submitting the application, ideally.
- The name, company address, and title of the person writing the letter.
- The employee’s position at the company.
- The date the employee started at the company.
- A description of the employee’s responsibilities.
- The annual salary (preferred) OR weekly rate and average weekly hours of the employee.
- The employee’s current status (part time/full time OR average hours worked per week).
- Wherever possible, a statement of prospective future employment (ie. a statement saying that the company anticipates you working there for an extended amount of time).
- Signature of the writer (HR representative or direct supervisor).
Example of an employment verification letter:
Employment verification letter template:
If you need some help getting started, click here to download a copy of our employment verification letter template.
FAQs:
What if I am self-employed?
When going through the Simple Citizen process, the system will let you select that you are self-employed. It will then ask you a series of questions about your income, job description, and dates of self-employment. The answers to these questions will replace the need for an employment verification letter with a list of new required documents.
What if I have more than one job?
If you have more than one job, you will need to include an employment verification letter for each job that you are currently employed at. You will then add the combined income values on all forms as the total annual income in the questionnaire.
I just started my job – do I still need an employment verification letter?
If you just started your job, adding the original offer letter as well as an employment verification would be the best way to illustrate your current employment to USCIS. USCIS is less likely to accept a sponsor’s documentation as sufficient if they started the job recently. Adding an Employment Verification letter with a statement of prospect of future employment (ie. a statement saying that the company anticipates you working there for an extended amount of time) can help improve your odds.
I have an employment verification letter from 5 months ago. Can I just submit with that one?
Since the overall goal of the employment verification letter is to prove that you are currently employed, you want to make sure the letter is as current as possible. As a best practice, your letter should be dated no more than 2-3 months before your application submission date.
What if I am paid hourly?
If you are paid hourly, you will want to have the author of the letter add your hourly rate and average hours worked each week. If your employer does not include an estimate of your annual income in the letter, best practice would be to also upload a signed conversion letter showing the math used to calculate your annual income.
How to calculate annual income:
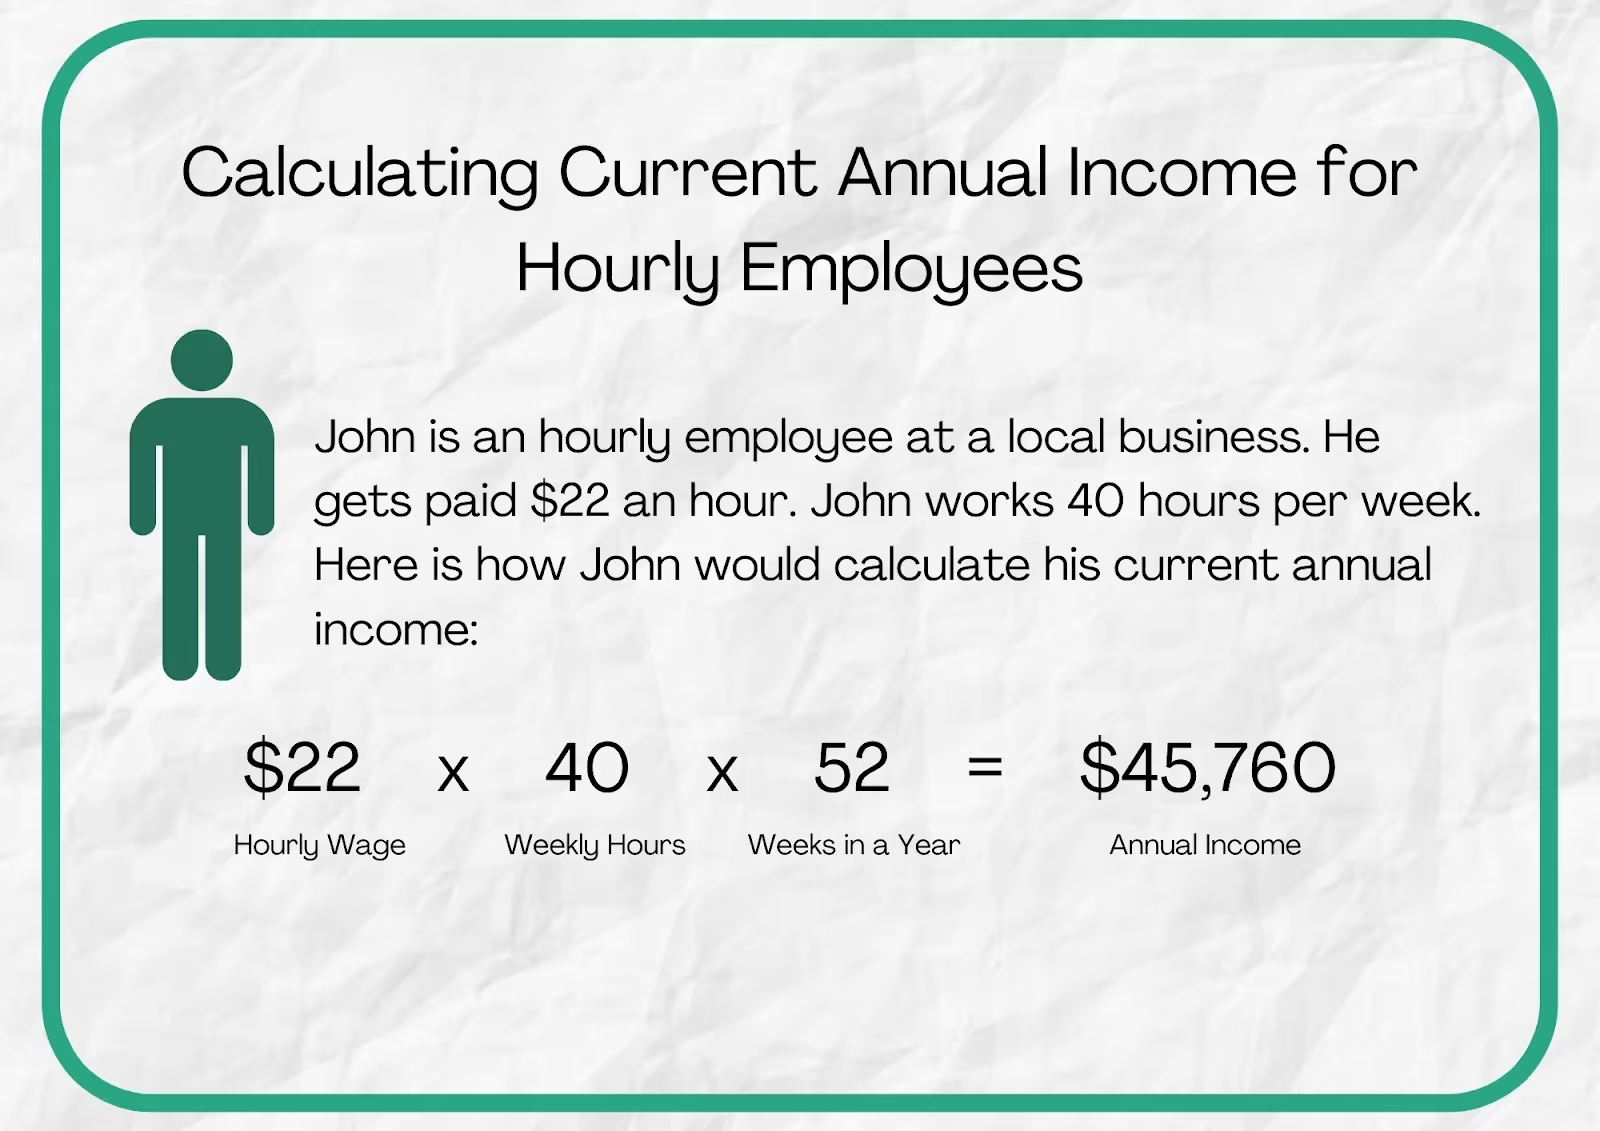
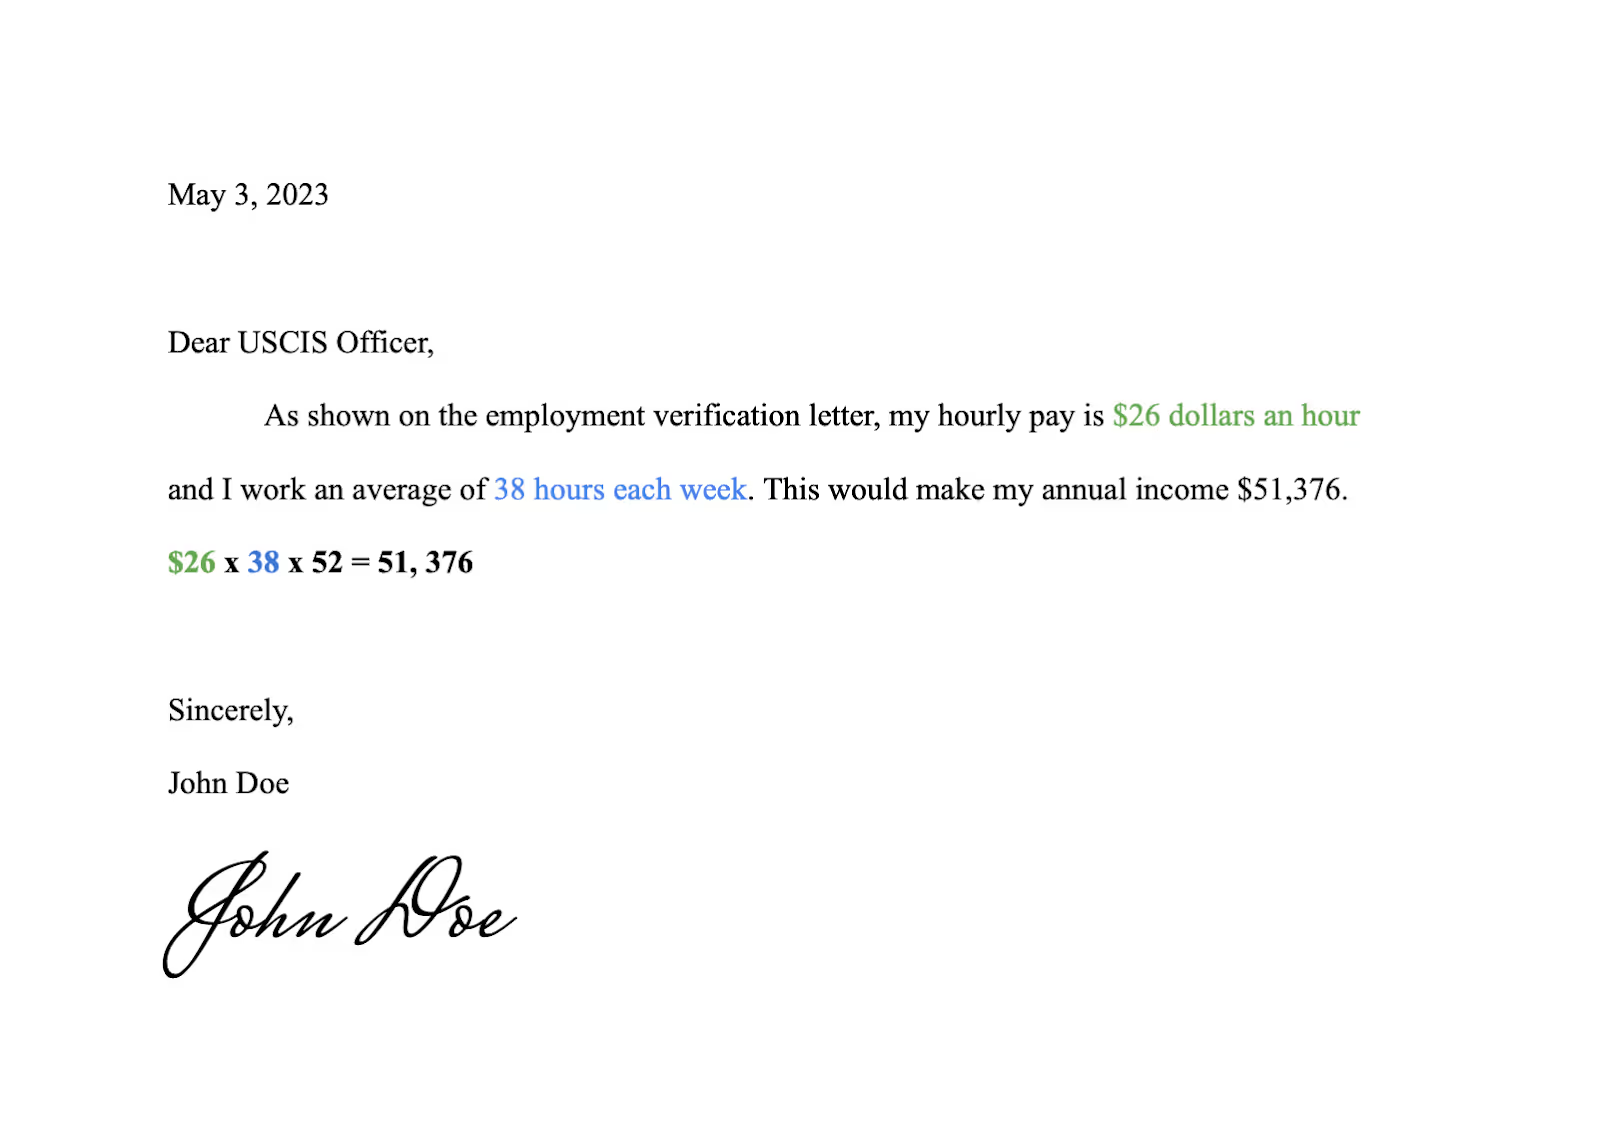
Conversion Letter Outline:
“Date
Dear USCIS officer, as shown on the employment verification letter, my hourly pay is _X_ dollars an hour and I work an average of _X_ hours each week.
[hourly pay] x [avg weekly hours] x [52 weeks/year] = a calculated estimated annual salary of _X_.
Name
Signature”
Conversion Letter Sample:
Relationship Evidence for the Marriage-Based Green Card Application
Tips and tricks for submitting marriage-based relationship evidence with your green card application.
For most individuals hoping to file for a green card through marriage, USCIS requires evidence that the petitioner and applicant are in a bona fide marriage. In other words, USCIS asks for applicants to provide a variety of documents showing that their relationship is well-established and that it was done in good faith. This article provides the following:
- The basic guidelines for Relationship Evidence documents
- Some of the warning signs that might cause USCIS officers to be more picky about approving an application
- Lists of ideas for different types of evidence that may be included
- Tips for compiling evidence
Basic Guidelines
The following are basic guidelines for all relationship evidence:
- USCIS expects a variety of evidence to prove the legitimacy of the relationship. Generally this can be done by providing around 100-200 pieces of relationship evidence, including 15+ different types of evidence.
- All evidence must be in English, otherwise, a certified english translation must be provided. You can find out more about providing certified self-translations here.
- Non-photo evidence must include the names of both individuals in order to be considered by USCIS as evidence
Please note that variety is generally more effective than quantity, so an application with 150 pages of photos would likely be considered weaker than an application with 90 pages that included 16 different types of evidence.
Warning Signs
The following circumstances may cause your application to receive greater scrutiny from USCIS:
- Large age disparity
- Inability of petitioner and beneficiary to speak each other’s language
- Vast difference in cultural and ethnic background
- Family or friends unaware of the marriage
- Marriage arranged by a third party
- Marriage contracted immediately following the beneficiary’s apprehension or receipt of notification to depart the United States
- Discrepancies in statements on questions for which a husband and wife should have common knowledge
- The couple is not currently living together, even if there are valid reasons.
- Beneficiary is a friend of the family
- Petitioner filed previous petitions on behalf of other intending immigrants, especially immigrant spouses
- No proof of shared finances or joint financial responsibility
For couples in any of the above circumstances, a large quantity of evidence can give USCIS a better insight into the relationship to prove it is real and was not entered into for immigration benefits.
Suggestions for Different Types of Evidence
The lists below provide ideas for different types of evidence you might include in your application. They are divided into different categories for convenience. Please note that USCIS recognizes that each couple’s circumstances are different, so not everyone will have the same evidence. You are welcome to get creative and add things to your application that are not on this list.
Additionally, none of the items below are technically required. Rather, they are just suggestions to help get you started. That being said, there are certain types of evidence that may raise red flags if not included. In particular, please try to include photos of the couple together, proof of shared address, proof of spending time together, and proof of shared finances.
1. Evidence of spending time together
When gathering proof of spending time together, it is helpful to focus on evidence that shows the length of the relationship, and also that shows that the relationship is public, and that friends and family are aware and involved in the couple’s lives. Here are some examples:
- Travel itineraries and lodging bookings from joint vacations or get-aways
- Photos from joint vacations or trips, especially trips abroad to visit relatives
- Cards from loved ones complimenting you on your wedding, anniversary, or other joint life events
- Evidence that the spouses have met or communicated with each other's parents and relatives, including photographs, letters, cards, emails, messages, etc.
- Telephone and instant message records demonstrating that the spouses communicate regularly
- Photographs from the couple’s wedding, honeymoon, get-aways, family meals, holidays, etc. List the date and names of the people in the photographs
- Tickets to events both spouses attended or plan to attend
- Receipts for gifts spouses bought for each other
- Records of social media posts and interactions, including screenshots of Facebook pages, Twitter posts, Instagram posts, etc.
- Documents showing membership in the same clubs, churches, teams, etc.
- Documents showing that one spouse took the other’s last name
- Proof that a spouse went to visit the other spouse’s family outside of the United States, that is a great indicator of a marriage “in good faith”
2. Evidence of sharing finances
Many married couples combine finances or split expenses in some way. Although it is becoming more common to keep finances more separate, USCIS uses this as a large part of their decision on if a relationship is legitimate. Commingling some finances can help show evidence of a good faith marriage. Use these documents to show evidence of shared finances:
- Bank statements for joint accounts showing both names
- Statements for loans where one spouse is a co-signer for the other spouse
- Voided and canceled checks for joint accounts
- Joint insurance agreements, statements, and cards, including health, life, property, and auto insurance, etc showing both names
- Utility bills showing both names, including, cell phone, trash, cable, internet, electricity, water, gas bills, etc.
- Life insurance policies, wills, and trusts, showing a spouse as a beneficiary
- Documents showing joint ownership of cars, real property, or investments
- All tax returns filed jointly as a married couple showing both names
- Funeral plans or intended burial locations that involve or are close to a spouse
- Copies of bank statements from separate accounts and payment receipts showing that the spouses both contribute to financial responsibilities and payments. For example, bank statements from separate accounts could show that each spouse pays half of rent each month - please be sure to highlight the important transactions, and maybe include an explanation note
- Copies of vehicle titles showing joint ownership
- Venmo, CashApp, or wire transfers between the couple
While commingling finances isn’t technically necessary, USCIS tends to see it as strong evidence that the marriage is legitimate. Applications that do not include proof of shared finances tend to be treated with higher scrutiny.
3. Evidence of living together
Because most married couples live together USCIS sees this as another strong form of relationship evidence. Showing evidence of cohabitation, or living together is a good place to start. Use these documents to show evidence of cohabitation:
- Mortgage or loan papers with both names
- Any and all Lease agreements showing both names
- Bank statements giving the same address for both spouses
- Driver’s licenses or identification documents showing the same address
- Voided or canceled checks showing the same address
- Deed to property indicating both names
- Property insurance agreements, statements, or cards showing the same address
- Health and life insurance statements showing the same address
- Correspondence from friends, family, or businesses showing the same address
- Utility bills showing the same address, including, cell phone, trash, cable, internet, electricity, water, gas bills, etc.
- Affidavits from family, friends, neighbors, and landlords testifying of cohabitation (more on this later)
Cohabitation isn’t necessary for a marriage to be legitimate, but if a couple is not living together, their application is likely to receive greater scrutiny. If a couple is not living together, it may be helpful to include a letter explaining why they are not living together, along with any plans that they have to move in together in the future.
4. Evidence of raising children together
Showing proof of raising children together is fantastic evidence of a legitimate marriage. If a couple shares children, they can consider using these documents as evidence:
- Adoption certificates showing the two spouses as the parents
- Birth certificates showing both spouses as parents
- Documents that show a relationship with children or step-children, including vacation itineraries, photos, school records, affidavits from friends, family, and teachers
- Documents showing the step-parent as the emergency contact for a step-child, including, doctor’s records, school records, etc.
- Medical records showing an ongoing pregnancy
- Photos of the couple with the shared child
- Evidence of pregnancy - Ultrasound photos, baby announcements, shower invites, etc.
In addition, raising step- or adopted children together can also be very convincing evidence for USCIS, but it is by no means mandatory.
Affidavits
Affidavits of support from family and friends can also make great relationship evidence. These are letters that show support for the marriage. This article gives an in-depth explanation of what these letters should include, and includes several sample letters.
Tips for Assembling Your Relationship Evidence
Here are some tips and tricks that can help with assembling relationship evidence. These tips are not required, but they can make it easier to assemble the evidence, and for the USCIS officer to process your application!
- Show Both Names: As much as possible, please make sure that both couple’s names are on all non-photo documents, especially leases, bank statements, travel itineraries, etc. USCIS has to clearly see that both people are connected to each piece of evidence.
- Add Captions to Photos: Adding captions to photos and other documents is not required. It can be helpful, however, especially to help explain evidence that is less clear (such as a flight itinerary with only one person’s name on it because they were traveling to visit the other person).
- Combine Files Before Upload: Applicants are welcome to just upload individual photos and documents to our website if they would like. However, once documents are uploaded, there is limited ability to edit and rearrange them. If you would prefer more control over how your relationship evidence will appear in the final application, you can put all of your photos and documents into a word document or powerpoint, save it as a PDF, and upload that.
- Upload Files as PDFs: Whenever possible, please be sure to upload documents as PDFs, not as JPEGs. This is especially true for any word-heavy documents (such as letters of support, screenshots of emails, bank statements, etc.) Uploading them as JPEGs will decrease the image quality and make it very difficult to read the information.
Providing a wide variety of relationship evidence is a great way to strengthen your application and reduce the risk of receiving a Request for Evidence. If you have any questions about gathering relationship evidence, please don’t hesitate to reach out to our live chat. If you would like more in-depth and specific feedback from an attorney on your application, all of our marriage-based green card packages include a full attorney review. You can sign up for one of our application packages here, and we will be happy to help guide you through your application!
Perhaps it may be found within a different category.