Search Results

Changing Your Name: A Guide for Marriage-Based Green Cards and Citizenship
A guide to marriage-based name changes
Citizenship Application
Last Updated: March 13, 2025.
Overview
If you recently married a U.S. Citizen or U.S. green card holder, chances are you are considering whether or not you should change your name, and how to do so. While changing your name can be a tedious task, doing so through the USCIS is quite simple--it just takes a little time. If your name has been legally changed, it should be updated with USCIS immediately in order to comply with USCIS requirements. Make sure that if you do decide to change your name, you add changing it with USCIS to your to-do list. It is very important that your green card or naturalization documentation correctly reflect your legal name.
Some individuals may need to change their name for other reasons such as name misspelling, originally using a fictitious name, clerical error, etc. For more information on these types of cases, see the USCIS guide here.
Step 1: Determine if Changing Your Name is Right for You
Whether or not you or your spouse change your last name following marriage is a personal decision. While conventional, changing your last name to match that of your spouse is not required in the United States. In fact, there are a number of name-changing variations that are starting to become increasingly popular, such as using a hyphenated last name that includes the surname of both you and your spouse.
Regardless of how you choose to change your name, doing so presents a number of benefits and challenges. Here is a brief summary of some of the pros and cons associated with changing your name:
Pros
- Proving that you are married can be much easier when traveling
- Can offer additional ease when children are involved
- Easier to prove that you are married when one of you is admitted to a hospital
Cons
- Time Consuming
- Can be difficult for working professionals who have built a career using their previous name
- Can take a long time for replacement immigration documentation to arrive
- Replacing documentation can be expensive
Step 2: When to Change Your Name
The answer to when you should change your name following marriage varies from person to person. While many recommend waiting to change your name until you apply for Citizenship/Naturalization, name changes can be done earlier in the immigration process. For example, name changes can happen when initially filing for your marriage-based green card. Additionally, those who decide to change their name after they have already been granted their green card or Citizenship (Form N-400), can file to have their name changed by filing for a card replacement. This is done using either Form I-90 (Application to Replace Permanent Residence Card) or Form N-565 (Application for Replacement of Naturalization/Citizenship Document), depending on which step the application is in in the immigration process. However, something to consider is that it can be quite expensive to get a replacement card with it costing up to $540 to replace a green card and up to $555 to replace a naturalization certificate.
So all things considered, there is no single time during the immigration process that an immigrant is supposed to change their name. Rather, there are multiple times when changing one’s name is possible. When deciding which time would work best, there are a number of things you should consider such as timing, and cost. The details of the potential “times” or ways you can change your name are detailed in the section below.
Remember that regardless of what stage in the immigration process you are in, your immigration documentation should reflect your legal name. For that reason, you should avoid changing your legal name until you are prepared to change it on your immigration documentation as well, and vice versa.
Step 3: Change your Name
First, an individual’s name must be legally changed under applicable state law. The legal process and the required fees for changing your name will differ slightly depending on the state you are living in, so make sure you are familiar with your specific state’s requirements. After legally making this change under state law, you are then eligible to apply for a green card or naturalization under your new legal name, or apply to replace your old green card or old naturalization certificate.
Note that when submitting evidence of a legal name change, a photocopy of your name change document is not sufficient. The document you submit must be officially registered with the proper civil authority. You will need to request a registered copy of your name change document if you do not already have one. This should be in addition to the original registered copy you keep for your personal records.
Changing Your Name While Filing For Your Green Card
When filing for a marriage-based green card, you are able to change your name simultaneously, as long as you have sufficient proof of your marriage. To do this, you would simply need to file under your new married name and include your previous maiden name in the section designated for “previous names ”. This means you will list your new married name as your legal name on all the forms you fill out. Remember to be consistent as any inconsistencies can increase the likelihood of your application being delayed or rejected. You will also need to include a copy of your marriage certificate with your application as evidence of your union. Because you are originally filing for Permanent Residency with your new name, no additional costs are incurred with this option, apart from any filing fees associated with your state’s name changing process.
Changing Your Name After Being Granted a Green Card
Many applicants do not change their name before applying for permanent residency. If they wish to change their name after applying, they can do so by filling out Form I-90, Application to Replace Permanent Resident Card. It can be used for a number of purposes, including changing the name on a current green card.
Lawful Permanent Residents (green card holders) who change their name due to marriage (or because of other circumstances) are able to travel using their original U.S. green card in their prior name as long as they bring proof of their name progression. Proof could include a marriage certificate, or other court documents showing a legal name change.
Form I-90, Application to Replace Permanent Residence Card
Specific Instructions:
For item numbers 3.a. - 3.c. provide your full legal name in the spaces provided. If formally legalized by your state, this would be your new married name.
Item number 4 on the form provides a space where you can indicate that your name has legally changed since the issuance of your green card/ Permanent Resident Card. Select the appropriate box (“Yes”), and then continue to Item Numbers 5.a. - 5.c.
For Item Numbers 5.a. - 5.c., you should provide your name exactly as it is printed on your Permanent Resident Card (green card), even if it has changed since that card was issued. This means that assuming you used your maiden name on your original green card, you would list that maiden name in this section.
Don’t forget to include all the required documentation and filing fees with your application.
Cost: Unlike some of the other options, changing the name on your green card has some associated filing fees. These include a filing fee of $455 and a biometrics fee of $85, for a total filing cost of $540.
Required Information and Documents
- Legal Name
- Date of Birth
- Mailing Address
- Copy of your current green card
- Filing fee
- Name exactly as it appears on your Permanent Resident Card (green card)
- Registered copy of Marriage certificate and/or other court-issued document showing that your name was legally changed
- Legal name change documents must have been registered with the proper civil authority.
Submitting: Can be submitted online or by mail to the USCIS. For more information on how to file and submit Form I-90, see the USCIS website here
Status Updates: Once you fill out your Form I-90 you will be able to access your online account. If you file online, you will create an online account yourself. However, if you file on paper, USCIS will scan the documents online and create your online account for you. After USCIS creates your online account they will send you instructions on how you can access your USCIS online account and see status updates.
Wait Time: Currently, the average estimated wait time for Form I-90 to be processed is approximately 6 -11 months.
More Information: If your request for a name change is approved, you will be sent a new green card. However, if USCIS wants more information from you, you may need to go to a USCIS office for an interview or provide additional documentation.
Changing your Name When Filing for Citizenship/Naturalization
Any green card holder that qualifies for U.S. Citizenship is able to legally change their name to any name they wish, assuming it meets a few specific requirements. If that Legal Permanent Resident (green card holder) wishes to wait 3 or 5 years until they qualify for U.S. Citizenship, they can change their name when they apply for U.S. Citizenship. Doing so concurrently with their N-400 application does not incur any additional costs, allows them to apply for a United States passport with their new married name on it, and will result in their married name appearing on their Naturalization Certificate as well.
Form N-400, Application for Naturalization
Instructions: Part 2, Question 3 of the form is specifically meant for you to change your name
The name-change service is only available at USCIS offices that offer swearing-in (oath) ceremonies in a courtroom, presided over by a judge. Only a judge has the authority to grant your name change at the swearing-in ceremony, a USCIS officer does not. Additionally, not all offices offer this service. Some regions only have ceremonies presided over by a judge a few times per year. If you live in these regions, it will likely result in your Citizenship application taking longer than others.
Occasionally the swearing-in-ceremonies are held at a USCIS office--sometimes right after the naturalization interview. When the ceremony occurs after the naturalization interview, the request for a name change on Form N-400 cannot be acted upon. In this case, the applicant would need to follow the name-change procedures specific to their state’s law and apply for a name change after their Naturalization/Citizenship has been granted. The instructions for this process are detailed below.
Changing your Name After Citizenship has Been Granted
If you decide to change your name after your Citizenship/ Naturalization Certificate has already been granted, there is a way to do that too! However, it does require the payment of an application fee as well as any other costs associated with changing your name on your U.S. passport, and any other official documents. To request a name change on your U.S. Naturalization Certificate you simply fill out and submit Form N-565, Application for Replacement Naturalization/Citizenship Document.
N-565, Application for Replacement Naturalization/Citizenship Document
Instructions: Anyone applying for a new document due to a name change will be required to fill out Part 5 on the form. You must also include your original document, as well as a copy of your marriage certificate and a copy of evidence that your name has legally been changed to the new married name.
Required Information and Documentation:
- 2 identical passport-style photographs
- Your original document or certificate (note that a copy of this document is not acceptable since you are applying for a name change. You must submit the original).
- Evidence of marital status change (copy of marriage certificate)
- Evidence of legal name change
Wait Times: Currently, the average national wait time for Form N-565 acceptance is 6-8 months. You can stay up-to-date on the USCIS processing times by checking the USCIS website here.
More Information: For more information on how to file and submit Form N-565, see the USCIS website here
Conclusion
In conclusion, changing your name is a long, tedious, often expensive process! Changing your name through USCIS is just one of the many steps that need to be taken. Remember not to change your name legally until you are ready to change it on your immigration documentation so that you can align with USCIS regulations.
If you are applying for your green card or citizenship soon, SimpleCitizen can help! Find out how to get the help of the professionals at a fraction of the cost here.
Additional Resources
What Happens After Filing Form I-90
Cómo obtener las vacunas requeridas o solicitar una exención
Cómo obtener las vacunas requeridas o solicitar una exención
En Español
Como ya sabrá, solicitar la inmigración a los Estados Unidos requiere un examen médico con un médico certificado por USCIS. Para obtener más información sobre este examen médico y el Formulario I-693, Informe de examen médico y registro de vacunación, lea nuestro artículo aquí. Sirve como precursor de este artículo.
Parte del examen médico requiere que los médicos verifiquen que está al día con todas las vacunas designadas como obligatorias por USCIS y El CDC. Este artículo encontrará información sobre los requisitos básicos de vacunación para aquellos que esperan inmigrar a los Estados Unidos y describe las acciones necesarias para optar por no cumplir con estos requisitos. Para obtener más información sobre los requisitos de vacunación, consulte algunas de las preguntas frecuentes en el sitio web de USCIS.
Información General
¿Qué vacunas se requieren?
Según la ley de inmigración de los Estados Unidos, todos los inmigrantes, incluidos aquellos que buscan el estatus de residente permanente, deben recibir vacunas para prevenir las siguientes enfermedades:
- Haemophilus influenzae tipo B
- Hepatitis B
- Sarampión
- Paperas
- Tos ferina
- Polio
- Rubéola
- Toxoides tetánicos y diftérico
- Cualquier otra enfermedad prevenible por vacunación recomendada por el Comité Asesor de Prácticas de Inmunización.
- Influenza
- Rotavirus
- Hepatitis A
- Enfermedad meningocócica
- Varicela
- Enfermedad neumocócica
El requisito de vacunación contra la influenza es único en el sentido de que solo se requiere durante la temporada de influenza, ya que es específico de la cepa y solo está disponible por un tiempo limitado cada año. A los efectos del Formulario I-693, se considera que la temporada de gripe es del 1 de Octubre al 31 de Marzo. Si se aplica durante este período, se requiere la vacunación contra la influenza. Esta es una vacuna diferente a la vacuna Covid-19 que se requiere a partir del 1 de Octubre de 2021.
A partir del 1 de octubre de 2021, los solicitantes sujetos al examen médico de inmigración deben estar completamente vacunados contra COVID-19 antes de que el cirujano civil pueda completar un examen médico de inmigración y firmar Formulario I-693, Informe de examen médico y registro de vacunación.
Prepárate para tu cita
Debe traer los siguientes artículos:
- Registro oficial de vacunación o inmunizaciones.
- Formulario I-693, Informe de examen médico y registro de vacunación. Imprima y traiga el formulario a su cita. Complete la Parte 1 del formulario, pero no lo firme hasta que el cirujano civil se lo indique.
- Identificación emitida por el gobierno, un pasaporte válido o una licencia de conducir.
- Tarjeta de seguro médico. Consulte con el consultorio del médico para ver si aceptan su plan médico.
- Pago. Consulte con el consultorio del médico sobre las formas de pago aceptables.
Recuerde llevar su historial de vacunación actualizado a su cita.
Si perdió o extravió su historial de vacunación, comuníquese con su médico o clínica de salud pública para ver si tienen una copia. También puede comunicarse con el departamento de salud de su estado si vive en los Estados Unidos para ver si mantienen registros de vacunación. Para los niños, consulte con las escuelas o guarderías anteriores, ya que es posible que también tengan una copia.
Evaluación de vacunación
Durante su cita, el cirujano civil o el médico del panel revisará su historial de vacunación con usted para determinar si ha recibido o no todas las vacunas requeridas. Por eso es tan importante recordar llevar un registro oficial de su historial de vacunación a su cita. Los resultados de esta evaluación se registrarán en su Formulario I-693.
Si está al día con las vacunas requeridas, no se requerirán vacunas adicionales en el momento del examen médico.
Si no tiene las vacunas requeridas
Si no está al día con todas las vacunas requeridas, no se preocupe! El cirujano civil o el médico del panel a menudo pueden proporcionarlos y pueden ayudarlo a determinar cuáles son adecuados para usted. También tiene la opción de pedirle a su médico de familia que le administre las vacunas necesarias después de su evaluación. Si elige la última opción, deberá mostrar los registros de estas vacunas al cirujano civil o al médico del panel para que los anote en el Formulario I-693 para completar el formulario antes de enviarlo a USCIS.
Además, algunas de las series de vacunas requeridas tardan meses o años en completarse. Esto puede dificultar que los solicitantes reciban todas las vacunas requeridas antes del ajuste de estatus o inmigración. Para muchos de estos, USCIS solo requiere que tenga al menos una dosis de cada vacuna apropiada para la edad listada como obligatoria.
Hable con su médico antes de vacunarse
Es posible que algunas personas no puedan vacunarse o que deban esperar.
El día de su cita, informe a su médico si:
- Tiene alguna alergia
- Ha tenido efectos secundarios graves a causa de una vacuna en el pasado.
- Está embarazada o planea quedar embarazada
- Están enfermos
Costos de vacunación
USCIS no cobra una tarifa de presentación del Formulario I-693, las tarifas del examen médico las fija y cobra el médico que administra la prueba. Por lo general, estas tarifas de examen cuestan entre $ 100 y $ 500. Hable a varios sitios para encontrar el mejor precio. Además de la tarifa del examen, también deberá pagar las vacunas adicionales necesarias para cumplir con los requisitos de USCIS y CDC.
Como era de esperar, los costos de estas vacunas dependerán en gran medida de cuántas y qué vacunas necesite. También dependerá del país en el que esté vacunado, la clínica a la que asista y el tipo de seguro médico que tenga. Puede esperar pagar entre $ 25 y $ 150 por cada vacuna antes de que se considere el seguro. Las clínicas suelen enumerar las vacunas que llevan y cuanto cobran, así que siéntase libre de comparar precios para encontrar el mejor precio.
Exenciones de vacunación
Hay una variedad de razones por las cuales alguien puede no tener o no querer recibir ciertas vacunas.
Las personas pueden quedar exentas de los requisitos de vacunación por motivos como la edad, la salud, el embarazo, así como por sus convicciones morales y religiosas. Para encontrar una lista más detallada de posibles exenciones, consulte esta lista del USCIS.
Exención general: exenciones "No apropiadas desde el punto de vista médico"
Algunas personas califican para algo llamado una exención "No médicamente apropiada", a menudo referida como una exención general. Según el sitio web de USCIS, esto se aplica a:
- Vacunas que no sería seguro recibir debido a una condición médica como embarazo, alergias o una mala reacción previa a esa vacuna.
- Vacunas que no se requieren según la edad del solicitante en el momento del examen médico.
- Vacunas que se administran en serie en intervalos, pero no hay tiempo suficiente para completar toda la serie en el momento del examen médico. (A menudo se requiere que el individuo tenga al menos la primera ronda de la serie)
- La vacuna contra la influenza si no es temporada de influenza. Como se mencionó anteriormente, la vacuna contra la influenza es diferente de la vacuna Covid-19.
Si cumple con uno o más de estos criterios, el cirujano civil o el médico del panel lo indicarán en el Formulario I-693 y USCIS podrá entonces renunciar a ese requisito.
No se requiere una solicitud de exención por separado para estas exenciones específicas. En otras palabras, no se necesita ningún formulario adicional para que un oficial otorgue una exención general para el requisito de vacunación.
Para obtener más información sobre los requisitos de vacunación para mujeres embarazadas, consulte la página "Pautas para vacunar a mujeres embarazadas" de los CDC. Para obtener información más detallada sobre las vacunas específicas por edad, consulte la información de los CDC sobre los requisitos de edad.
Exenciones morales o religiosas
Para las exenciones que no cumplen con los criterios de "No médicamente apropiado", una persona debe presentar una solicitud de exención por separado. Esto se aplica específicamente a aquellos que se oponen a las vacunas requeridas debido a convicciones morales o creencias religiosas sinceras. La exención requerida es el Formulario I-690, Exención de motivos de inadmisibilidad. Si planea solicitar esta exención, informe a su cirujano civil o médico del panel.
Tenga en cuenta que los I-690 tienen una tasa de rechazo más alta. Si se niega, USCIS le pedirá que complete el examen médico, lo que podría retrasar la aprobación de su caso.
Formulario I-690, Renuncia de motivos de inadmisibilidad
Qué es?
Este formulario se utiliza para solicitar una exención de inadmisibilidad. Los solicitantes pueden utilizarlo por varias razones, incluida la exención de los requisitos de vacunación. Esta exención del requisito de vacunación es específica para aquellos que desean quedar exentos debido a convicciones morales o creencias religiosas. Para obtener información adicional sobre este formulario y sus posibles usos, consulte esta página web de USCIS. Este enlace también le brinda acceso a la versión PDF del formulario I-690.
Costo
A partir de Septiembre de 2021, la tarifa de presentación de este formulario de exención fue de $ 715.00 usd.
Requisitos de exención para exenciones de vacunación
USCIS, en consulta con los CDC, ha establecido los siguientes requisitos que un solicitante debe demostrar a través de evidencia documental para calificar para esta exención:
- El solicitante debe oponerse a todas las vacunas en cualquier forma. No pueden elegir qué vacunas quieren. Sin embargo, es importante tener en cuenta que tener algunas vacunas pero no otras no implica automáticamente la denegación de la exención. El oficial debe considerar las razones proporcionadas para recibir ciertas vacunas y no otras, como si las convicciones morales o creencias religiosas de la persona han cambiado sustancialmente desde la fecha en que se administraron las vacunas.
- La objeción debe basarse en creencias religiosas o convicciones morales.
- La creencia religiosa o convicción moral debe ser sincera. El enfoque de la adjudicación de la exención se basará en gran medida en si puede demostrar o no que la creencia religiosa o la convicción moral se aplica de manera consistente en su vida. Esta estricta adherencia se considera distinta de la mera preferencia.
Evidencia
La evidencia de estas creencias religiosas o convicciones morales se puede establecer de dos formas principales:
- Mediante declaración jurada del solicitante
- Mediante evidencia adicional que sustente esa declaración jurada
El requisito mínimo es que incluya una declaración personal que describa las razones detrás de su objeción. Asegúrese de incluir suficiente información en su declaración para demostrar adecuadamente que cumple con los tres criterios enumerados anteriormente.
Un ejemplo de evidencia de apoyo sería proporcionar evidencia de participación regular en una congregación mediante la presentación de declaraciones juradas de miembros de la congregación o evidencia de trabajo voluntario regular.
Cómo presentar el formulario I-690
Cuando presente este formulario, debe presentar todas las pruebas y la documentación de respaldo requeridas. También deberá incluir la tarifa de presentación de $ 715.
Completar en una computadora
Descarga y visualiza en un visor de PDF.
Imprima y complete el formulario en papel
Imprime el PDF y rellénalo a mano con bolígrafo negro.
Contratar a un profesional legal
Busque un profesional legal para completar el formulario.
¿Tiene preguntas sobre los requisitos y exenciones de vacunación?
Para obtener información adicional sobre su examen médico y el formulario I-693, consulte nuestro artículo Cómo completar un examen médico.
Si necesita ayuda o tiene preguntas sobre los requisitos de vacunación, las exenciones o el Formulario I-690, comuníquese con nuestro equipo y nos comunicaremos con usted a la brevedad.
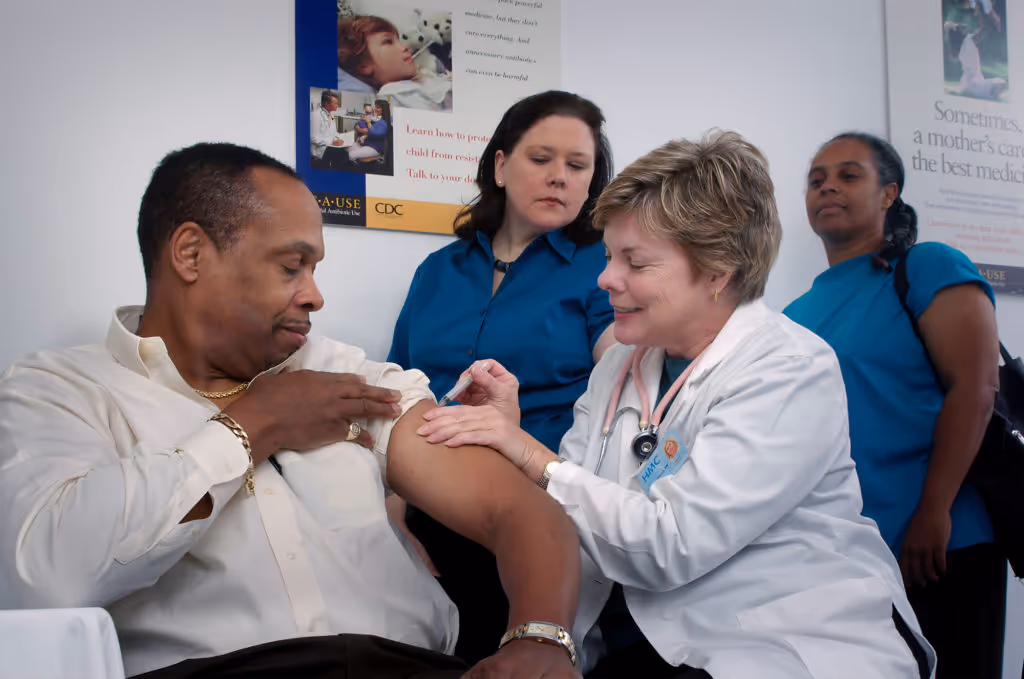
How to get the required vaccinations or file for an exemption
This article provides information about the basic vaccination requirements for immigrating to the USA.
General Immigration Information
Last Updated: March 20, 2025.
As you may already know, applying to immigrate to the United States requires a medical examination with a USCIS certified doctor. To learn more about this medical examination and it’s Form I-693, Report of Medical Examination and Vaccination Record, read our article here. It serves as a precursor to this article.
Part of the medical examination requires doctors to check that you are up-to-date on all vaccinations designated as mandatory by USCIS and CDC. This article provides information about the basic vaccination requirements for those hoping to immigrate to the United States as well as describes what actions are required to opt-out of these requirements. For further information on vaccination requirements, check out some of the FAQ’s on the USCIS website.
Overview
Which vaccinations are required?
Under US immigration law, all immigrants, including those seeking permanent resident status, are required to receive vaccinations to prevent the following diseases:
- Haemophilus influenza type B
- Hepatitis B
- Measles
- Mumps
- Pertussis
- Polio
- Rubella
- Tetanus and Diphtheria Toxoids
- Any other vaccine-preventable diseases recommended by the Advisory Committee for Immunization Practices
- Influenza
- Rotavirus
- Hepatitis A
- Meningococcal disease
- Varicella
- Pneumococcal disease
The influenza vaccination requirement is unique in that it is only required during the flu season since it is strain-specific and only available for a limited time each year. For the purposes of the Form I-693, the flu season is considered to be from October 1st - March 31st. If applying during this window, the influenza vaccination is required.
Going to your appointment
You should bring the following items with you:
- Official vaccination or immunization record.
- Form I-693, Report of Medical Examination and Vaccination Record. Print out and bring the form to your appointment. Fill out Part 1 of the form but do not sign it until the civil surgeon tells you to do so.
- Government-issued I.D., such as a valid passport or driver’s license.
- Medical insurance card. Check with the doctor’s office to see if they accept your medical plan.
- Payment. Check with the doctor’s office about acceptable forms of payment
Remember to bring your up-to-date vaccination history with you to your appointment.
If you have lost or misplaced your vaccination history, contact your doctor or public health clinic to see if they have a copy. You can also contact your state’s health department if you are living in the United States to see if they keep vaccination records. For children, check with previous schools or daycares as they may have a copy as well.
Vaccination Assessment
During your appointment, the civil surgeon or panel physician will review your vaccination history with you to determine whether or not you have received all of the required vaccinations. This is why it is so important to remember to bring an official record of your vaccination history with you to your appointment. The results of this evaluation will be recorded on your Form I-693.
If you are up to date on the required vaccines, no additional vaccines will be required at the time of the medical exam.
If you do not have the required vaccinations
If you are not up-to-date on all of the required vaccinations, don't worry! The civil surgeon or panel physician can often provide them and can help you determine which ones are appropriate for you. You also have the option to ask your family doctor to administer the required vaccines to you after your evaluation. If you choose the latter option, you will need to show the records of these vaccinations to the civil surgeon or panel physician to note on Form I-693 in order to complete the form prior to submitting it to USCIS.
Additionally, some of the required vaccine series require months to years to complete. This can make it difficult for applicants to receive all required vaccinations prior to adjustment of status or immigration. For many of these USCIS only requires that you have at least one dose of each age-appropriate vaccination listed as mandatory.
Talk to your doctor before you get vaccinated
Some people may not be able to get vaccinated — or may need to wait.
The day of your appointment, tell your doctor if you:
- Have any allergies
- Have had serious side effects from a vaccine in the past
- Are pregnant or planning to get pregnant
- Are sick
Vaccination Costs
While USCIS does not charge a filing fee for Form I-693, fees for the medical examination are set and charged by the doctor administering the test. Usually these examination fees range from $100 to $500. You can shop around to find the best price. In addition to the examination fee, you will also need to pay for any additional vaccinations needed to meet USCIS requirements.
As can be expected, the costs of these vaccinations will depend largely on how many and which vaccinations you need. It will also depend on the country in which you are getting vaccinated, the clinic you are attending, and what type of health-insurance you have. You can expect to pay anywhere from $25-$150 for each vaccination before insurance is factored in. Clinics often list which vaccinations they carry and how much they charge, so feel free to shop around for the best price!
Vaccination Exemptions
There are a wide variety of reasons why someone may not have or may not wish to receive certain vaccinations.
Individuals can be exempted from immunization requirements for reasons such as age, health, pregnancy, as well as their moral convictions and religious beliefs. To find a more detailed list of potential exemptions, check out this list from the USCIS.
Blanket Waiver - “Not Medically Appropriate” exemptions
Some people qualify for something called a “Not Medically Appropriate” exemption, often referred to as a blanket waiver. According to the USCIS website, this applies to:
- Vaccinations that would not be safe to receive due to a medical condition such as pregnancy, allergies, or a previous bad reaction to that vaccine.
- Vaccinations that are not required based on the applicant’s age at the time of the medical exam.
- Vaccinations that are administered as a series in intervals, but there is insufficient time to complete the entire series at the time of the medical examination. (The individual is often required to have at least the first round of the series)
- The influenza vaccine if it is not the flu season.
If you meet one or more of these criteria, the civil surgeon or panel physician will indicate this on the Form I-693 and USCIS can then waive that requirement.
A separate waiver application is not required for these specific exemptions. In other words, no additional form is needed for an officer to grant a blanket waiver for the vaccination requirement.
To learn more about vaccination requirements for pregnant women, see the CDC’s "Guidelines for Vaccinating Pregnant Women" page. For more detailed information regarding age-specific vaccinations, check out the CDC’s information on age requirements.
Moral or Religious Exemptions
For exemptions that do not meet the “Not Medically Appropriate” criteria, an individual must file a separate waiver application. This specifically applies to those who object to required vaccinations because of sincerely held moral convictions or religious beliefs. The required waiver is Form I-690, Waiver of Grounds of Inadmissibility. If you plan to apply for this waiver, inform your civil surgeon or panel physician.
Please note that I-690s have a higher rejection rate. If denied, USCIS will require you to complete the medical exam which could delay the approval of your case.
Form I-690, Waiver of Grounds of Inadmissibility
What is it?
This form is used to apply for a waiver of inadmissibility. It can be used by applicants for a number of reasons, including to waive the vaccination requirements. This waiver of the vaccination requirement is specific to those who wish to be exempted due to moral convictions or religious beliefs. For additional information on this form and its potential uses, refer to this USCIS web page. This link also provides you access to the PDF version of form I-690.
Cost
As of September 2021, the filing fee for this waiver form was $715.00 usd.
Waiver Requirements for Vaccination Exemptions
USCIS, in consultation with CDC, has established the following requirements that an applicant has to demonstrate through documentary evidence to qualify for this exemption:
- The applicant must be opposed to all vaccinations in any form. They cannot pick and choose which vaccinations they want. However, it is important to note that having some vaccinations but not others does not automatically result in the denial of the waiver. The officer should consider the reasons provided for getting certain vaccines and not others such as whether the individual’s moral convictions or religious beliefs have changed substantially since the date the vaccinations were given.
- The objection must be based on religious beliefs or moral convictions.
- The religious belief or moral conviction must be sincere. The focus of the waiver adjudication will be largely based on whether or not you can demonstrate that the religious belief or moral conviction is consistently applied in your life. This strict adherence is considered to be distinct from mere preference.
Evidence
Evidence of these religious beliefs or moral convictions may be established in two primary ways:
- Through the applicant’s sworn statement
- Through additional evidence that supports that sworn statement
The minimum requirement is that you include a personal statement describing the reasons behind your objection. Make sure you include enough information in your statement to adequately demonstrate that you meet the three criteria listed above.
An example of supporting evidence would be providing evidence of regular participation in a congregation by submitting affidavits from congregation members or evidence of regular volunteer work.
How to File Form I-690
When you file this form you must submit all evidence and supporting documentation required. You will also need to include the filing fee of $715.
Fill Out On a Computer
Download and view in a PDF viewer.
Print & Fill Out Paper Form
Print the PDF and fill by hand with black pen.
Hire a Legal Professional
Find a legal professional to complete the form.
Have questions about Vaccination Requirements and Exemptions?
For additional information on your medical examination and form I-693, refer to our article How to Complete a Medical Examination.
If you need help or have questions about vaccination requirements, exemptions, or Form I-690, please leave a comment or reach out to our team and we’ll get back to you shortly.
Cómo preparar y enviar el Formulario I-693
Cómo preparar y enviar el Formulario I-693
En Español
Cómo completar el formulario I-693 (para El Solicitante)
El I-693 incluye 10 partes. Como solicitante, solo debe completar la Parte 1 antes de su cita con el médico. También deberá escribir su nombre y número de extranjero (cuando tenga uno) en la parte superior de cada página del formulario. Debe ser un número de 8 o 9 dígitos que comience con la letra A y se puede encontrar en cualquier carta o aviso que haya recibido del Departamento de Seguridad Nacional.
Para completar la Parte 1, necesitará:
- Tu nombre completo (tu nombre legal)
- Su dirección: el lugar donde vive, los apartados de correos no funcionarán
- Tu sexo
- Tu fecha de nacimiento
- La ciudad, pueblo o aldea en la que nació.
- El país en el que naciste
- Su número de registro de extranjero (número A) si tiene uno
- Su número de cuenta en línea de USCIS, si tiene uno
Como solicitante, también deberá completar la Parte 2. Esta parte es donde proporciona información de contacto y firma el formulario. Debe completar esta sección con el cirujano civil presente para presenciar cómo lo completa.
El formulario I-693 está incluido en el Creador de Solicitudes de Tarjeta Verde
Cita con el Médico
Para encontrar un cirujano certificado por el USCIS:
- Vaya a uscis.gov
- Seleccione “Find a Doctor”
- Ingrese su código postal
- Haga clic en "Search"
Debería aparecer una lista de médicos en su área. Seleccione uno y programe una cita llamando al número que se encuentra al lado.
Cómo completar el formulario I-693 (para el intérprete)
Se le pedirá que complete la Parte 3. Esto incluye:
- Tu nombre
- El nombre y la dirección de la empresa u organización (cuando corresponda)
- Tu número de teléfono diurno
- Su número de teléfono móvil (si tiene uno)
- Su dirección de correo electrónico (si tiene una)
- Tu firma y la fecha
Cómo llenar el Formulario I-693 (para el cirujano civil)
Como cirujano civil certificado por USCIS, debe informar los resultados verdaderos y precisos de su examen.
Para hacer esto, deberá anotar la información de la identificación emitida por el gobierno del solicitante. También será responsable de atestiguar que el solicitante completa y firma la Parte 2.
Deberá seguir las regulaciones más recientes del Departamento de Salud y Servicios Humanos y las pautas de los Centros para el Control y la Prevención de Enfermedades. Esas pautas se pueden encontrar aquí.
También se le puede pedir que haga referencias y presente informes de casos. Estos procesos también se pueden encontrar en las pautas de los CDC.
Al completar el I-693, deberá:
- Verificar la información de identificación del solicitante
- Dar un resumen del examen médico, después de que se complete el examen y cualquier seguimiento necesario.
- Proporcione su información de contacto y firme el formulario después de que se complete el examen, certificando que es un cirujano civil legal. (Si está realizando la evaluación para un solicitante de ajuste de refugiado, deberá incluir el médico con licencia que estuvo presente durante el examen y el sello oficial o sello en relieve del departamento de salud. Si es un médico militar que realiza el examen para un miembro o veterano de las Fuerzas Armadas de los EE. UU. o de la Guardia Costera o de ciertos dependientes elegibles, se requiere la firma del médico militar con licencia, que está operando bajo la supervisión de un cirujano civil general, así como el sello oficial o el sello en relieve de la instalación de tratamiento militar).
- Complete la hoja de trabajo incluida en el I-693
- Incluir los resultados de cualquier trabajo de laboratorio u otros estudios necesarios para determinar si el solicitante es inadmisible en los EE. UU. Por cuestiones relacionadas con la salud.
- Si se requiere una remisión, complete el Artículo 5 en la hoja de trabajo que se encuentra en la Parte 7. El médico derivado deberá completar la Parte 8. (Si no es necesaria una remisión, deje el Artículo 5 en la hoja de trabajo en blanco).
¿Hay una tarifa de presentación?
No hay tarifa de presentación para el I-693.
Cómo presentar el I-693
- Haga una cita con un cirujano civil certificado por USCIS.
- Complete la Parte 1. En su I-693. (No lo firme todavía. Debe firmar el formulario frente al cirujano civil).
- Mantenga su cita con el cirujano civil. Si son necesarias más visitas, asista a todas ellas también. Asegúrese de traer prueba de su identidad y cualquier registro médico que pueda tener con usted a su cita. Como prueba de identidad, traiga una identificación con foto válida emitida por el gobierno (es decir, pasaporte válido o licencia de conducir). Si tiene menos de 14 años, los documentos deben mostrar su nombre, lugar de nacimiento, nombres completos de los padres y cualquier otra información que pueda identificarlo (es decir, certificados de nacimiento o declaraciones juradas, incluya traducciones cuando sea necesario).
- El cirujano civil debe completar el I-693, presenciar su firma y hacer una copia. El cirujano civil debe sellar el I-693 original en un sobre y entregárselo para que lo envíe al USCIS y le entregue la copia que hizo.
- Luego debe enviar la carta sellada a USCIS. Si está presentando el I-693 porque está solicitando un ajuste de estado, puede hacerlo de una de estas tres maneras:
- Envíelo por correo con su Formulario I-485 a la dirección que coincida con su motivo para presentar el I-485. Puede encontrar una lista de las razones para presentar el I-485 y la dirección necesaria aquí.
- Envíe el I-693 después de haber enviado el I-485 a la dirección especificada en su última comunicación con USCIS.
- Entregue el I-693 en persona cuando vaya a una entrevista en una oficina local de USCIS.
If you are not applying for an adjustment of status, follow the instructions given by the office requesting the medical examination.
Formas de completar el Formulario I-693
Completar en una computadora
Descarga y visualiza en un visor de PDF.
Imprima y complete el formulario en papel
Imprime el PDF y rellénalo a mano con bolígrafo negro.
Contratar a un profesional legal
Busque un profesional legal para completar el formulario.
Understanding the Different Paths to Permanent Residency for Marriage-Based Applications
This article outlines the different ways individuals can apply for a marriage-based green card
Green Card Application
Introduction
If you’re married to or about to marry either a U.S. citizen or a U.S. green card holder AND hope to live in the United States, you’re probably trying to figure out the best way to apply for a green card. If this description applies to you, then you’ve come to the right place! This article lays out the different ways individuals can apply for a marriage-based green card, how these paths are similar, as well as how they are different. This article does not, however, discuss immigration pathways for those seeking permanent residency through employment-based applications, or as refugee or asylum seekers.
As you read, you might feel confused or even overwhelmed at times… don’t worry, we get it! U.S. immigration can feel like a lot to take in! That’s why SimpleCitizen has sought out to make U.S. immigration more accessible to people just like you! We offer the same assistance and expertise an immigration lawyer provides at a fraction of the cost! Need help applying? Learn how to prepare your application with SimpleCitizen here.
Understanding the Basics
Before we begin, it’s important to note that your choices will differ depending on whether you are married or unmarried, and whether that marriage is to a U.S. citizen or a U.S. green card holder. Let’s clarify what the difference is!
Defining Married vs Unmarried
Married: For the purposes of this article, married refers to any applicant that is married to a U.S. green card holder or U.S. citizen.
Unmarried: Unmarried refers to any applicant who plans to marry a U.S. green card holder or U.S. citizen but has not yet done so. Unmarried, in the context of this article, does not include employment-based applicants, or those seeking status as a refugee or asylum-seeker.
Married vs. Unmarried Paths to Permanent Residency
As previously mentioned there are different application options available depending on whether the applicant is married or unmarried. Here's a quick list of options available to an applicant depending on whether they are married or unmarried.
Married Applicants
- Adjustment of Status
- Consular Process
Unmarried Applicants
- K-1 (Fiancé(e) Visa) to Adjustment of Status
- Consular Process
The sections below will both summarize and detail the primary differences between these options and should help you better identify the path that is right for you!
Application Types for Married Individuals
These application paths apply to individuals who are ALREADY married to a U.S. citizen or a U.S. green card holder.
Adjustment of Status for Married Applicants
The process of applying for an Adjustment of Status green card as a married applicant differs slightly depending on whether the applicant is married to either a U.S. citizen or a U.S. green card holder. While applicants married to a U.S. citizen can file Form 1-130 (Petition for an Alien Relative) concurrently with Form I-485 (Adjustment of Status to Permanent Resident), applicants married to U.S. green card holders cannot. Rather, they must go through something called the Visa Bulletin after they file Form I-130 (Petition for an Alien Relative). Only once the Visa Bulletin for the applicants category is current can they submit Form I-485.
Visa Bulletin
The way the Visa Bulletin works can be pretty complicated but here is a brief overview! Again, remember that this step only applies to applicants married to U.S. green card holders NOT to applicants married to U.S. citizens.
Overview
The Visa Bulletin is released every month by the U.S. Department of State. It shows which green card applications are eligible to move forward based on when the I-130 (or I-140 for employment-based applications) petition was originally filed.
Because the U.S. congress sets annual limits on the amount of green cards that can be issued, and because the number of annual applications often far-exceeds that quota, there is a large backlog of applications. This backlog leads to wait times for new applicants, which are published monthly in the Visa Bulletin.
After filling Form I-130, Petition for Alien Relative, you’ll be able to check the Visa Bulletin to see your place in line which can then help you estimate how much time it will take before you can apply to be issued a green card.
How Does it Work
First, the spouse of the applicant seeking a marriage-based Adjustment of Status must file Form I-130, Petition for Alien Relative. They are considered the petitioner of the applicant. Once Form I-130, Petition for Alien Relative, is approved, one must wait for the priority date in one’s immigrant visa category to become current (see the date listed in the Notice of Action, and check when it is current by clicking here) be sure to check the current month and year. When the date listed is current, it is time to file Form I-485, Application to Register Permanent Residence or Adjust Status. This is the required form for becoming a Permanent Resident.
Violating Terms
Another primary difference between those married to U.S. citizens and U.S. green card holders is the flexibility that exists in regards to violating the terms of one’s status. The spouses of U.S. citizens are more likely to be forgiven for things such as overstaying a visa or working without authorization. This same forgiveness is not extended to the spouses of U.S. green card holders. If you or your spouse have violated the terms of your status as the spouse of a U.S. green card holder, it is recommended that you get a lawyer to assist you.
Learn more
For monthly updates on the Visa Bulletin, see this page.
Understanding Intent and Misrepresentation
Another important thing to be aware of as someone applying for a marriage-based Adjustment of Status are intent and misrepresentation. If applicants are not careful, they could potentially put themselves at risk of being flagged for or even committing immigration fraud. This applies to both the spouses of U.S. citizens and U.S. green card holders.
In short, USCIS wants to make sure that when an applicant entered on a temporary, non-immigrant status (such as a temporary work permit or student visa), their intention was not actually to gain an immigrant status. If they feel like the applicant misrepresented their intent, that applicant’s case is much more likely to be flagged for potential fraud. An example of this would be an applicant entering on a non-immigrant student visa and then getting married shortly after their arrival. Such behavior could appear to indicate that the individual misrepresented their intent to come to the United States.
A case is much more likely to be flagged for immigrant intent if the applicant gets married or submits an application to adjust status within 90 days of entry into the United States. Applicants who share these circumstances should prepare to address this in their interview with USCIS. This can be overwhelming or scary for applicants. Luckily, SimpleCitizen offers guidance on instances like this through application review by an immigration attorney from our network attorney. Learn more here.
Required Forms for Marriage-Based Adjustment of Status
There are a number of forms required to apply for an Adjustment of Status.
- Form I-130, Petition for Alien Relative:
For more information on this form check out these resources!
For more Information on filling form I-130 as someone who is married to a U.S. green card holder check out this article.
- Form I-130A
Since the petitioner is filing for their spouse, the spouse must fill out and sign Form
I-130A, Supplemental Information for Spouse Beneficiary.
Learn more about Form I-130A and how to file it here
- Form I-485. Application to Register Permanent Residence or Adjust Status:
Learn how to file this form here
Additional forms that are needed include:
- Form I-864, Affidavit of Support
For more information on this form see USCIS instructions here and our article here
- Form I-693, Report of Medical Examination and Vaccination Record.
Learn more about how to file this form here.
Optional Forms
- Form I-131, Application for Travel (optional)
Learn more about this form here
- Form I-765, Application for Employment Authorization (optional)
Check out our step-by-step guide to Form I-765 here
Cost
The overall cost of the application will vary slightly depending on the applicant, but the filing fees are consistent for most family-based applications. The total cost for filing the above listed forms is currently $3,005. This cost is broken up into four primary parts: the filing fee for Form I-130 (Petition for Alien Relative) which is $675, the filing fee for Form I-485 (Application to Register Permanent Residence or Adjust Status) which is $1,440, the filing fee for Form I-765 (Application for Employment Authorization) which is $260, and the filing fee for Form I-131 (Application for Travel Authorization) which is $630.
Who does this route apply to?
Applying for a green card through an Adjustment of Status applies to applicants that are a) married to a U.S. citizen or U.S. green card holder and b) are applying from inside the United States.
Applying and waiting
Applicants both apply and wait from inside the United States. Leaving the country before either Advance Parole or Permanent Residency has been granted could result in the termination of the applicants petition. In this case, they would then need to reapply and wait from outside the United States through the Consular Process method.
Timeline
Previously, the average wait time for Adjustment of Status applications was 8-20 months. These wait times vary depending on the office filed through and the particulars of the case. However, applicants are not able to pick and choose which office they work through. Rather, your field office will be assigned to you based on where you live. Learn more about office-specific wait times here.
Work and Travel
Working and traveling in the United States is allowed as long as the applicant meets at least 1 of the following requirements
- They have applied for and been granted the Work and Travel Permit (Obtained through filing forms I-765 and I-131)
- They have an additional valid visa that signifies dual intent (ie. an H-1B Visa) that also authorizes work and travel
- Their green card has been granted
As previously mentioned, leaving the country before either Advance Parole (Form I-131) or Permanent Residency has been granted could result in the termination of the applicants petition. In this case, they would then need to reapply and wait from outside the United States through the Consular Process method.
Consular Process for Married Applicants
Required Forms
The forms required for this application cannot be done all at once. Rather, they are broken down into two primary steps.
Step 1: Fill out and submit Form I-130, Petition for an Alien Relative
Step 2: Once Form I-130 has been approved, the applicant must then fill-out and submit two more forms
- DS-260, Immigrant Visa Application
- Form I-864, Affidavit of Support
To learn more about applying through the Consular Process, check out this guide!
Cost
Form I-130 = $675
Form DS-260 and Affidavit of Support = $445
USCIS Immigrant Fee = $235
Total: $1,355
Who does this route apply to
Applying for a green card through the Consular Process applies to applicants that are a) married to a U.S. citizen or U.S. green card holder and b) are applying from outside of the United States.
Applying and waiting
Applicants both apply for and wait for their green card from outside of the United States. Initially, applicants file Form I-130, Petition for Alien Relative, through USCIS. Afterwards, the agencies they work with are the U.S. Department of State and U.S. Department of Homeland Security.
Wait Times
In the past, average wait times for applications submitted via Consular Process have ranged from 6-10 months, depending on the embassy or consulate.This route tends to have shorter wait times than applying for an Adjustment of Status from within the United States.
Work and Travel
Applicants applying through Consular Process will not be granted entry to the United States until their green card has been granted. For this reason, they will not obtain work or travel authorization for the U.S. until permanent residency has been granted.
However, if applicants have an additional visa that allows them to travel into the United States they are able to use it during the waiting process. That being said, entry is not guaranteed. Rather, their admittance into the United States will be up to the agent reviewing their case. If said officer believes the applicant is at risk of overstaying their visa, they can deny the applicant entry into the United States.
Application Types for Unmarried Individuals
As a refresher, this section is specifically for applicants intending to marry either a U.S. citizen or green card holder.
Consular Process for Unmarried Applicants
If you do not want to go through the K-1 Fiancé(e) Visa process the other option would be to get married and then follow the consular process for married applicants, as outlined above. They are listed in the same table as the Fiancé(e)-to-Adjustment of Status path to help you compare the two.
K-1 to Adjustment of Status for Unmarried Applicants
What is a K-1 Visa?
A K-1 Visa is a visa issued to the foreign fiancé(e) of a U.S. Citizen that allows them to enter the United States temporarily. Upon arrival to the United States, the couple has 90 days to get married.
In order to be eligible for this type of Visa, the couple must meet two primary requirements
- Both met each other once within the last two-year period (exemptions are available)
- Both must be legally free to marry in the United States
Basic Steps
Step 1: Petitioner files Form I-129F, Petition for Alien Fiancé(e)
The petitioner, usually the U.S. Citizen Partner, must file Form I-129F, Petition for an Alien Fiancé(e) with USCIS. The filing fee for this form is currently $675. Find the PDF version of this form as well as the filing instructions here.
Step 2: Receive Notice of Action (I-797C)
After a few weeks, applicants usually receive Form I-797C, Notice of Action, from USCIS. This indicates that the application has passed basic checks and is awaiting adjudication. It is during this adjudication that the petition will either be approved or denied. It usually takes anywhere between 8-10 months for a petition to be approved.
Step 3: Approval and Jurisdiction Transfer to National Visa Center
Once the petition has been approved by USCIS, they transfer jurisdiction of the case to the National Visa Center (NVC) which is a segment of the U.S. Department of State. Here the NVC will issue the applicants a case number. This case number is very important so be sure to keep it in a safe place!
Once NVC assigns the application a case number, it will forward the I-129F packet (application) to the embassy of the home country of the foreign fiancé(e).
Step 4: Filing for a K-1 Visa (Form DS-160)
After the application has been forwarded to the embassy closest to where the foreign fiancé(e) lives, the applicant is then able to fill out Form DS-160 to apply for their K-1 Visa and pay their DS-160 Filing Fees ($265). Form DS-160 is filled out and submitted online. To access the form, click here. For answers to frequently asked questions about Form DS-160, check out this helpful link!
Be sure to heep the following information for your records
- The USCIS receipt number also known as a case number
- Principal Applicant
- Petitioner
- Interview location
Step 5: Schedule and Have Interview
Once the status of the case is “Ready” the applicant is then able to reach out to their local U.S. embassy and schedule their K-1 Visa Interview. However, Form DS-160 must be submitted, the medical examination must have taken place, and the application fees must be paid before the interview can take place. The applicant should make sure they bring all required documents to the interview to avoid any delays or complications. This includes the receipt number from their application payment as well as the printed confirmation information for their completed DS-160 application.
Step 6: Visa Granted, Enters USA
If their visa is granted, the foreign fiancé(e) will get a visa stamp in their passport which can then be used to enter the United States within 4 months of its issuance. Remember that this is a temporary Visa, so be sure to enter the U.S. before it expires.
Step 7: Get Married Within 90 Days of Entry
After entry into the United States, applicants have 90 days to get married. This is because the Fiancé(e) status automatically expires 90 days after entry and cannot be extended. The applicant must leave the United States at the end of the 90 days if they are not yet married.
Call-out: In the case when marriage does not happen within 90 days AND the fiancé(e) does not depart, they will violate U.S. immigration law. This could affect their future eligibility for U.S. immigration benefits and may result in removal r(deportation).
Step 8: Apply for Adjustment of Status to Gain Permanent Residency
After marriage, the next step is for the couple to file for a green card (Form I-485, Adjustment of Status). If the foreign partner intends to work in the U.S. or travel outside of the country while their application is being processed, they must also file for a Work and Travel Permit (Forms I-765 and I-131, respectively) and From I-864, Affidavit of Support. Filing these forms concurrently with Form I-485 results in the waiving of their fees.
Listed below are the required forms for this step in the application process:
Form I-485. Application to Register Permanent Residence or Adjust Status:
- Learn how to file this form here
Form I-864, Affidavit of Support
- Learn how to file this form here,
Form I-131, Application for Travel
- Learn more about this form here
Form I-765, Application for Employment Authorization
- Check out our step-by-step guide to Form I-765 here
Cost
Going the K-1, Fiancé(e) Visa to Adjustment of Status route is often the most expensive option for applicants, totaling approximately $3,945.
1) Petition for Alien Fiancé(e) (Form I-129F) = $675
2) K-1 Fiancé(e) Visa Application Fee = $265
3) Green card application: Forms I-130, I-485, I-765, and I-131 = Up to $3,005
Total: $3,945
Who does this route apply to
This route applies to anyone who is engaged to a U.S. citizen and who plans to get married in the United States before applying for Permanent Residency.
Applying and waiting
- Petition for Alien Fiancé(e) (Form I-129F) - Outside the U.S.
- K-1 (Fiancé(e)) Visa (Form DS-160): Outside the U.S.
- Entry to the United States is only allowed once the K-1 temporary visa has been granted. Applicants are then able to marry inside the United States and apply for an Adjustment of Status.
- Adjustment of Status (Form I-485): Inside the U.S.
Timeline
- Petition for Alien Relative (Form I-129F) = 8-10 months
- K-1 Visa Application: Varies by embassy/consulate
- Green card application: 10-24 Months
In total, the timeline for the fiancé(e) path to permanent residency varies greatly depending on the circumstance of the case such as the citizenship of the applicant, wait-times at the specific embassy, etc. On average, start to finish wait times average anywhere between 13 and 27 months.
Work and Travel
Rules surrounding work and travel differ depending on which stage in the process the applicant is at. Below, the information is broken up into the two primary stages.
- Petition for Alien Fiancé(e) and K-1 Fiancé(e) Visa: Applicants must wait for their Fiancé(e) Visa from outside of the United States and, as a result, will be unable to work or travel in the United States.
- Green card application via Adjustment of Status: Applicants both apply for and wait for their green card inside of the United States. During the waiting period they will be unable to work and travel until a Work and Travel Permit has been granted. Leaving the country before Advance Parole or Permanent Residency has been granted could result in the termination of the applicants petition. Working without the proper authorization could affect future eligibility for U.S. immigration benefits and may result in removal (deportation).
SimpleCitizen’s Eligibility Quiz
In order to make sure you are eligible to apply and that you choose the correct application for your situation, you can use SimpleCitizen’s free eligibility quiz here.
By answering just a few easy questions you can determine if you are eligible to apply.
If you have a questions about your eligibility or are unsure how to get started, here are a few options:
Sign up for SimpleCitizen & take the guesswork out of the green card process
You don’t have to try to navigate the green card process yourself, and you don’t have to pay outrageous attorney fees. SimpleCitizen’s easy to use software will guide you through the whole green card application.
Apply for a green card at the fraction of the cost of using an attorney — with all the comfort of having a guide along the way.
Your American dream awaits you, and SimpleCitizen can help you achieve it.
Click here to start your application.
Additional Resources
https://learn.simplecitizen.com/immigration-support/what-is-consular-processing
https://learn.simplecitizen.com/immigration-support/what-is-adjustment-of-status
https://learn.simplecitizen.com/immigration-support/comprehensive-guide-get-green-card
https://learn.simplecitizen.com/immigration-support/form-i-485-instructions
https://learn.simplecitizen.com/immigration-support/submitting-form-i-485-what-to-expect
https://learn.simplecitizen.com/immigration-support/what-is-form-i-485-used-for
https://learn.simplecitizen.com/immigration-support/who-may-file-form-i-485
https://learn.simplecitizen.com/immigration-support/top-10-questions-about-getting-green-card
¿Quién puede presentar el formulario I-130?
¿Quién puede presentar el formulario I-130?
En Español
Cuando se trata de quién puede presentar el Formulario I-130 existe una diferencia entre los ciudadanos estadounidenses y los residentes permanentes legales.
Si es ciudadano de los Estados Unidos, puede presentar el Formulario I-130 para familiares, que incluyen:
- Su esposa o esposo
- Su hijo o hija soltero menor de 21 años
- Su hijo o hija soltero de 21 años o más
- Su hijo o hija casado de cualquier edad
- Su (s) hermano (s) o hermana (s) si tienen 21 años o más; y
- Su madre o su padre si tienen 21 años o más.
Sin embargo, si es un residente permanente legal, solo puede presentar el formulario para:
- Su esposa o esposo
- Su hijo o hija soltero menor de 21 años; y
- Su hijo o hija soltero de 21 años o más
Si desea presentar la solicitud para más de un familiar, debe completar un Formulario I-130 por separado para cada individuo. No hay límite para la cantidad de formularios que puede enviar siempre que cada familiar se ajuste a las categorías enumeradas anteriormente en "ciudadano" o "residente permanente legal".
Immigration During the Biden Administration
The impact of the Biden-Harris administration on Immigration Law.
U.S. Immigration News
Last updated May 5, 2021.
Joseph R Biden Jr was inaugurated as the 46th president of the United States on January 20, 2021. Since then we’ve seen significant changes and expect to see further improvements in immigration law. There are a number of actions that the Biden-Harris administration has proposed to improve the immigration system.
Family Separation:
They will end family separation at the border and reunite children with their parents. They will not use a zero-tolerance policy as an intimidation tactic.
Asylum
They will open more access to asylum. They will do this by expanding the meaning of persecution, or the grounds on which to seek asylum. For example, they want to extend protections to LGBTQ+ individuals. They also want to end the Migrant Protection Protocols, which forced individuals awaiting asylum cases to go back to their home countries while their cases are being processed. Furthermore, they will make sure that asylum applications are processed efficiently and with less limitations.
They will end prolonged detention, especially of children. They want to develop alternatives to detention, such as case management programs. These allow individuals to exit detention but continue to move through the legal system.
They want to send more resources to the border. Specifically, they want to work with private and public organizations that help asylum seekers at the border, such as those who provide shelter or legal aid. They will focus on working with established non-governmental organizations and other asylum/refugee assistance agencies.
Public Charge
On March 9, 2021, the 2019 Public Charge Rule was terminated. USCIS is no longer accepting or requiring Form I-944, Declaration of Self-Sufficiency. The Biden administration saw the public charge rule as having added more roadblocks to immigration when individuals had to use public assistance such as SNAP or Medicaid. They want to allow individuals to use these services if they need them and still enjoy family reunification.
DACA
They want to protect DREAMers and their families. The ultimate goal is to provide a path to citizenship for DREAMers and their families, but for now, they will introduce protections. On January 20, 2021, President Biden issued a Presidential Memorandum entitled, “Preserving and Fortifying Deferred Action for Childhood Arrivals (DACA)” (“The Memo”). USCIS is accepting first-time requests for DACA as well as renewals.
They will expand economic help for DACA students, such as access to federal student aid, community college without debt, and investment in minority colleges such as HBCUs.
Refugees and Representation
The Biden administration will rescind travel and refugee bans. They will not ban individuals based on their religion or the color of their skin. They will direct visa and other immigration applications to be re-opened from regions which previously saw immigration halts.
They will review the Temporary Protection Status (TPS) and the Deferred Enforced Departure (DED) programs. They will make sure individuals who qualify for these programs are not returned to their home countries. They also hope to provide a path to citizenship to those TPS/DED individuals who have been in the United States for a long time. They have added the new TPS rules.
They will restore sensible immigration enforcement. They will focus enforcement on those migrants who pose a threat to public safety. Those who are in detention will see due process and other civil rights defended. There will be no workplace raids, or raids in other areas where individuals are vulnerable (such as hospitals, schools, and churches).
They will enforce better standards for Immigration and Customs Enforcement (ICE) and Customs and Border Protection (CBP) officers. They will receive more training and be required to be more transparent, and they will also receive independent oversight.
ICE will replace the word “illegal alien“ with “undocumented” and “integration” will replace “assimilation”.
They will protect those migrants who have served in the military. They will not be targeted for deportation, and those who have been deported will be paroled back to the United States and be reunited with their families and military service.
They want to give representation to non-citizens. They will do so by counting any individual living in a certain State at the time of the Census, regardless of immigration status.
Citizenship
They will improve the naturalization process. They will improve and streamline it by addressing the backlog. They hope to prioritize better adjudication (or decision making) systems, make processing quicker, and get rid of unreasonable filing fees.
They will revitalize the Task Force on New Americans. They will prioritize integration, entrepreneurship, and civic engagement and provide resources and training for language learning, financial management, workplace skills, and guidance on the naturalization process.
Finally, they hope to convene a meeting with regional leaders (from countries such as Canada, Mexico, Guatemala, El Salvador, and Honduras). These leaders will build a multi-national plan to address and alleviate factors driving immigration between the countries.
Joe Biden will focus on building bridges for immigrants and refugees to access the opportunities that the United States has to offer. He believes that immigrants are an integral part of this nation. He has emphasized that past Trump administration policies have hurt immigrants, and he hopes to return to policies that help them.
How to Avoid USCIS Requests for Evidence
Let’s look at the most common RFEs that USCIS issues and how to avoid receiving one.
General Immigration Information
Last Updated: February 11, 2025.
When USCIS needs more information for a case they issue what is called a “Request for Evidence” or an RFE, as they are commonly called.
While these requests are issued on a routine basis and are just USCIS’s way of collecting more information, we understand that they can add stress to your process. Let’s look at the most common RFEs that USCIS issues for Family-Based green card applications and how to avoid receiving one.
SimpleCitizen is designed to help simplify the process of gathering required information and documents and strengthening applications overall. All applications include an independent attorney review of the information and evidence that has been added, and our case support teams
are trained to assist our customers as they work to implement the attorney’s feedback. This feedback is intended to help reduce the risk of Requests for Evidence (RFEs) and other delays with USCIS. While there is always some risk of an RFE, we work hard to reduce that risk whenever possible.
If you have received an RFE, please look at our Article “Request for Evidence (RFE)? What To Do”. If you are an existing customer, you can also reach out to our LiveChat support or to your SimpleCitizen case support team if you have additional questions or concerns!
Birth Certificates
Sending the incorrect birth certificate is one of the most common mistakes applicants make. USCIS will not accept just any birth certificate. They require a long-form certificate that contains information about at least one parent. In addition, USCIS only accepts certain versions of birth certificates from each country. To find which version is accepted from each country, you can visit the Department of State Reciprocity Schedule.
Additionally, if your birth certificate, or other official documents, are not in English, USCIS requires that a certified translation is included, along with the certificate of translation. Failure to include both a copy of the original document and its certified translation is likely to result in an RFE.
Missing Translations
Any documents submitted to USCIS, both required documents and documents submitted to support the application, must either be in English or include an English translation.The translation should include a certificate from the translator stating that the translation is complete and accurate. It should also include the translator’s contact information and signature. Neither the petitioner or beneficiary can complete their own translations.
SimpleCitizen is happy to provide certified translations for all USCIS required documents for our customers at no additional cost! However, if there are non-required documents, such as items for relationship evidence, that are not in English, a self-translation would also be accepted. For more information on translations, please see our article here.
NOTE: Make sure when you submit your translations to USCIS that you also include a copy of the original document. Only adding the translation could result in an RFE.
Missing Required Documents
Forgetting to add a required document is also a common reason why an RFE may be issued. Each case has unique document requirements that depend on the details included in their application. For this reason, please make sure to carefully check what documents are needed for your particular circumstances. Commonly missed documents could include divorce decrees or death certificates from all previous marriages, proof of U.S. citizenship or Legal Permanent Residence, and/or photo ID, and court-certified documents. SimpleCitizen guides our customers on exactly what documents their case needs. Click here to start your application.
Most Recent Federal Tax Return
In order to act as a sponsor you must have filed a tax return for the most recent tax year. Failing to include a copy of the full Tax Return 1040 OR Tax Return Transcript for the most recent tax year increases the chance of being issued an I-864 greatly. Please note that this is true even if the sponsor submits proof of a tax extension. Tax Returns are required regardless of whether or not a tax extension has been issued and the sponsor will be very likely to later get an RFE requesting proof that the Federal Tax Return has since been filed.
If a sponsor was not required to file taxes due to making less income than the specified requirements, an explanation must be included in the application. Something to consider here, however, is that USCIS has been extremely picky about income history recently. Not meeting the income requirement in the previous tax year also greatly increases the chance of being issued an RFE.
Another time RFEs are commonly issued for this reason is on/near the tax deadline of April 15th. If you are submitting near this date and do not submit the Federal Tax Return from the most recent tax year there is a risk of an RFE being issued. This is because if you are submitting near tax day there is a chance USCIS may not review the paperwork until after April 15th and may require additional evidence and request the newest tax return. This risk can be lessened by adding the newest tax year’s return when you are submitting close to the tax deadline.
Tax Documentation
USCIS prefers to receive copies of the IRS Tax Return Transcripts whenever possible. These are free to request on the IRS’s website, after providing valid identification. You can request these here. If you are planning on including IRS Transcripts, please make sure to select the correct one as USCIS will not accept the IRS Wage and Income Transcript, nor the Account Transcript for immigration sponsorship purposes.
If the IRS Tax Return Transcripts are not available for any reason, USCIS will also accept the Form 1040, which is commonly referred to as your Federal Tax Return. If you are providing USCIS with the Tax Return instead of the IRS Tax Return Transcript you will be required to provide all pages of the 1040 and any Federal Tax Schedules or Forms that were included when you filed the taxes with the IRS. In addition, any W-2s or 1099s associated with the tax return should be included. One common mistake is only adding W-2s or 1099s from a current job and not all other jobs held in the tax year. When submitting this information double check that all documents have been added.
*Please note that State taxes documents are not required and should not be included.
If you filed taxes based on income from self-employment or other forms of income such as investments, scholarships, grants, etc, you should have filed at least one of the following schedules with your tax returns: Schedule C (Profit or Loss from Business), Schedule D (Capital Gains), Schedule E (Supplemental Income or Loss), or Schedule F (Profit or Loss from Farming). You must include each and every Form 1040 Schedule, if any, that you filed with your Federal income tax return.
Your copy of the tax return form can show you if any schedules or supporting documents were used when the tax return was originally filed. Depending on which lines of your tax returns were filled out, supporting documentation may be needed!
Typically line 1 on the first page of the 1040 form shows the wages that were reported on the 1040 and can be a guide to make sure all W-2s or 1099’s are added to provide proof of those wages. These documents are generally provided through an individual's employers at the beginning of each new year.
The additional lines highlighted in red can also be a guide to see if any Federal Schedules were used to file your taxes. If there are totals in those spots, USCIS will require you to submit any supporting documents available!
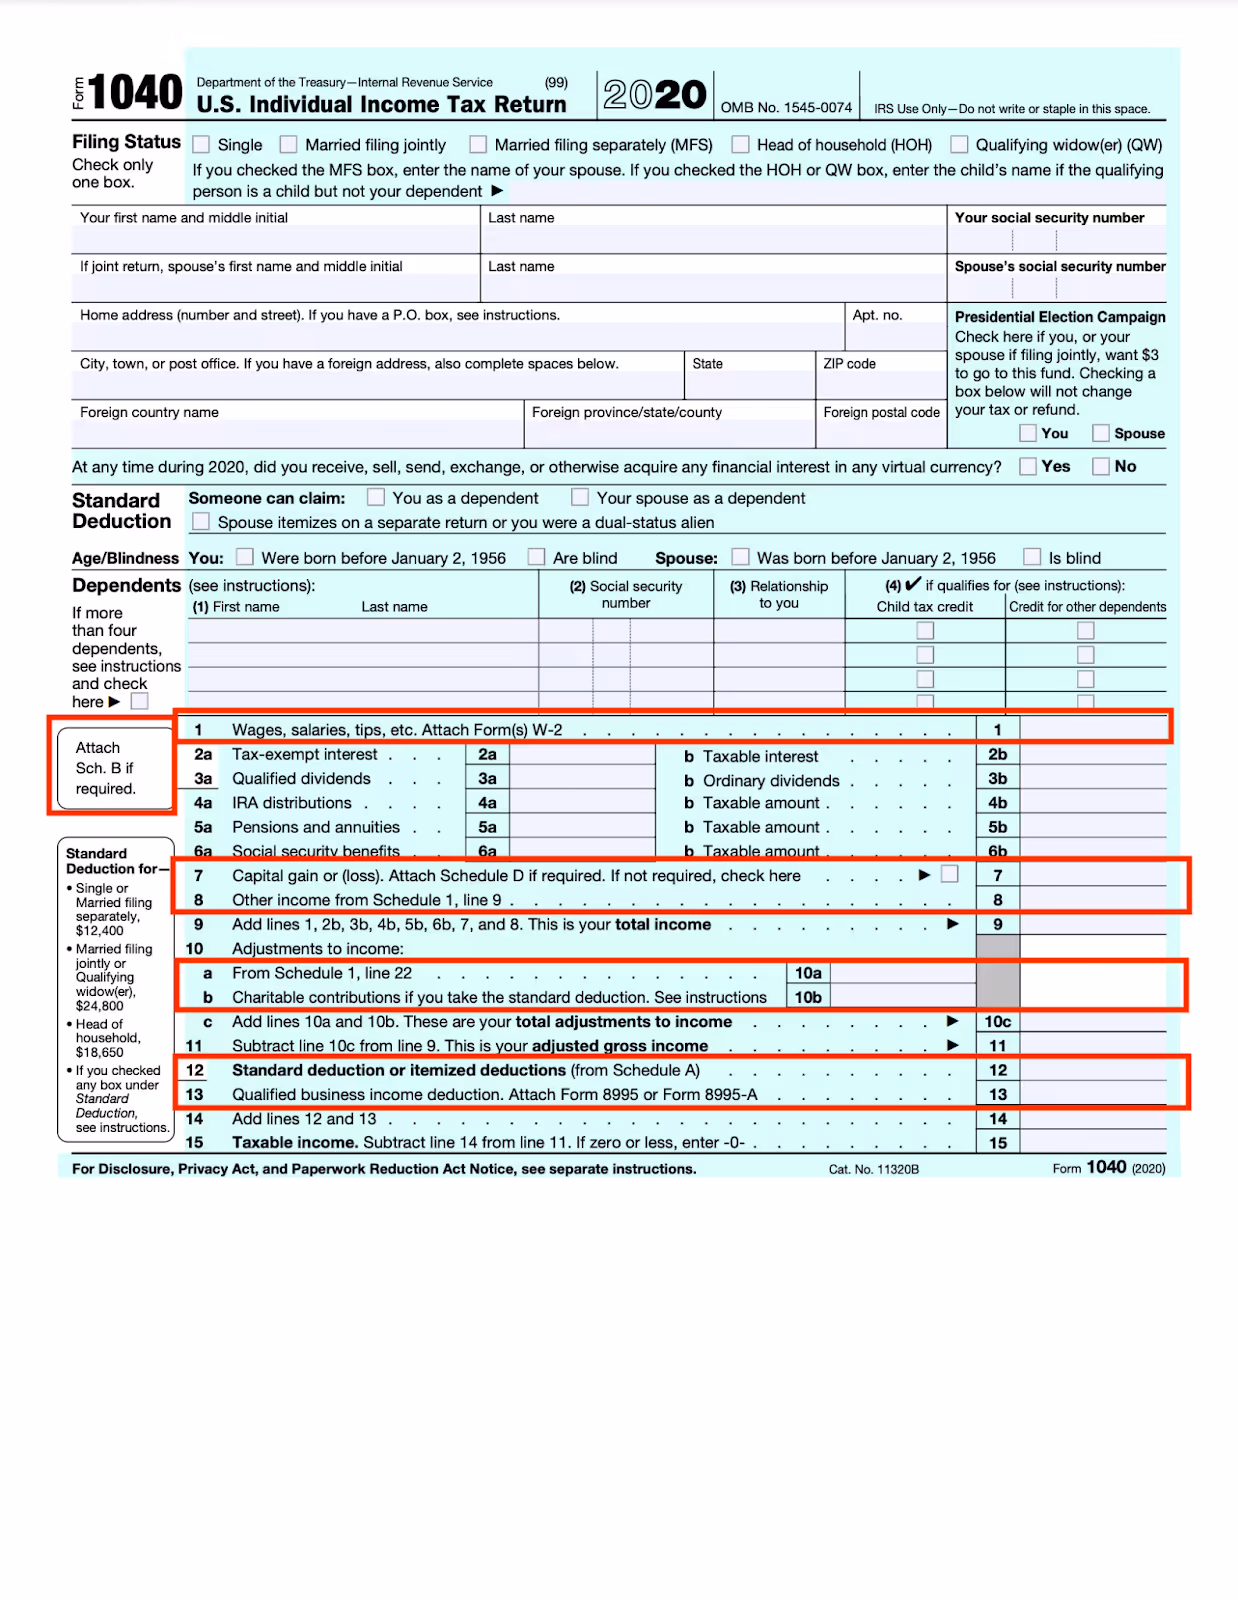
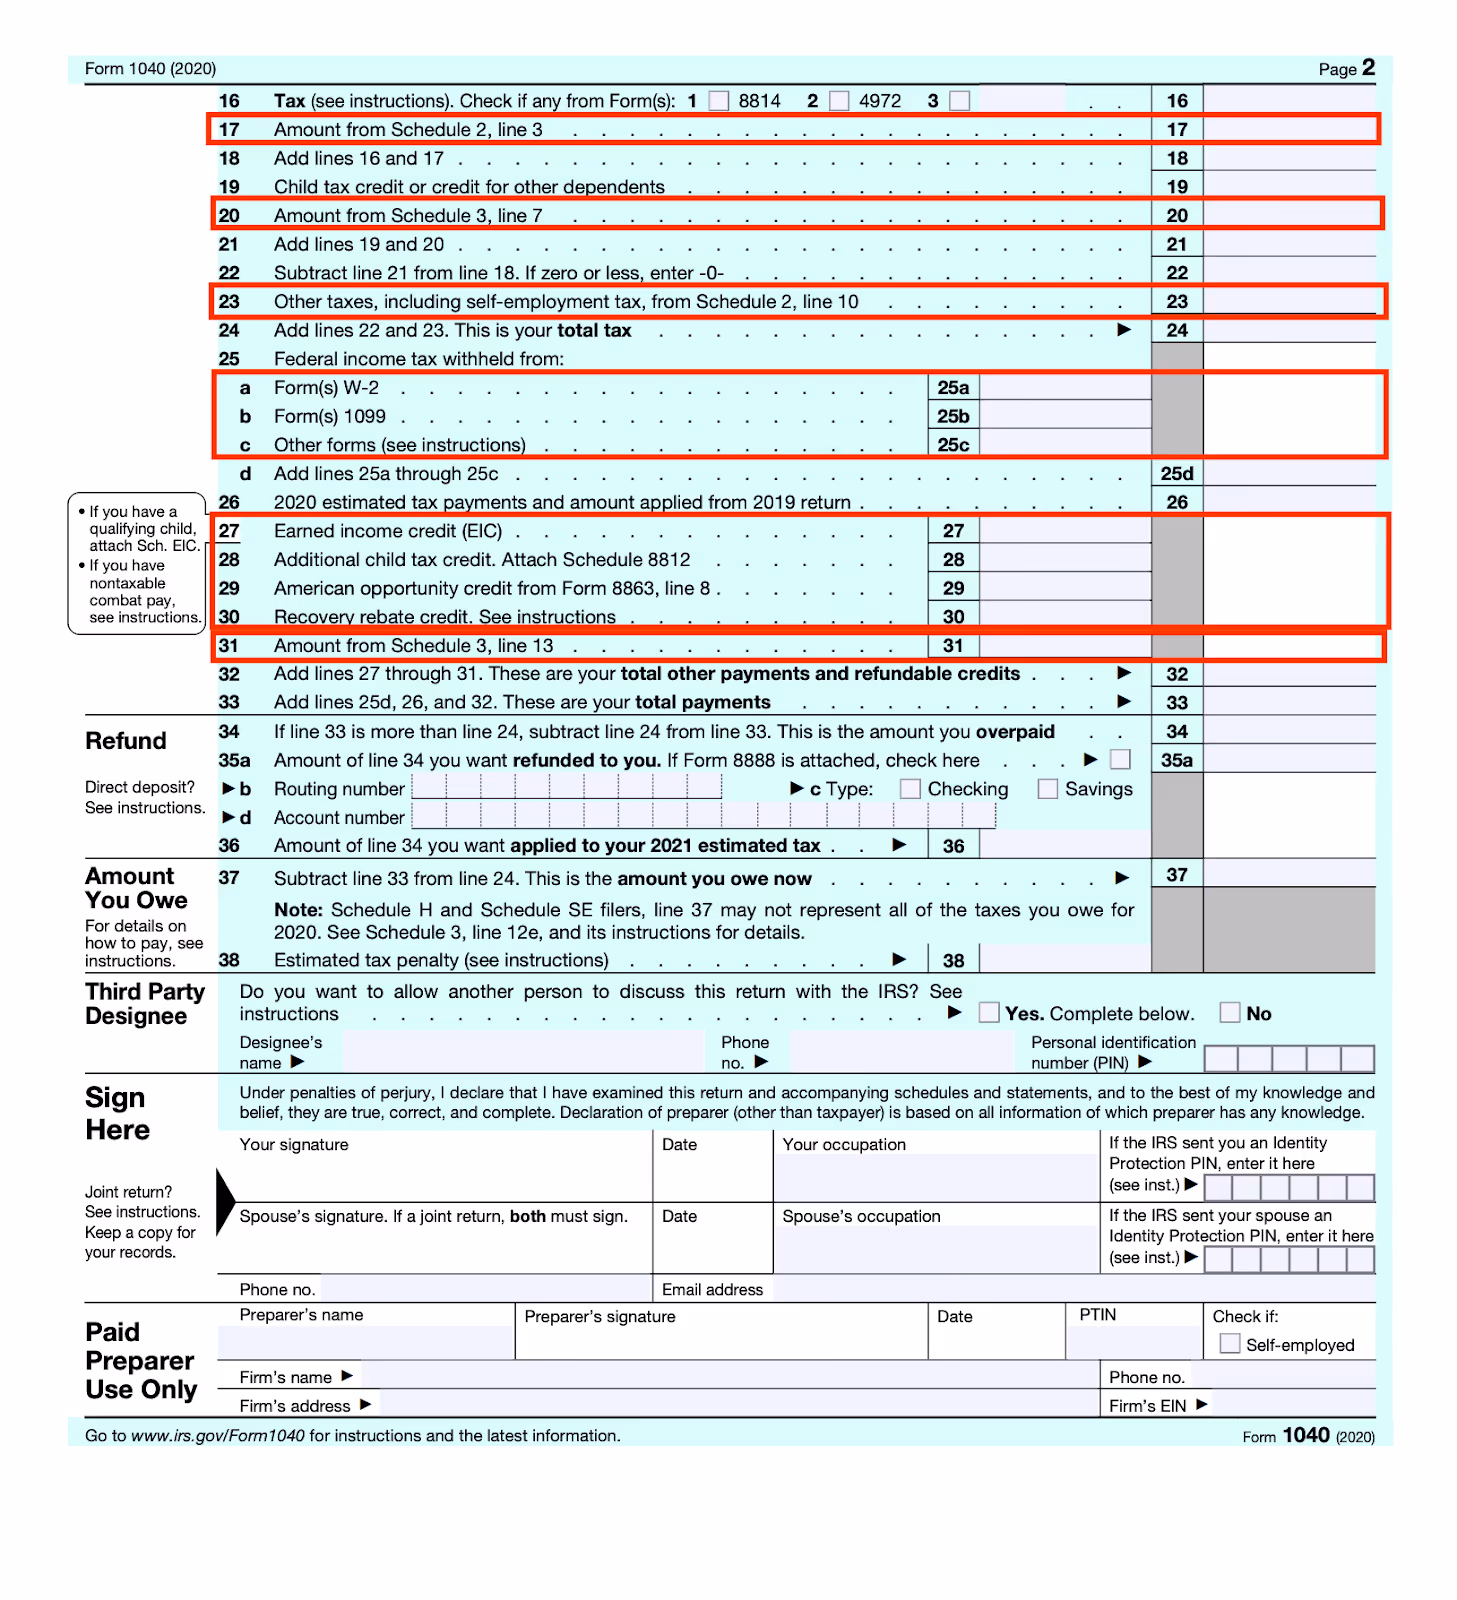
As a reminder: Sponsors are required to submit all supporting tax documentation submitted to the Internal Revenue Service for the most recent tax year. Supporting tax documents can include W-2s, 1099s, Form 2555, and all tax schedules to report various types of income that have been reported to the IRS for each year. Forgetting to add one of these documents is very likely to result in an RFE.
Income Close to the Required Level/Lack of Proof of Income
The Form I-864, Affidavit of Support, is filed to show that the intending immigrant will be supported financially in the U.S. This is done by showing that the petitioner or a joint sponsor makes an income of 125% of the poverty line for their household size. You can see USCIS’s breakdown of these income requirements based on the current year here.
USCIS always highly scrutinizes proof of income, but especially if the income is close to the required income. In these cases a detailed letter from the employer confirming the employment and six months of pay stubs showing consistent income can help, but in some circumstances a joint sponsor may also be necessary. For more information on Employment Verification Letters, please see this article.
Use of Assets to Meet the Income Requirements
In addition, USCIS instructions state that assets can be included to help meet the income requirements. The I-864, Affidavit of Support Instructions provide the following information for including assets in the application:
“If your Current Annual Household Income is equal to or more than needed to meet the income requirement as shown by the current Federal Poverty Guidelines (Form I-864P) for your household size, you do not need to [include assets]. If your total household income does not meet the requirement, you may submit evidence of the value of your assets, the sponsored immigrant’s assets, and/or assets of a household member that can be used, if necessary, for the support of the intending immigrants. The value of assets of all of these persons may be combined in order to meet the necessary requirement.
Only assets that can be converted into cash within one year and without considerable hardship or financial loss to the owner may be included. The owner of the asset must include a description of the asset, proof of ownership, and the basis for the owner’s claim of its net cash value. You may include the net value of your home as an asset. The net value of the home is the appraised value of the home, minus the sum of any and all loans secured by a mortgage, trust deed, or other lien on the home. If you wish to include the net value of your home, then you must include documentation demonstrating that you own it, a recent appraisal by a licensed appraiser, and evidence of the amount of any and all loans secured by a mortgage, trust deed, or other lien on the home. You may not include the net value of an automobile unless you show that you have more than one automobile, and at least one automobile is not included as an asset” (Italicized and underlined formatting has been added by SimpleCitizen).
If a sponsor or applicant cannot provide sufficient evidence of their claimed assets, including them in the application may increase the risk of an RFE.
Please note: USCIS adjudicating officers are increasingly issuing RFEs for sponsors that use assets to help meet the income requirement. For this reason, many customers choose to add a Joint Sponsor instead of assets when they do not meet the income requirement.
Self-Employed and Retired Joint Sponsors
Similarly to the previous point, we have seen an increase in scrutiny against self-employed and retired joint sponsors. If USCIS feels that the income from self-employment, or retirement, is not stable enough to sponsor an immigrant long-term or that not enough evidence of income has been provided, they are very likely to send an RFE requesting a different joint sponsor.
If you are wanting to include income from someone who is self-employed, additional documentation can help to make a stronger case. The evidence provided with the I-864 is to help establish that the income requirements are clearly and consistently met. Including this additional documentation can help in making it clear to USCIS that the self-employment is sufficient for their requirements.
Here are some of the potential documents for Self-Employed sponsors and joint sponsors:
- Federal Tax Return for the most recent year (This should include all tax documents such as 1099s and Federal Schedules) (Required)
- Record of bank statements/invoice records that show income has been deposited into the sponsor’s personal account over the past 12 months. . If including these documents, the bank statements can be highlighted to show the income from self-employment. The business bank statements, while helpful to show the business income, do not provide proof of personal income from the business.
- If an entity has been set up, all of the entity paperwork may be included
- A letter outlining the details of the self-employment and the projected income for the current year
- If the sponsor has an accountant, a letter from the accountant stating historical income and projected income for the current year can be included
Similarly, if you are wanting to include income from someone who is retired, here are some potential documents to help make their case stronger:
- Recent Pension statements and current Pension payment receipts
- Social Security documents that indicate payments
- Federal Tax Return for the most recent year (This should include all tax documents such as 1099s and Federal Schedules)
- Bank Statements for the previous 12 months marked to clearly show retirement income
- If they are including assets, they would also want to include any 1099’s from investments as well as the most recent statements for any stocks they hold.
Please note: These lists are general recommendations that can help reduce the risk of an RFE. However, they do not guarantee that these types of sponsors will be accepted by USCIS and documentation will vary on a case-by-case basis based on their individual employment situation. Each application is adjudicated by an assigned USCIS officer, and the approval of them is largely up to the officer’s individual discretion.
Relationship Evidence
We have seen customers find the most success when their relationship evidence is extensive and varied. If a benchmark would be helpful for you, it could be useful to aim for approximately 100-200 pieces of evidence with approximately 10-15 different evidence types spanning the full duration of the relationship.
Evidence we have seen be preferred by USCIS for customers in the past includes the following:
- Proof of shared financial responsibility extending for the full duration of the relationship (bank statements, leases, credit card statements, etc.)
- Proof of shared addresses (leases or mortgages in both of your names extending back the full duration of the relationship)
- Proof of jointly filed taxes for all years filed jointly
- Photos of the couple from throughout the whole relationship
- A wide variety of other evidence such as joint insurances, joint bills, beneficiary designations, etc.
Remember, a large portion of the Marriage-Based Green Card application process is designed to prove that you and your US Citizen (or Legal Permanent Resident) spouse are in a legitimate relationship. . If USCIS does not feel that you provided enough evidence for them to make that judgment, then they will request more, either by an RFE letter in the mail, or at the interview.
Medical Exams
Occasionally, applicants will receive an RFE for the Form I-693, Report of Medical Examination and Vaccination Record if they chose not to submit it at the time of their initial submission. In the past, we have seen this be a common indicator for when USCIS may be waiving an interview.
To complete a medical exam, applicants must go through a licensed Civil Surgeon. You can find one closest to you here.
There is no set price for the medical exam -- each doctor's office determines their own fee so it can be good to "shop around" and call multiple offices in your area to compare the prices and wait times. For example the fees for the same exam can often range anywhere from $175 to $950.
Here is some information about completing the medical exam that may be helpful for you!
For USCIS Form Instructions on completing Form I-693, Medical Exam, read here.
Please note: If you have received a Deficiency Notice for the Form I-693, Report of Medical Examination and Vaccination Record, a response is not required at that time. Deficiency notices are a courtesy reminder to applicants who chose not to submit the completed medical exam when they originally filed their application with USCIS. It will typically inform you that no response is needed, but that the medical examination should either be submitted at the time of the interview or when an RFE is issued for the exam.
Conclusion
We hope this guide was helpful in determining what you can do to reduce the risk of receiving an RFE from USCIS!
As a final note, it is also important to know that not all RFEs are a bad thing. In the past, we have seen USCIS send out RFEs in order to determine if an interview might be waived for a case, which can help reduce the overall processing times as well! At the end of the day, RFEs are completely normal. That being said, responding to any request for evidence as soon as possible is critical to the overall processing of your application.
If you have any additional questions or concerns, please feel free to reach out to us directly on our Live Chat.
Need to file for an immigration benefit but aren’t sure where to start? To get started on your application, please take our eligibility quiz here to help determine the correct application type for you!
Thank you! We’re happy you’re here!
Getting A Credit Report for Form I-944
Learn what a credit report and score are, how to get one, and what to do if you don’t have one!
Last Updated: August 21, 2020

This article addresses what a Credit Report and Credit score are, how to get your credit report as well as what to do if you do not have one!
Recently, USCIS introduced a new form, Form I-944, Declaration of Self-Sufficiency. This Form is extensive and includes many different components used to determine the likelihood of an applicant becoming a public charge, or in other words, relying on the US government for financial support. One of these components is the credit report and score requirements.
USCIS will review the applicant’s U.S credit report and credit score to help determine whether or not they are at a high risk of becoming a public charge. Being deemed a high risk of becoming a public charge could increase the chances that your application will be denied.
Understanding Credit Reports and Credit Scores
Credit Report
A credit report is a record of an individual’s history managing and repaying their debt. It contains a wide variety of information, including, but not limited to:
- Personal Information: Name, address, employment history, etc.
- Accounts: Open accounts, closed accounts (like paid-off loans and credit card amounts) from the previous 10 years
- Inquiries: Applications for new credit (like a credit card) and credit checks,
- Public Records: Bankruptcy record. Only included in some reports.
Credit files are “living” documents in the sense that they are constantly being updated with the most recent information.
Credit reports are used to create an individual’s credit score. This report and the credit score work together to help lenders or other entities determine if an individual is “credit-worthy” based on their history of debt management and repayment.
For more information on credit reports, check out this webpage.
Credit Score
A credit score is a 3-digit number ranging from 300-850 that summarizes the historical credit information on the credit report. It is used to indicate the likelihood that a person will become delinquent on a loan or a credit obligation. The lower a credit score the lower a person’s perceived credit worthiness. Higher scores are better as they indicate better credit management and repayment.
Obtaining your Credit Report
Credit reports can be obtained once a year under the Fair Credit Reporting Act from each one of the three credit reporting agencies for free. Applicants are only required to provide one credit report from any of the three nationwide credit reporting agencies, Equifax, Experian, and TransUnion. See https://www.usa.gov/credit-reports for more information.
Requesting Your Free Credit Report:
Online:
Visit AnnualCreditReport.com
By Phone:
Call 1-877-322-8228. For TTY service, call 711 and ask the relay operator for 1-800-821-7232.
By Mail:
Complete the Annual Credit Report Request Form (PDF, Download Adobe Reader) and mail it to:
Annual Credit Report Request Service
PO Box 105281
Atlanta, GA 30348-5281
Credit Report Errors
Sometimes credit reports have errors. If this is the case, the applicant should provide evidence from their chosen credit reporting agency that demonstrates that the error has been reported and that the error has either been resolved or is under investigation.
Additionally, if there is any negative credit history in the report such as delinquent accounts, debt collections, tax liens, foreclosures, etc., the applicant may provide an explanation in the designated areas on Form I-944.
What to do if you do not have a Credit Report
Some applicants may not have a US credit report or credit score. This is often because they either do not have a Social Security Number (SSN) which is required to sign up to get a credit report or they have not used credit while in the United States. If an applicant does NOT have a credit report or credit score, they should include alternative documents such as evidence of continued bill payment. Additionally, applicants can also try to include a letter from one of the three credit reporting agencies listed previously stating that they have no credit score.
Getting a Letter from one of the three credit reporting agencies
Equifax:
In the past, people have been required to fax a letter to Equifax stating that they could not access a Credit Report with their information and asking if Equifax could send them a letter stating that there was no Credit Report available for them. To do so, individuals must first call into Equifax to be given the fax number which they can then use to send the letter. Once Equifax received the faxed letter requesting a statement about a lack of a Credit Report, Equifax mailed them a letter stating the following:
Experian and TransUnion:
At the time this article was written, Transunion and Experian did not appear to offer the same services as Equifax.
What’s Next?
The form I-944 asks for a lot of information and requires a lot of documentation and this can add to the stress of the immigration process.
At SimpleCitizen, we handle many of these cases daily and know how to best prepare an application. Our team of experts, along with our partner immigration law firms can ensure that your application is well taken care of. Sign up today to start your green card application.
Federal Court Blocks Fee Increases
In July of 2020, USCIS announced they would be increasing green card, citizenship, and other fees.
U.S. Immigration News
Updated: Oct. 1, 2020
On Tuesday night (9/29/2020), a federal judge in California temporarily blocked U.S. Citizenship and Immigration Services (USCIS) from increasing their fees.
In July, USCIS announced they would be increasing green card, citizenship, and other fees to “meet operational needs”. The fee increases were significant compared to previous fee increases implemented by USCIS, averaging 20 percent across all applicaiton types. According to the Immigrant Legal Resource Center, the changes included a new $50 fee for asylum applications, limited fee waivers and changed the criteria for fee waiver eligibility, and charged separate fees for Forms I-765 and I-131 when filed with Form I-485, which is more than a 60 percent increase.
In Tuesday’s opinion, Judge Jeffrey White of the United States District Court for the Northern District of California questioned the reasoning behind these fee increases. USCIS has not provided data to show why their financial situation has become so dire. The court agreed with the plaintiffs that the fee increases seem to be based on arbitrary and capricious arguments.
The court also questioned the legality of the fee increases as The Department of Homeland Security (DHS) does not have a Senate-confirmed secretary. The acting director of DHS, Chad F. Wolf, and previous acting director, Kevin McAleenan, were both appointed unlawfully under the Homeland Security Act and as such, they did not have the authority to issue the rule changes USCIS set forth as its final rule. The court concluded that the public has an interest in avoiding executive overreach and that appointments required informed consent of the Legislative branch.
In his ruling, Judge White also cited humanitarian protections for low-income and vulnerable immigrants. The fee increases would “expose those populations to further danger” he wrote.
The court’s injunction took effect immediately Tuesday night, so USCIS fees will not increase in the short term. However, the Trump administration will likely appeal the court’s decision.