General Immigration Information
Learn more about visas, immigration best-practices, and other helpful information!
Immigration Term Dictionary
Here are some of the most commonly used USCIS terms and their definitions.
Introduction:
Immigration terms can be hard to wrap your head around – especially when you are just starting your immigration journey. To assist you with this, we have compiled some of the most commonly used USCIS terms and their definitions. For a more extensive list of Immigration terms and their definitions, please refer to the USCIS Glossary.
Terms:
A
A-Number/Alien Registration Number/Alien Number (A-Number or A#)
An A-number is an unique seven-, eight- or nine-digit number assigned to a noncitizen by the Department of Homeland Security, used for identification purposes. Also see USCIS Number.
Most people aren’t granted an A-number until they file for a green card, so if you don’t have one yet, don’t worry. However, one exception to this is that students on F-1 visas who are granted work authorization are likely to be assigned an A-number on their EAD card, when issued.
Once you apply for a green card, your A#-number should be listed on all of the documents sent to you by USCIS, including the I-797 notices.
Pro Tip: USCIS will sometimes assign out multiple A#s to an applicant during the immigration process. Be sure to record all A-numbers in a safe place.
Adjustment of Status
Adjustment of Status is the process that you can use to apply for lawful permanent resident status (also known as applying for a Green Card) when you are present in the United States. This means that you may get a Green Card without having to return to your home country to complete visa processing. (Please note that this is different from a Change of Status).
Typically, one would need to submit Form I-485 in order to file to adjust their status.
For more information on Adjustment of Status, please see the following resources:
- What is Adjustment of Status
- Form I-485 Step-by-Step Instructions
- Maintaining H-1B Visa vs Using Adjustment of Status Work and Travel Permit
- What Evidence Must you Provide with Form I-485?
Affidavit
An affidavit is a document in which a person gives facts, and swears that the facts are true and accurate.
For an example of a type of affidavit, see the following article.
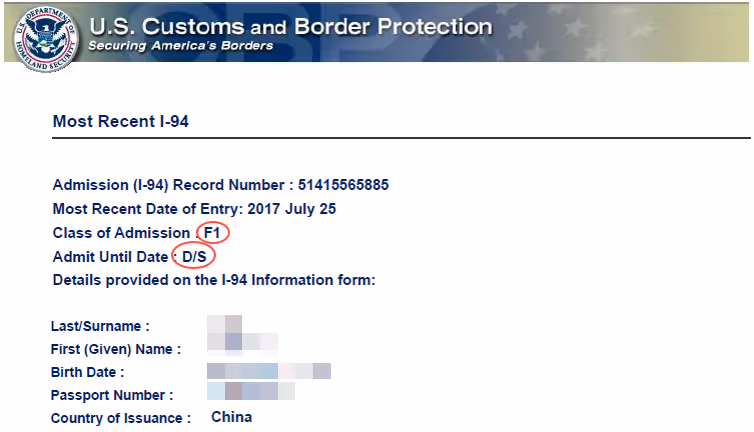
Arrival-Departure Record (Form I-94/I-94A)
The Arrival and Departure Record is the I-94, in either paper or electronic format, issued by a Customs and Border Protection (CBP) officer to foreign visitors entering the United States. As of April 30, 2013, most Arrival and/or Departure records are created electronically upon arrival.
For more information, see the following USCIS webpage.
To look up your more recent Form I-94 and/or Travel Record, see the following webpage.
B
Beneficiary
A Beneficiary is an individual who is sponsored by a relative or a business, or has self-petitioned for an immigration benefit. They can also be referred to as the applicant or the intending immigrant.
For example, if a US citizen spouse is hoping to sponsor their spouse for a green card, the spouse needing a green card would be the beneficiary.
C
CBP
An abbreviation for U.S. Customs and Border Protection, an agency of the Department of Homeland Security that is responsible for securing the homeland by preventing the illegal entry of people and goods while facilitating legitimate travel and trade.
Certificate of Citizenship
This is an identity document proving U.S. citizenship. Certificates of Citizenship are issued to derivative citizens and those who acquired U.S. citizenship..
Certificate of Naturalization
A certificate given at the oath ceremony. It serves as evidence of your citizenship.
Civil Surgeon
A Civil Surgeon is a medically trained and licensed physician having no less than 4 years’ experience who is designated by USCIS to perform immigration medical exams in a state where the physician is licensed and practicing medicine.
Civil surgeons practice within the United States. If you are completing your medical exam outside of the United State, you would go through what is called a Panel Physician. Information about Panel Physicians and which ones can be used is provided by the Consulate/Embassy processing the application.
IMPORTANT: Medical examinations will not be recognized if they are given by a doctor in the U.S. who is not a civil surgeon. Please make sure that your appointment is with a civil surgeon, or your results and documents will be invalid.
For more information on the medical exam within the United States, see the following article.
Find a Civil Surgeon near you here.
Conditional resident
Any alien granted permanent resident status on a conditional basis (for example, a spouse of a U.S. citizen or an immigrant investor) who must petition to remove the conditions of their status before the second anniversary of the approval date of their conditional status.
See the following articles to learn more about Removing Conditions from a Conditional Permanent Resident card.
- 5 Tips for Removing Conditions After a Divorce
- What happens after submitting your I-751 – Petition to Remove Conditions?
- Form I-751 & How to Prove Your Marriage is Legitimate
D
Duration of Status (D/S)
Duration of Status (D/S) is a notation on certain nonimmigrant Forms I-94 indicating that a person, such as an F-1 nonimmigrant student, is authorized to remain in the United States as long as they maintain a valid status. In other words, for the duration of their status.

E
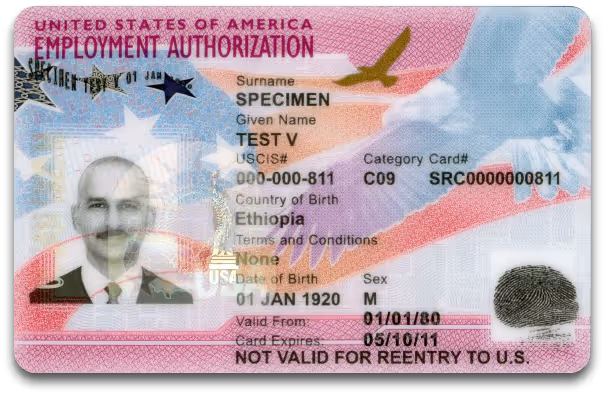
Employment Authorization Document (Form I-766/EAD)
A general term used to describe a card USCIS issues on Form I-766, Employment Authorization Card, to aliens who are authorized to work in the United States. The card contains a photograph of the individual and sometimes his or her fingerprint. An alien who has an EAD usually has open-market employment authorization, but there are exceptions.
To learn more about EAD’s, see the following articles:
- Form I-765 EAD Step by Step Guide
- What is an EAD or OPT?
- Submitting an Expedite Request for the Employment Authorization Document (EAD)
F
F-1 Nonimmigrant Student
A person who has been admitted to the United States as a full-time academic student at an accredited college, university, seminary, conservatory, academic high school, elementary school or other academic institution, or in a language training program. The student must be enrolled in a program or course of study that culminates in a degree, diploma or certificate, and the school must be authorized by the U.S. government to accept international students.
To learn more about F1 Visas, see the following Articles:
- F1 Student Visa
- How Do I Apply For an F1 Visa?
- Can I change my F1 status to another non-immigrant status?
- What documents do I need in order to apply for an F1 visa?
- How long can I stay in the U.S. on an F1 visa?
- Can I work while in the United States on an F1 Visa?
- What are my employment options as an F1 Visa holder?
- Can I travel abroad while I am in the United States on F1 status?
Field office
Field offices are offices within a USCIS district that provide services and enforcement functions for a particular portion of the district.
Please note that applicants are assigned a specific field office depending on their physical address. USCIS does not allow for people to request specific field offices.
Use this link to find the field office nearest to you.
G
Green Card
A green card is also known as a Permanent Resident Card, Form I-551, or alien registration card. USCIS issues Green Cards to aliens as evidence of their lawful permanent resident status in the United States. For Form I-9, it is acceptable as proof of identity and employment authorization. Although some Green Cards do not have an expiration date, most are valid for 10 years. Cards issued to individuals with conditional permanent resident status are valid for two years.
To find out if you are eligible to apply for a Green Card, you can use our Eligibility Quiz Here.
I
Immediate Relative
USCIS offers specific protections or exemptions for the immediate relatives of US Citizens. Immediate relatives refer to the nature of the relationship between the petitioner and the beneficiary and includes the following relationship types:
- The spouses of U.S. citizens,
- The children (unmarried and under 21 years of age) of U.S. citizens,
- The parents of U.S. citizens at least 21 years old, and
- Widows or widowers of U.S. citizens if the U.S. citizen filed a petition before his or her death or if the widow(er) files a petition within 2 years of the citizen’s death.
Any other relationship type would not be considered to be an immediate relation. Examples of these other relationships include, but are not limited to, the following examples:
- The aunts or uncles of U.S. Citizens
- The Cousins of U.S. Citizens
- The siblings of U.S. Citizens
L
Last name
Family name or surname.
Lawful Permanent Resident (LPR)
Any person not a citizen of the United States who is living in the U.S. under legally recognized and lawfully recorded permanent residence as an immigrant. Also known as “permanent resident alien,” “resident alien permit holder,” and “Green Card holder.”
M
Maiden name
A woman’s last name or family name at birth, before she married.
Mailing Address
The address where you would like to receive written correspondence from USCIS.
N
Naturalization
Naturalization is the manner in which a person not born in the United States voluntarily becomes a U.S. citizen.
To learn more about Naturalization and the N-400, see the following articles:
- How to Become a United States Citizen
- Applying for U.S. Citizenship: 10 Most Common Questions
- What Happens After Submitting Your Form N-400?
- 4 Common Reasons Citizenship Applications are Denied
- How to Apply for Citizenship while Serving in the United States Military
- What is “Good Moral Character?”
To find out if you are eligible to apply for Citizenship, use our Eligibility Quiz here.
P
Permanent resident
See Lawful Permanent Resident.
Permanent Resident Card (Form I-551)
Also known as a Green Card or alien registration card, this card is issued by USCIS to aliens as evidence of their lawful permanent resident status in the United States. For Form I-9, it is acceptable as proof of identity and employment authorization. Although some Permanent Resident Cards contain no expiration date, most are valid for 10 years. Cards held by individuals with conditional permanent resident status are valid for two years.
Petitioner
A petitioner is a person who files an immigration petition or application on behalf of the beneficiary/intending immigrant.
For example, if a US citizen spouse is trying to get their spouse a green card, the US citizen spouse would be the petitioner and their spouse would be the beneficiary.
Processing Times
Processing times are an estimate of how long it will take to process your case from start to finish. Each case is different, so some cases may take longer than others to process. These processing times tend to be form- and location-specific. You can find our average processing times on the USCIS website. If you use your receipt number to check your case status, please remember that USCIS will only research your case if it is beyond their current processing times.
To look up the current processing times for your assigned field office, go to the following webpage.
R
Re-entry Permit
Permanent or conditional residents should apply for a re-entry permit if they will be outside the United States for one year or more. A valid re-entry permit allows you to apply for admission to the U.S. without having to get a returning resident visa from a U.S. Embassy or Consulate.
Receipt Number
The receipt number is a unique 13-character identifier that USCIS provides for each application or petition it receives. The agency uses it to identify and track its cases.
The receipt number consists of three letters-for example, EAC, WAC, LIN, SRC, NBC, MSC or IOE-and 10 numbers. You can find it on I-797 notices of action (also known as receipt notices) USCIS has sent you via the mail or digitally to your USCIS account.
Request for Evidence (RFE)
USCIS may send you a request for additional evidence if:
- You did not submit all the required evidence;
- The evidence you submitted is no longer valid; or
- The officer needs more information to determine your eligibility.
This request is placed by sending the applicant or petitioner a letter detailing what is being requested and when it needs to be submitted by.
S
Service centers
Service centers only adjudicate applications that individuals have mailed, filed electronically, or filed with a USCIS Lockbox. Service centers do not provide in-person services, conduct interviews, or receive walk-in applications or questions. USCIS has five service centers: California, Nebraska, Potomac, Texas, and Vermont.
Sponsor
In the immigration field, the term “sponsor” often means to bring to the United States or “petition for.”
Another meaning of the term “sponsor” is a person who completes Form I-864, Affidavit of Support Under Section 213A of the Act. However, this type of sponsorship is not the first step in any immigration process.
U
U.S. Citizenship and Immigration Services (USCIS)
USCIS is a federal agency in the Department of Homeland Security that oversees lawful immigration to the United States. Its functions include:
- Granting employment authorization to eligible aliens;
- Issuing documentation of alien employment authorization;
- Maintaining Forms I-9; and
- Administering the E-Verify employment eligibility verification program.
USCIS Number
A USCIS Number is a unique, 9-digit number assigned to a noncitizen by the Department of Homeland Security that is listed on the front of Permanent Resident Cards (Form I-551) issued after May 10, 2010. See also Alien Number.
USCIS Online Account Number
Your USCIS Online Account Number (OAN) is a unique identification number issued by the USCIS online filing system account. You should have one account number for all cases submitted.
Understanding the K-1 Letters of Intent to Marry
Applying for a K-I Visa can be stressful, but we are here to help.
What is a Letter of Intent to Marry?
A Letter of Intent (LOI) to Marry is one of the documents USCIS requires as part of the K-1 visa application. It is a letter that helps USCIS verify the relationship. In a Letter of Intent to Marry, the petitioner (the U.S. citizen) and the beneficiary (the applicant/intending immigrant) declare their intention and legal ability to marry within 90 days of the applicant’s arrival into the United States.
Attention! USCIS requires that both the petitioner and the beneficiary each write and sign their own LOI to Marry, which means that two letters of intent should be submitted in total.
What should be included in a Letter of Intent to Marry?
Depending on the specifics of the couple's situation, a Letter of Intent to Marry may include the following:
- A statement of the intent and legal ability to marry
- Both the petitioner and the beneficiary’s names
- A signature and date at the bottom of the letter
- Supporting evidence of wedding plans
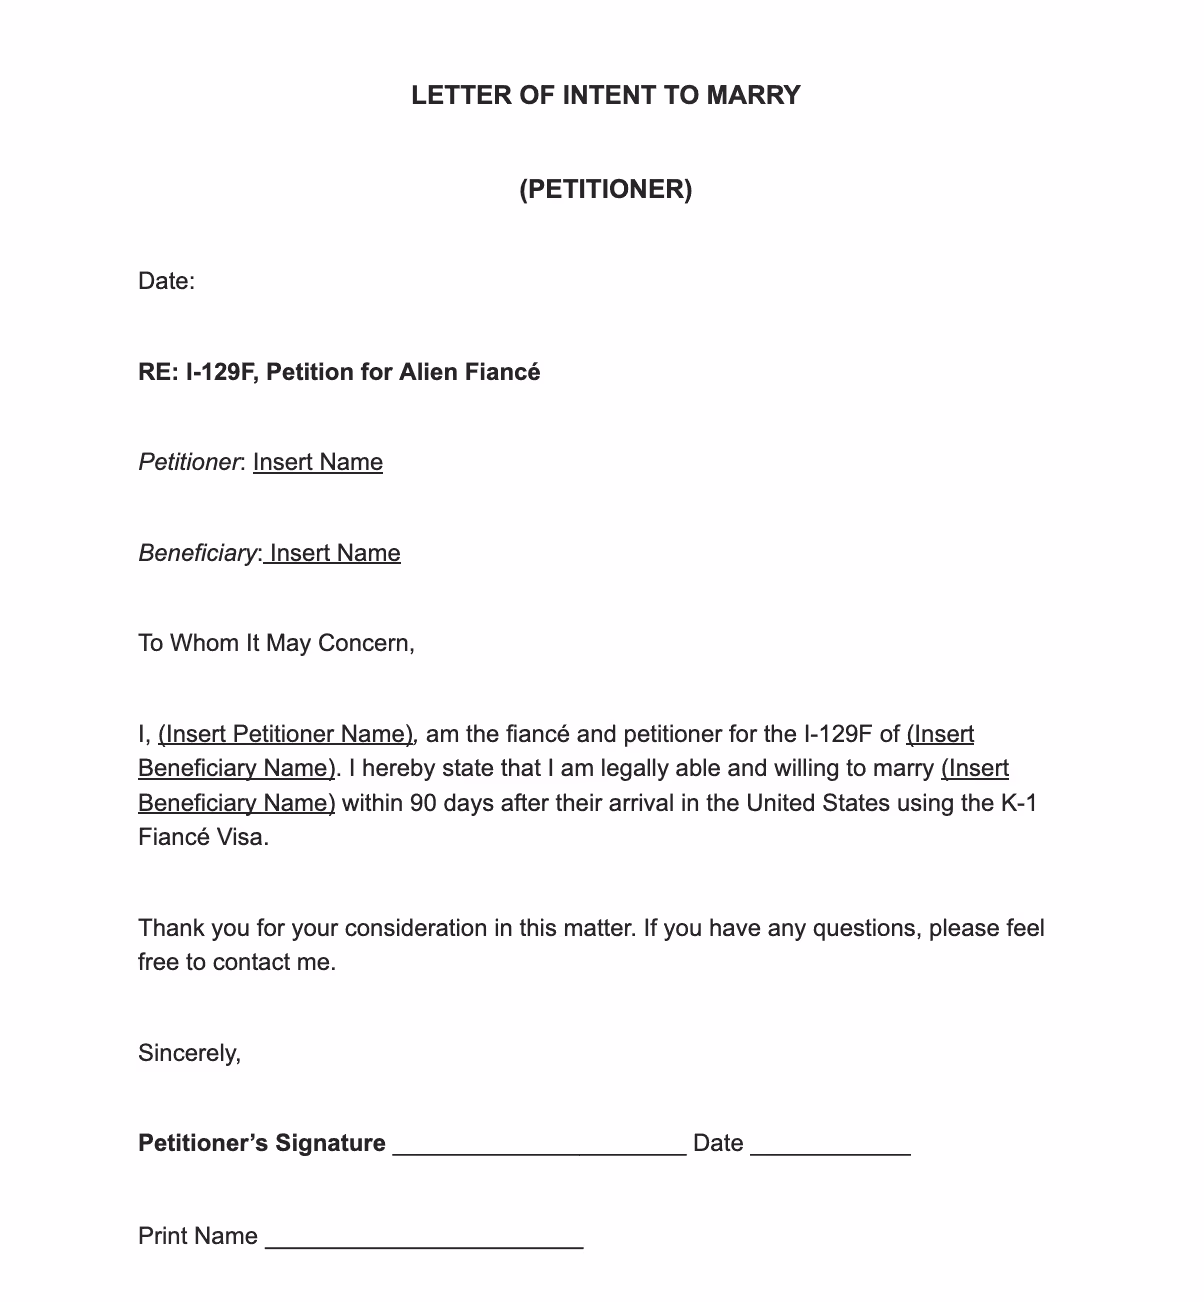
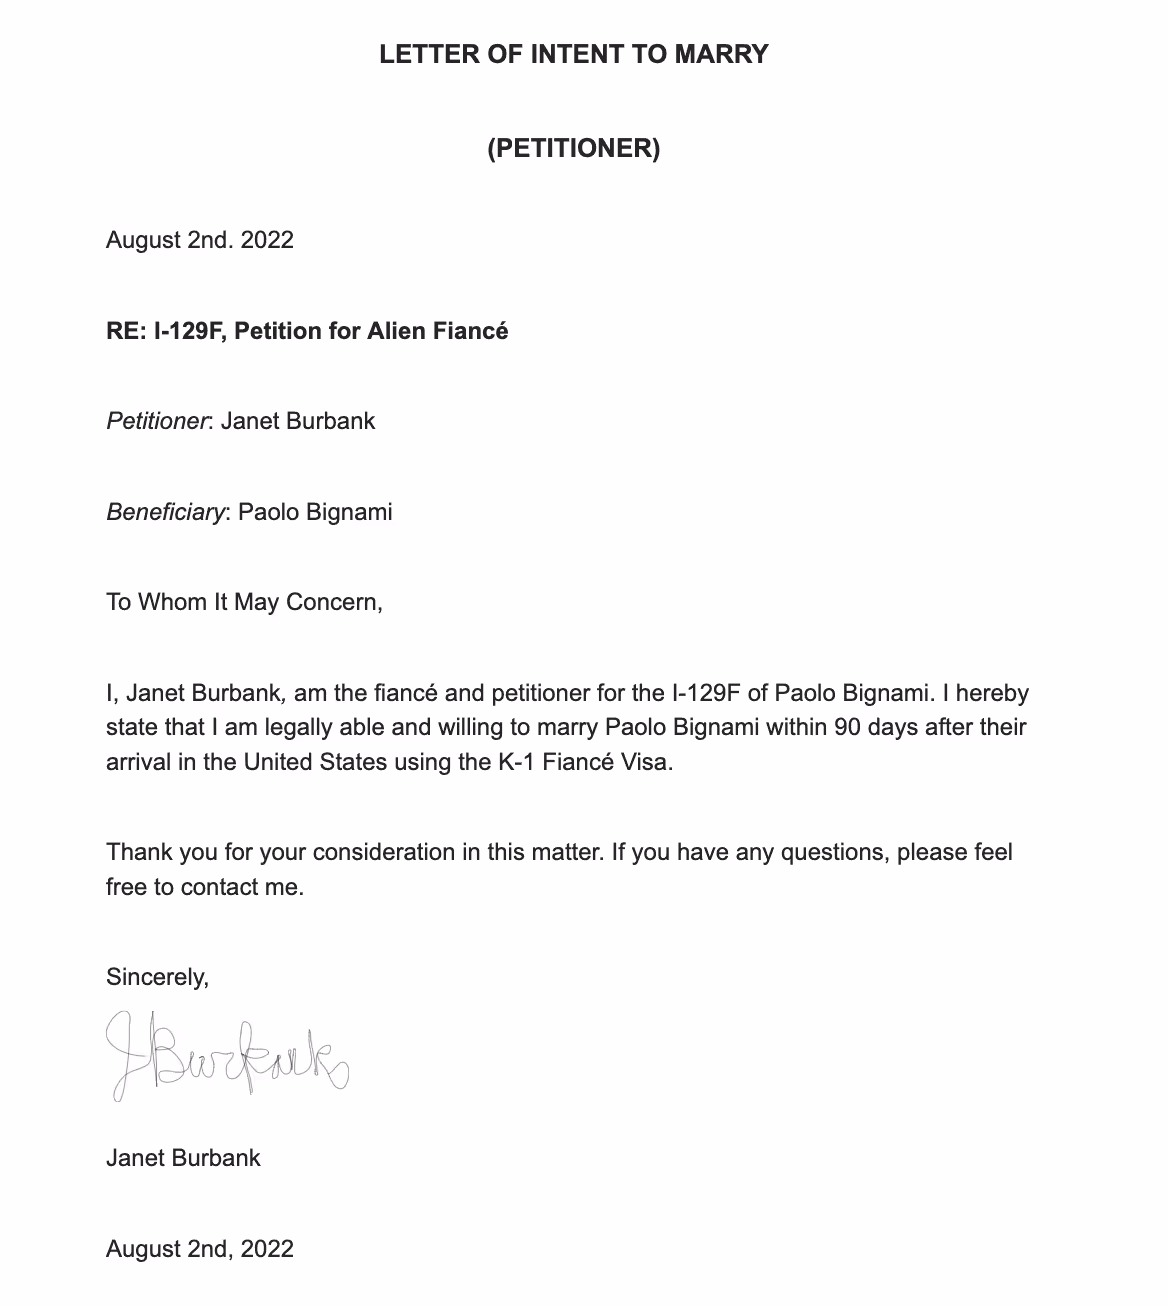
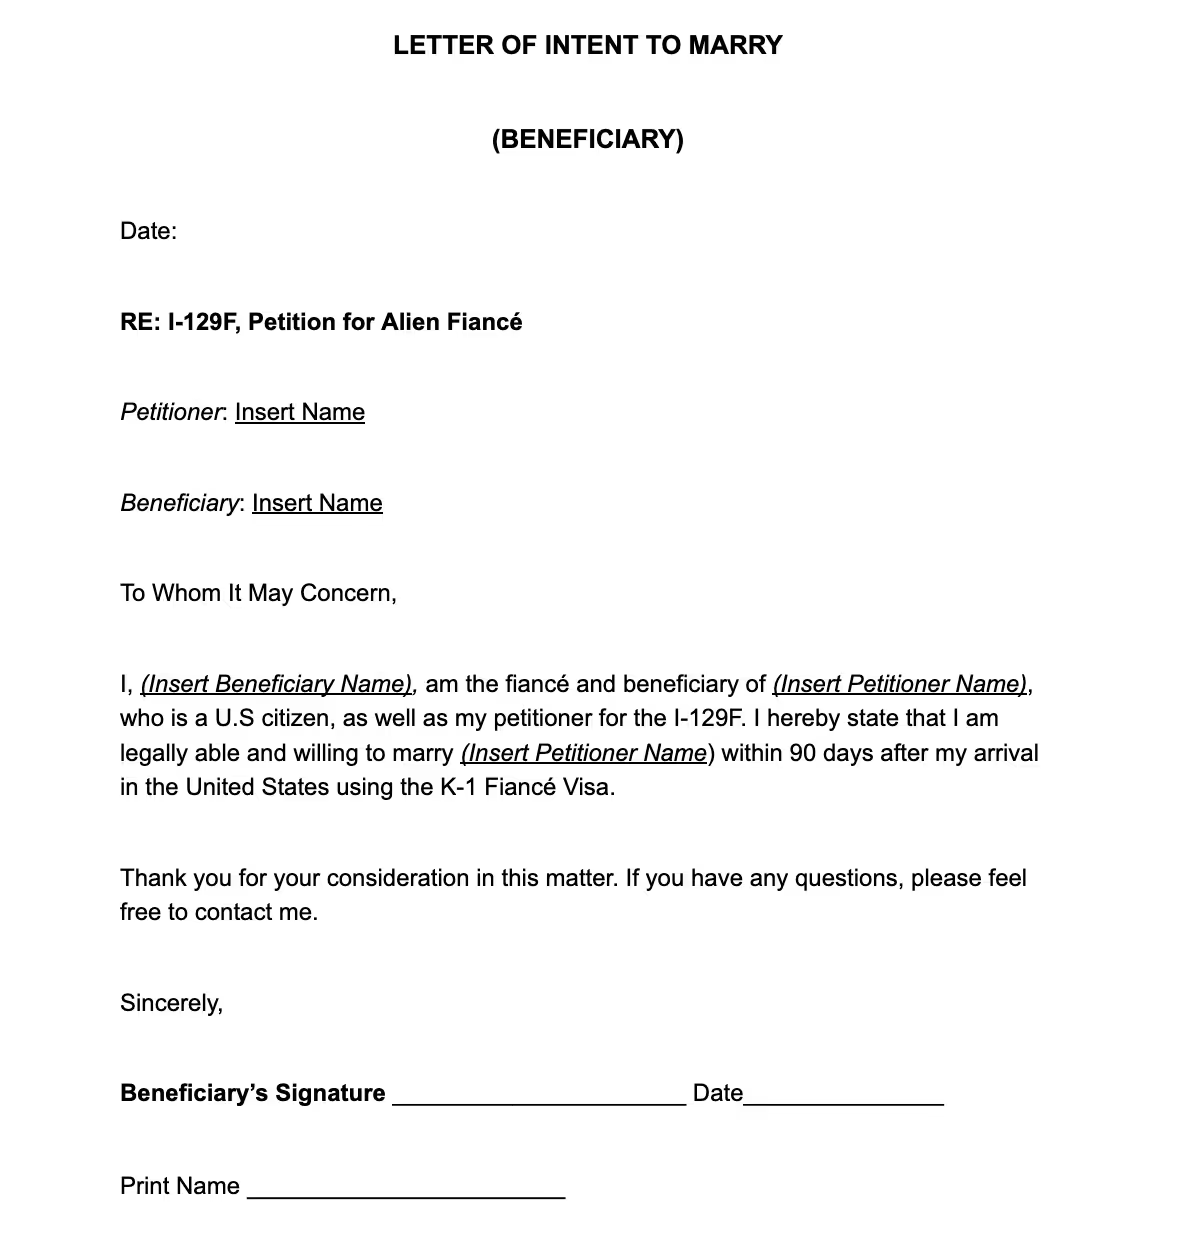
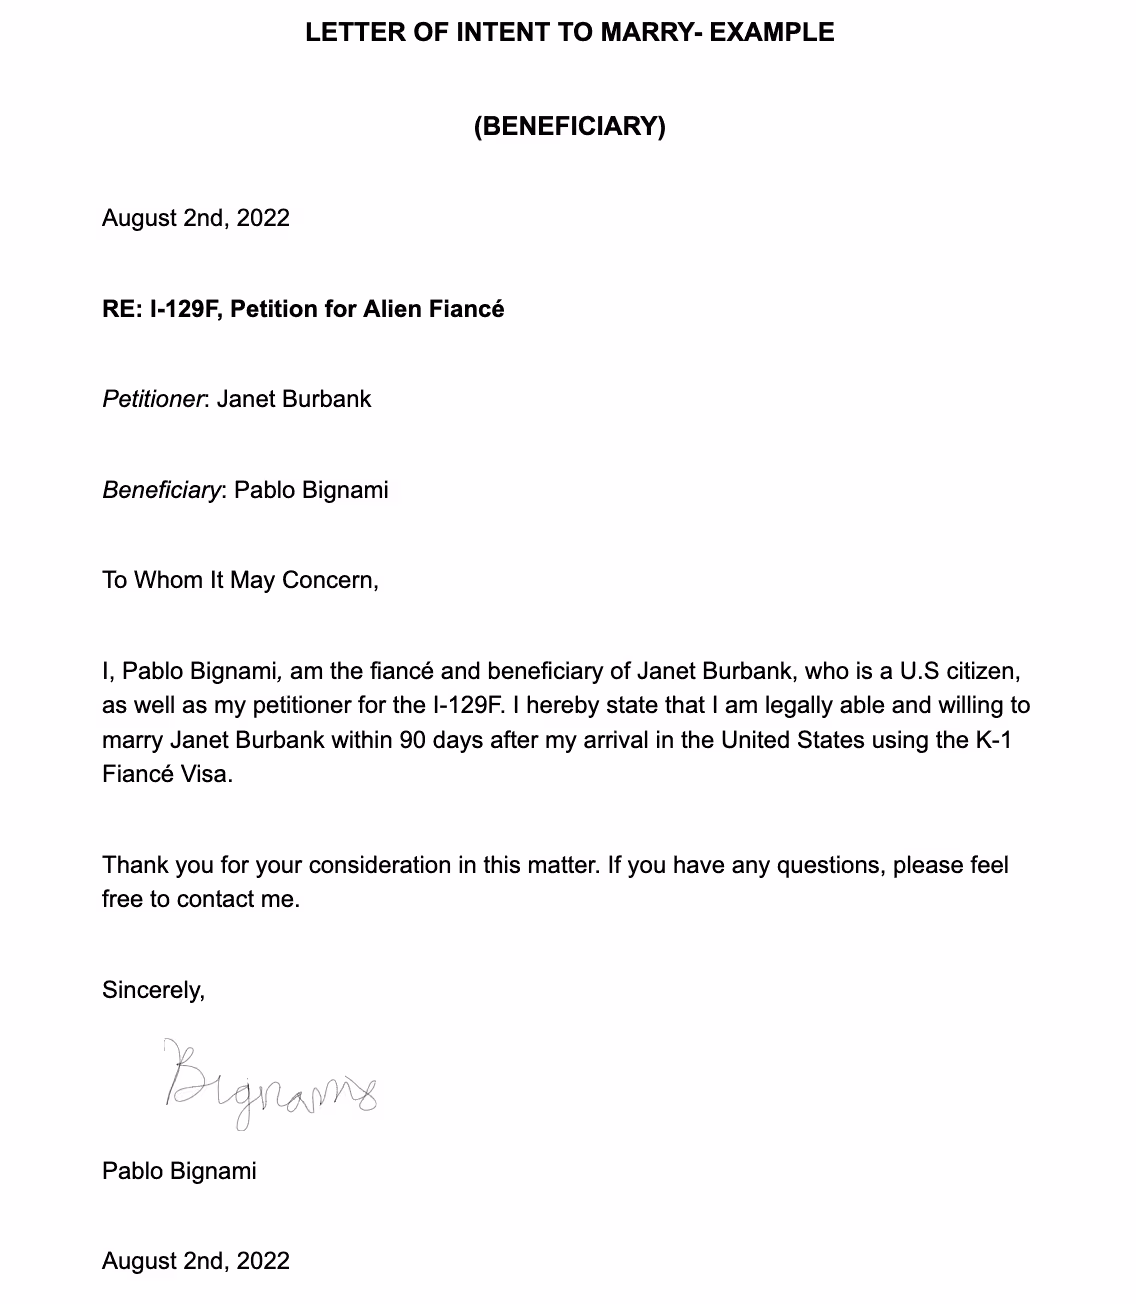
What does a Letter of Intent to Marry look like?
The formatting of a Letter of Intent to Marry can vary, but a basic template can be used to ensure all necessary information is included.
Below are templates as well as examples of what a basic LOI to Marry can look like. Please remember that the petitioner and the beneficiary should each write their own letter, and that letters should be unique in content and writing style, even though both letters can follow the format shown below.
Templates & Examples
Template - Petitioner
Example- Petitioner
Template- Beneficiary
Example- Beneficiary
FAQs
Who needs to write a Letter of Intent to Marry?
The petitioner and beneficiary are each required to write their own Letter of Intent to Marry.
Is evidence required? What can I use as evidence?
Including supporting evidence with the K-1 visa application is required. However, USCIS does not have specific requirements for what must be included.
Evidence can include:
- reservation receipts for venue or catering,
- engagement photos,
- ring receipts,
- engagement announcements,
- text messages showing proof of wedding plans,
- communication with friends and family about the wedding,
- social media posts.
What if I don't know when the marriage will take place since it is dependent on the visa approval?
In cases where the marriage is dependent on visa approval, include as much information as possible about plans to marry. Although a specific date may not be set yet, general proof of the wedding taking place can be added.
This can include information about the couple’s relationship, timeline, and story, as well as proof of conversations about the couple’s upcoming marriage and that friends and family were made aware. Including evidence can be a good way of supporting the validity of the relationship.
Need help applying for a K-1 visa?
Applying for a K-I Visa can be stressful, but we are here to help. With packages including online support and reviews with our independent licensed partner immigration attorneys , all with a 100% money back guarantee, we have you covered. Click here to learn about our K-I visa packages.
We’re happy you’re here!
Understanding USCIS’ Race and Ethnicity Questions
Explore the definitions of race and ethnicity, how USCIS defines them, and how customers use them.
On many applications USCIS requires people to declare both their race and their ethnicity. In this article, we are going to explore the definitions of race and ethnicity, how USCIS defines them, and examples of how some people have chosen to interpret and respond to these questions in the past.
What is the difference between race and ethnicity?
Race is a concept that usually refers to the phenotypical (physical) characteristics of a person and it can be self-identified or not. On the other hand, ethnicity takes into account the cultural components of a person’s upbringing, and it doesn’t typically refer to physical characteristics of that person. For example: Two people that both identify as Hispanic as their ethnicity may choose differently for their race, one White, another Black, or a mix of both.
How does USCIS define the different options?
On their applications USCIS usually has 2 questions about Race and Ethnicity:
- The first one that asks for a person’s ethnicity: The question simply asks if you consider yourself Hispanic or Latino OR Not Hispanic or Latino
- The second one asks for a person’s race and you can answer by marking one or more boxes. The options are: White, Asian, Black or African American, American Indian or Alaska Native, Native Hawaiian or Other Pacific Islander.
Here is the definition of the different race options directly from USCIS instructions:
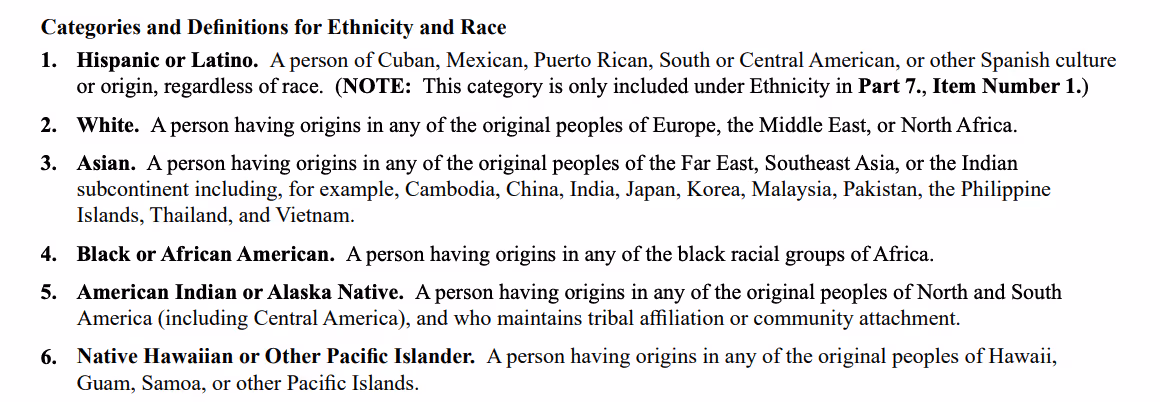
"When choosing between the race options, please make sure to carefully read through the USCIS definition of each of the options first.”
How should I answer if I am Hispanic/Latina/e/o/x?
Because USCIS considers Hispanic or Latino to be an ethnicity instead of a race, many people that choose the option “Hispanic or Latino” have different responses in the race question. Due to the multi-racial category that is Hispanic/Latina/e/o/x, many people choose between the options of White, Black, American Indian (if they have maintained tribal affiliation or community attachment as USCIS instructions show) or choose to mark more than one box.
How should I answer if I identify with more than one race/I Identify as biracial or multiracial?
The race question asks to mark *all applicable boxes*, so if you are a multi-racial person you can choose to mark all the boxes that apply to you.
Conclusion:
Please take into account that there isn’t a wrong or right answer for these questions. However, understanding USCIS definitions for race and ethnicity as well as a more clear understanding of how they define the various options within those questions, will hopefully help you answer this question more confidently and accurately.
Employment Verification Letter (EVL) 
Learn what an Employment Verification Letter is, why it's important and what it should include
What is the purpose of an employment verification letter?
When going through the immigration process, it is crucial to prove that the sponsor, and when applicable, the joint sponsor, meet the necessary financial requirements for their household size. In addition, USCIS will want to see proof of their current employment status. Both of these things are accomplished, in part, through an employment verification letter (EVL) that is submitted as evidence along with Form I-864. The employment verification letter provides evidence of both current employment and income.
Please note that an employment verification letter is different from an offer letter. An offer letter proves that employment was offered and an employment verification letter proves that employment is ongoing.
The employment verification letter is needed in addition to tax returns, pay stubs, and other financial documents. It is meant to strengthen the case by supporting the sponsor’s claim that they are able to provide adequate financial support to the applicant.
Who needs an employment verification letter?
The sponsor and, when applicable, any joint sponsor on a green card application will need to provide an employment verification letter. If the applicant is using their qualifying income to help meet the income requirements, they too will need to include an employment verification letter. The letter(s) will be required as evidence for Form I-864.
Creating an employment verification letter:
Who should issue an employment verification letter?
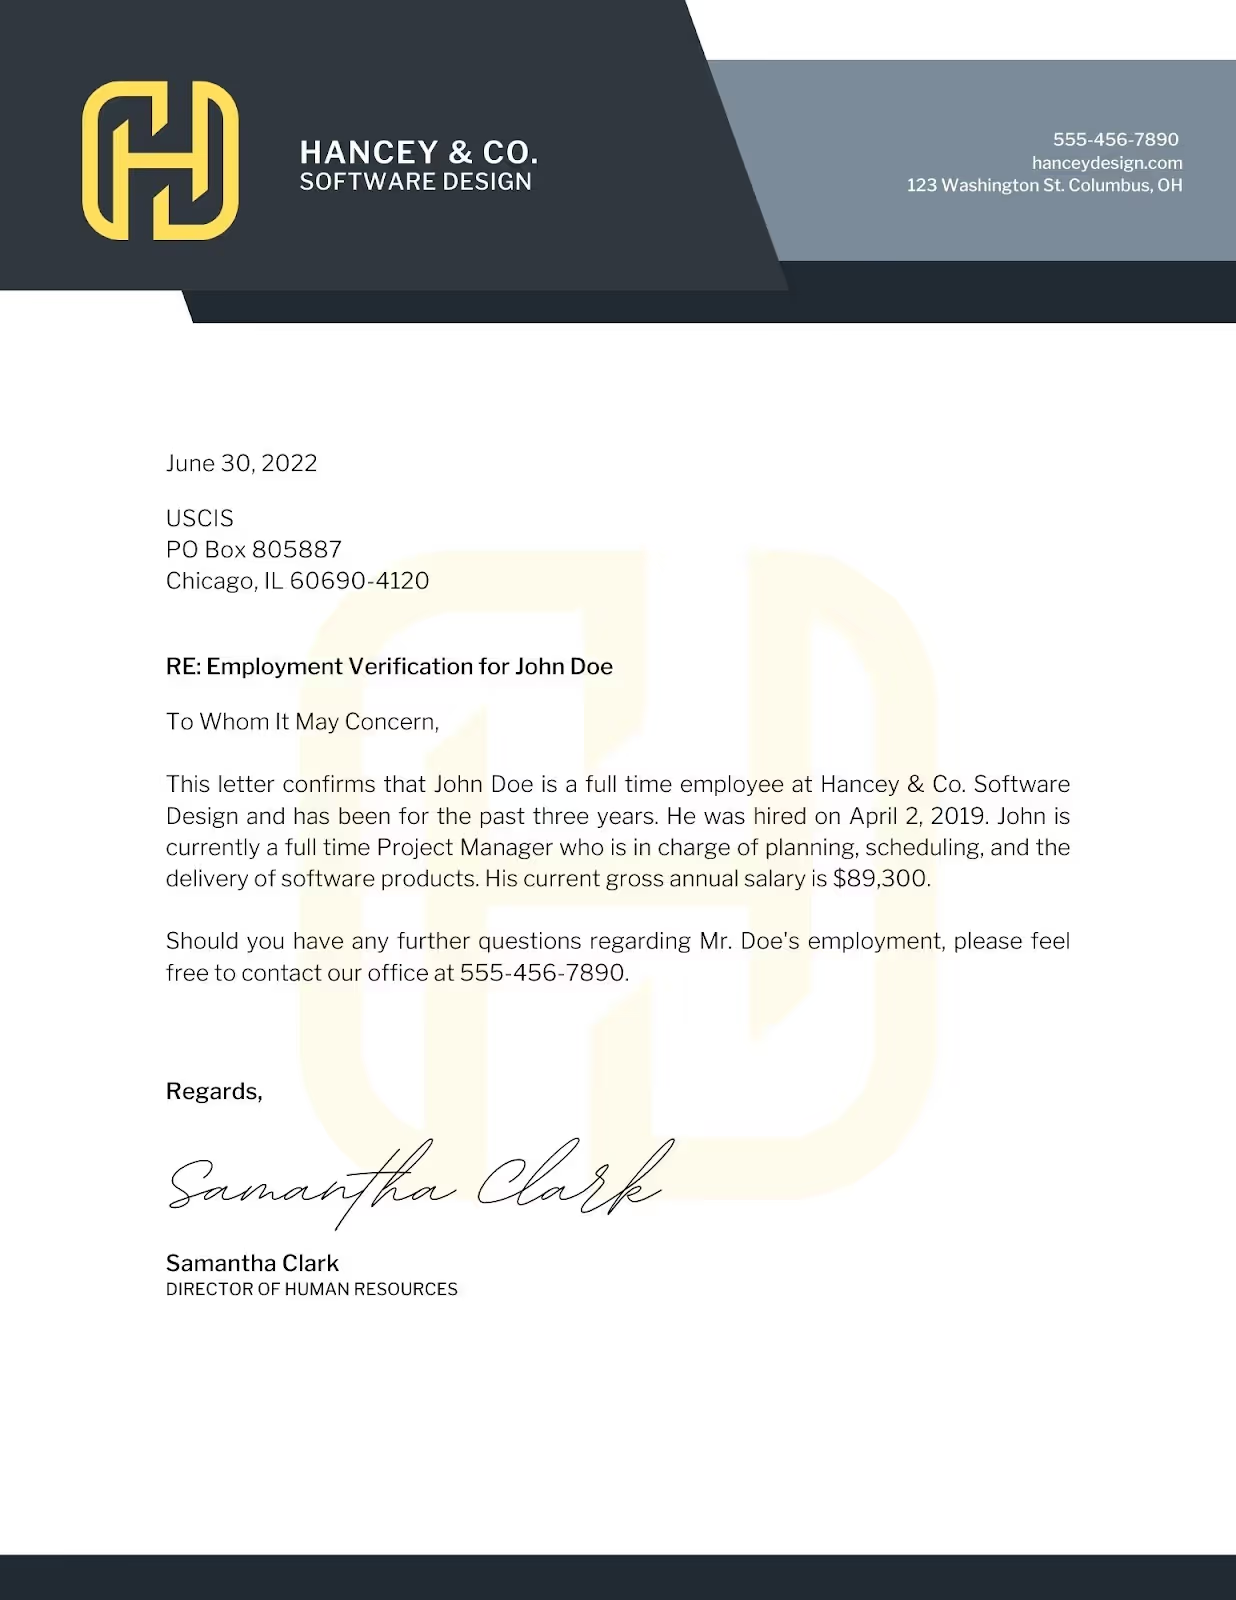
The employment verification letter should be issued by the company's HR department or the direct supervisor of the sponsor.
What type of paper should the letter be on?
The letter should be on official company letterhead.
What information should be included?
- The date that the employer is writing the letter. This should be within 2-3 months of submitting the application, ideally.
- The name, company address, and title of the person writing the letter.
- The employee’s position at the company.
- The date the employee started at the company.
- A description of the employee’s responsibilities.
- The annual salary (preferred) OR weekly rate and average weekly hours of the employee.
- The employee’s current status (part time/full time OR average hours worked per week).
- Wherever possible, a statement of prospective future employment (ie. a statement saying that the company anticipates you working there for an extended amount of time).
- Signature of the writer (HR representative or direct supervisor).
Example of an employment verification letter:
Employment verification letter template:
If you need some help getting started, click here to download a copy of our employment verification letter template.
FAQs:
What if I am self-employed?
When going through the Simple Citizen process, the system will let you select that you are self-employed. It will then ask you a series of questions about your income, job description, and dates of self-employment. The answers to these questions will replace the need for an employment verification letter with a list of new required documents.
What if I have more than one job?
If you have more than one job, you will need to include an employment verification letter for each job that you are currently employed at. You will then add the combined income values on all forms as the total annual income in the questionnaire.
I just started my job – do I still need an employment verification letter?
If you just started your job, adding the original offer letter as well as an employment verification would be the best way to illustrate your current employment to USCIS. USCIS is less likely to accept a sponsor’s documentation as sufficient if they started the job recently. Adding an Employment Verification letter with a statement of prospect of future employment (ie. a statement saying that the company anticipates you working there for an extended amount of time) can help improve your odds.
I have an employment verification letter from 5 months ago. Can I just submit with that one?
Since the overall goal of the employment verification letter is to prove that you are currently employed, you want to make sure the letter is as current as possible. As a best practice, your letter should be dated no more than 2-3 months before your application submission date.
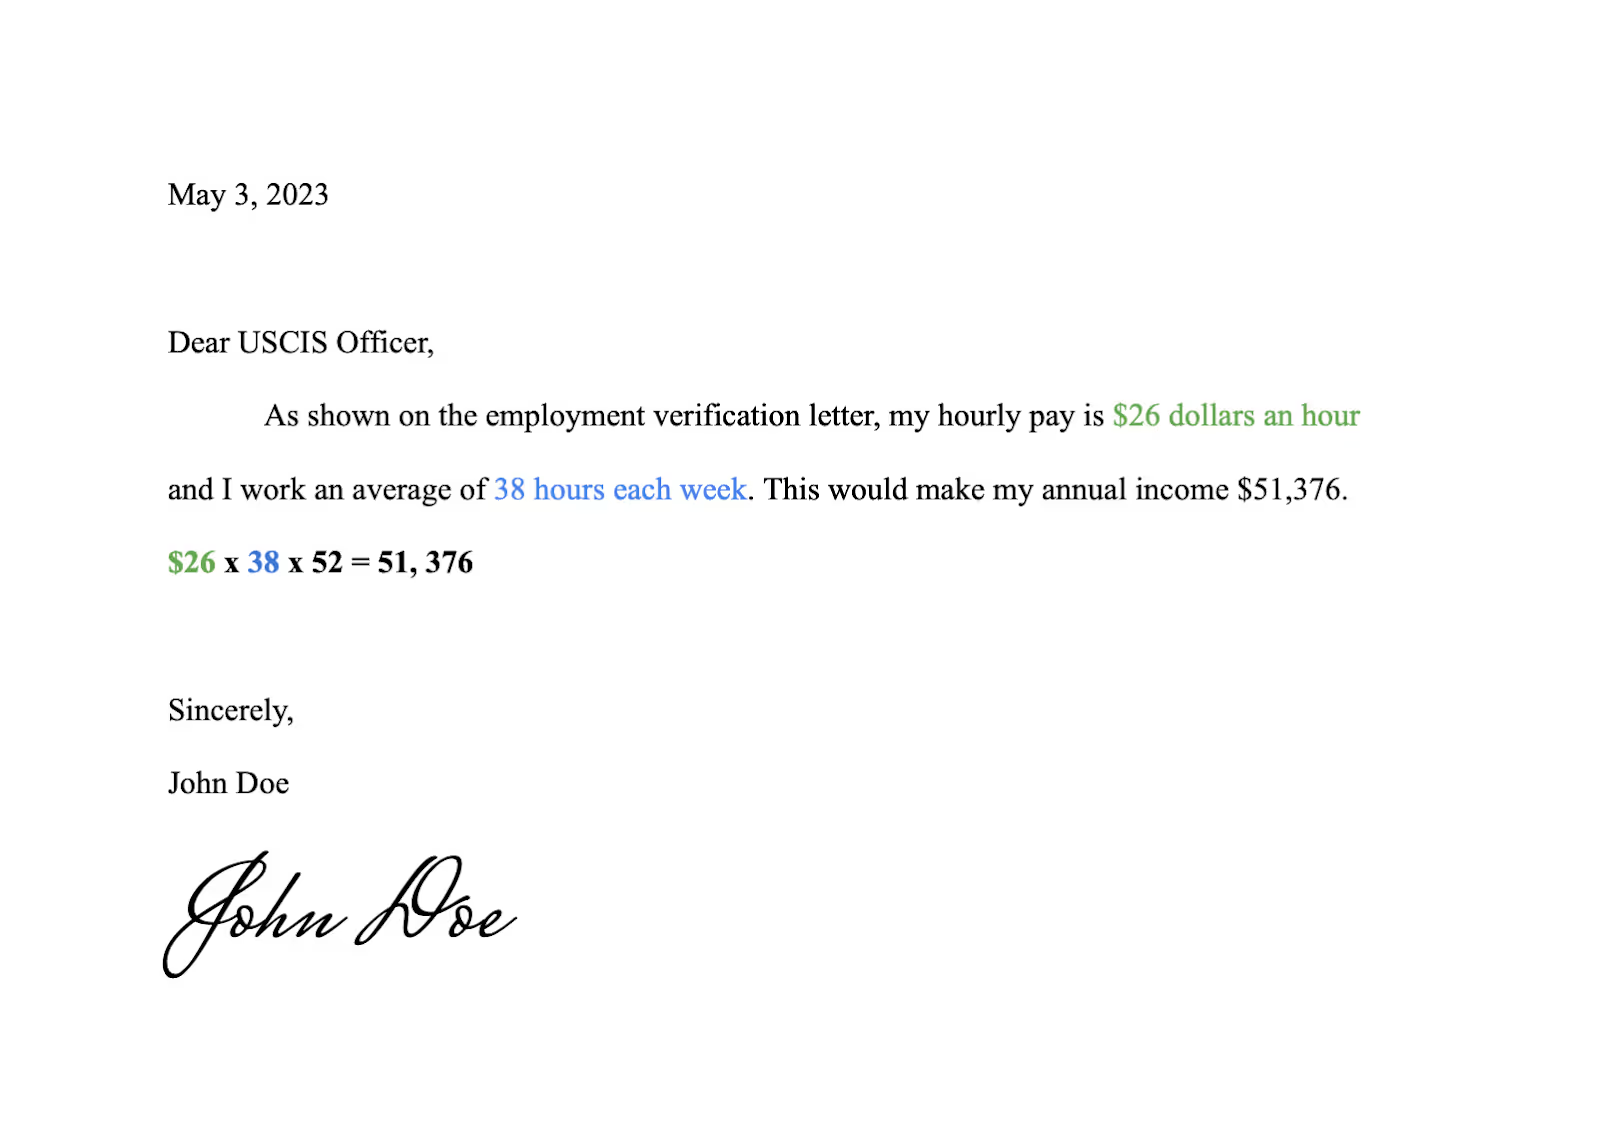
What if I am paid hourly?
If you are paid hourly, you will want to have the author of the letter add your hourly rate and average hours worked each week. If your employer does not include an estimate of your annual income in the letter, best practice would be to also upload a signed conversion letter showing the math used to calculate your annual income.
How to calculate annual income:
Conversion Letter Outline:
“Date
Dear USCIS officer, as shown on the employment verification letter, my hourly pay is _X_ dollars an hour and I work an average of _X_ hours each week.
[hourly pay] x [avg weekly hours] x [52 weeks/year] = a calculated estimated annual salary of _X_.
Name
Signature”
Conversion Letter Sample:
Calculating Current Annual Income for a Sponsor or Joint Sponsor
Understanding current annual income, why it's needed, and how to calculate it.
What is the current annual income and why is it needed?
The current annual income is the projected amount that a sponsor, and when applicable, joint sponsor, will earn that calendar year. Current annual income is calculated before any tax or other deductions and is sometimes referred to as gross income. Tax documents are not used to find the figure for current annual income as they are from a previous year and may not reflect financial changes. The current annual income helps support the claim to USCIS that the sponsor, and when applicable, joint sponsor, meet the financial requirements. The reported current annual income should match the salary figure listed on the employment verification letter (EVL).
Calculating current annual income
Salaried employees:
The current annual income will be your total annual salary. This should be stated on your employment verification letter and reflect on your pay stubs. Please note that bonuses or commission should not be included in this figure because they may not always be consistent.
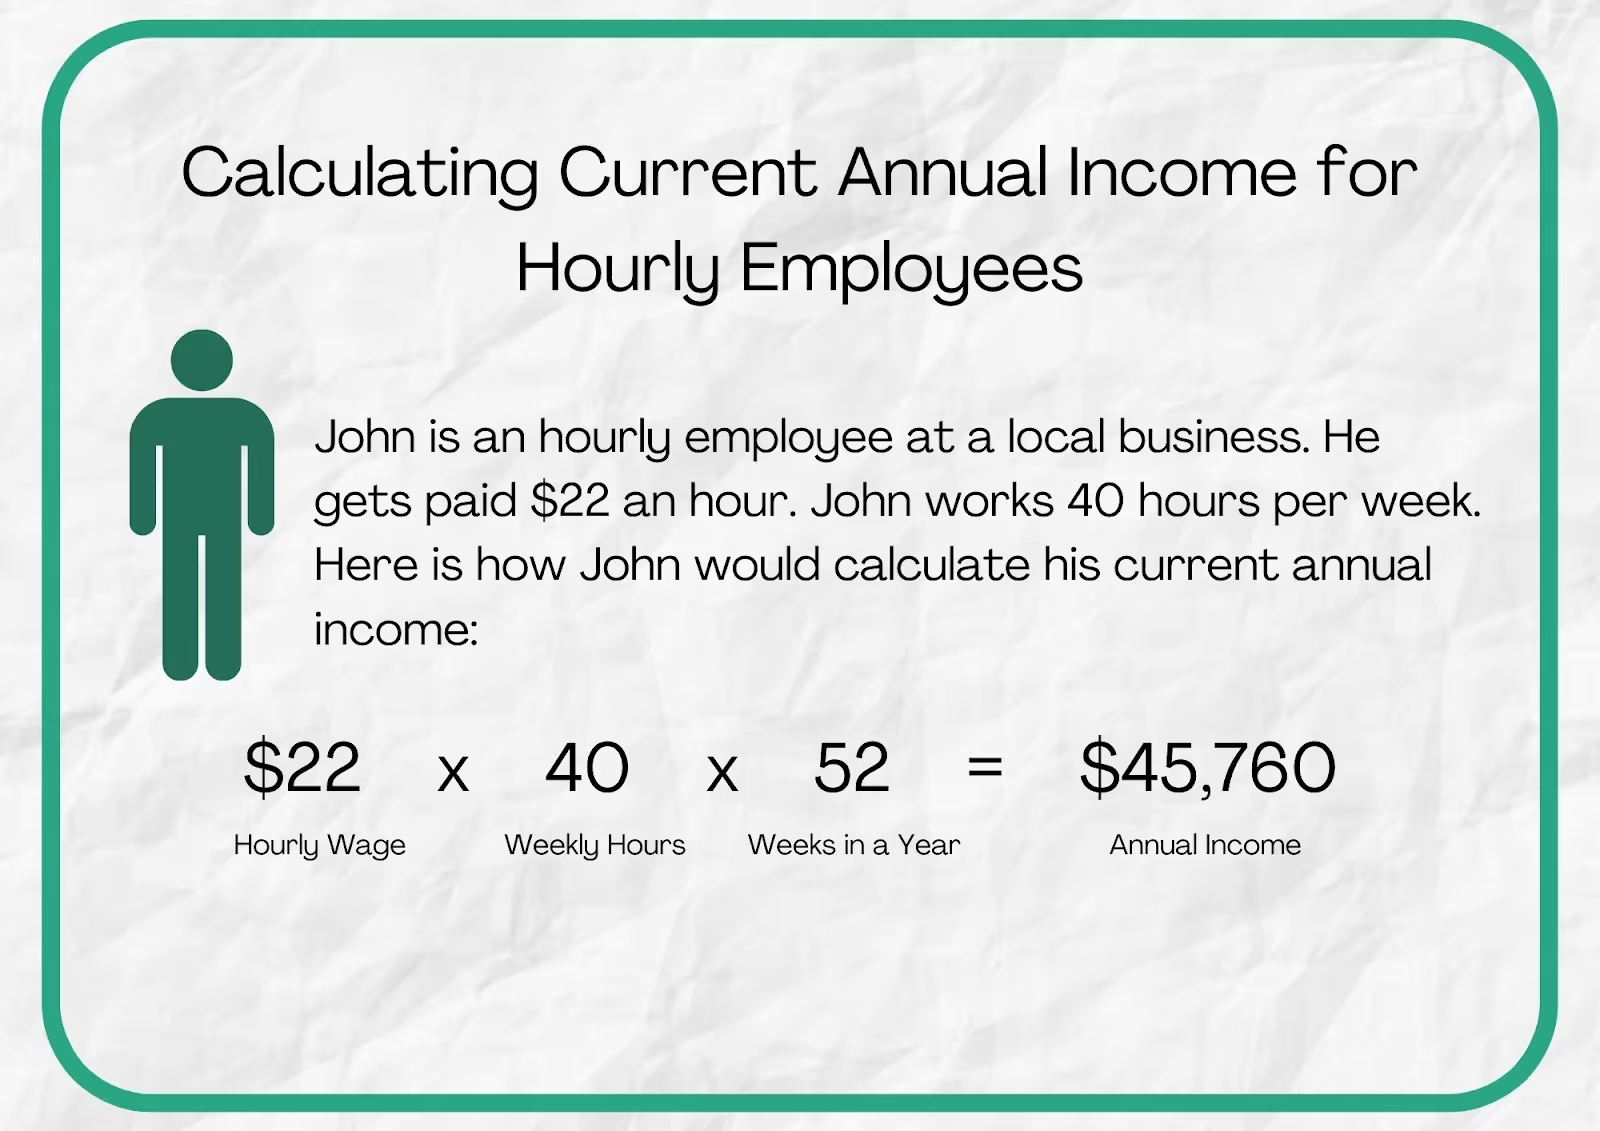
Hourly employees:
Hourly employees will need to calculate their annual income by multiplying their hourly wage by the average number of hours they work each week. Then, multiply that number by the total number of weeks in a year (52).
Example:
FAQ:
What if I have more than one job?
Sponsors that have more than one job should calculate the current annual income for each job individually and then add them together. The total amount is what the sponsor will enter as their annual income. Please note that you will need to provide an Employment Verification Letter and 6 months of paystubs for each job referenced.
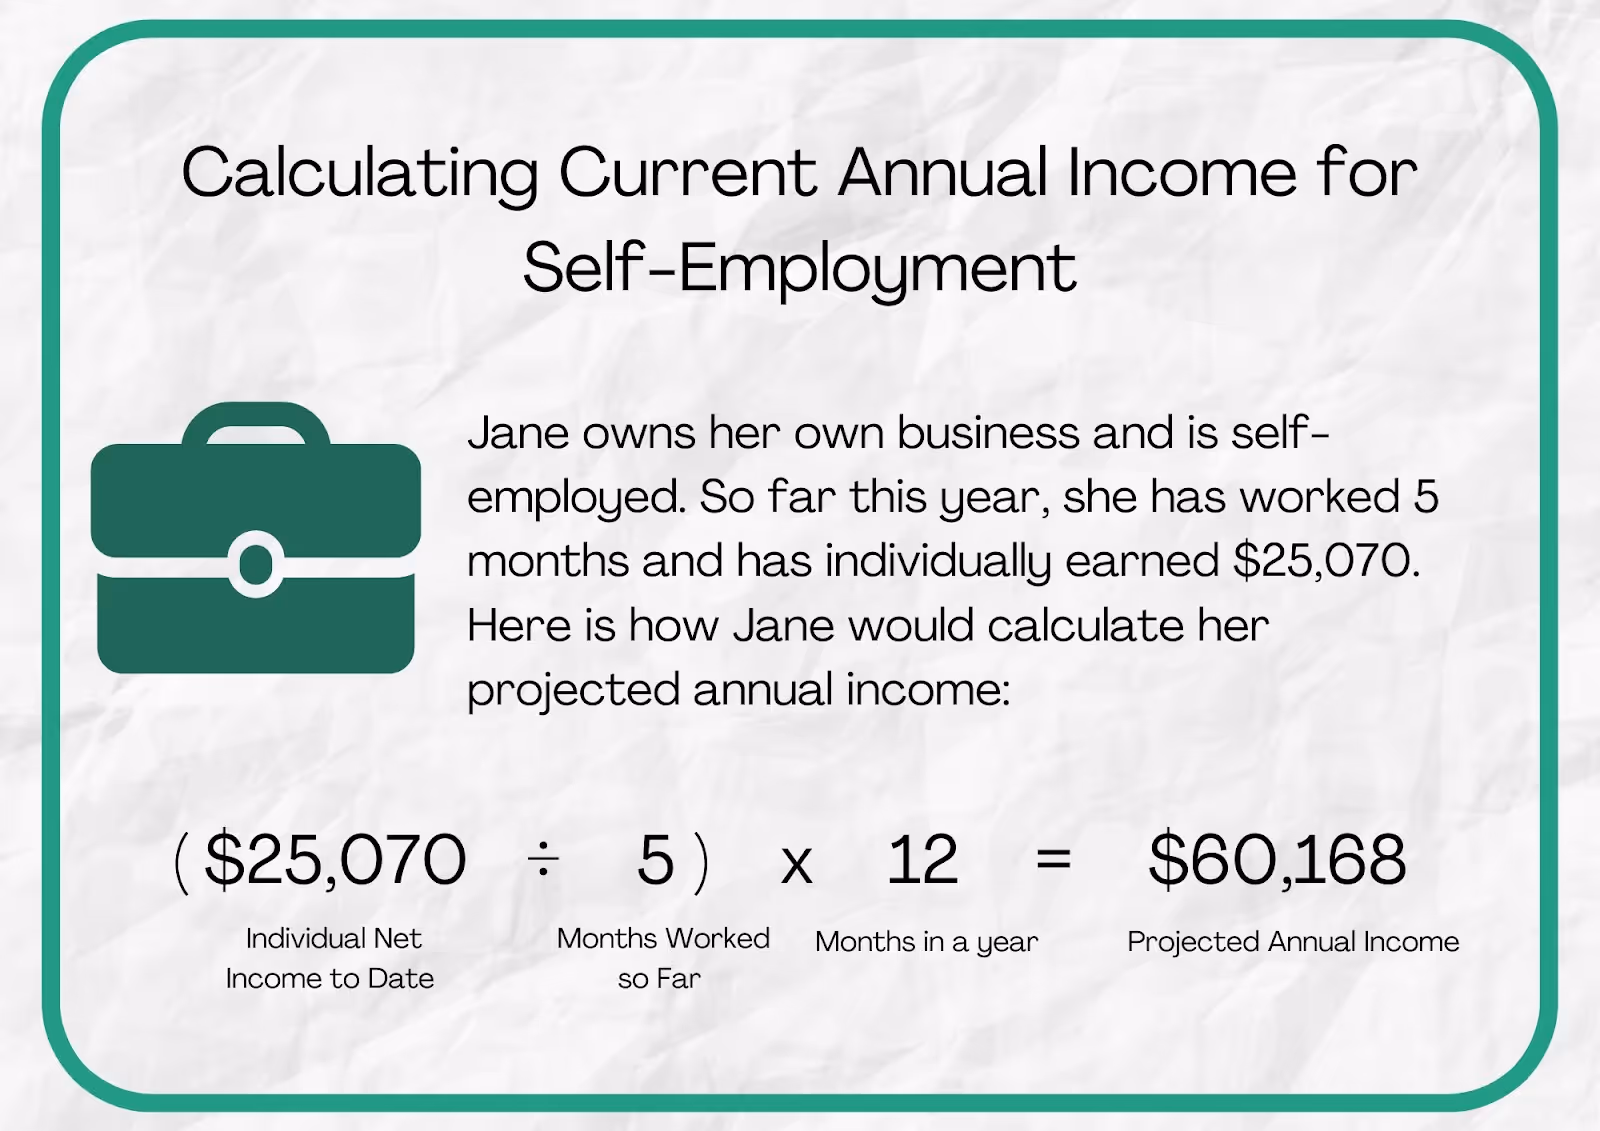
What if I am self-employed?
If the individual is self-employed and does not work consistent weekly hours, they can estimate their income by calculating their monthly average using their net individual (not business) income for the year so far divided by the number of months in the year that have passed multiplied by months.
Example:
My employer only included my hourly wages on my employment verification letter, but not my annual salary. What should I do?
If possible, it is best for your employer to include your annual salary in your employment verification letter. If you are paid hourly, you will want to ask that they include your hourly pay rate and your average hours worked each week. Be sure to add a separate conversion letter that contains the following conversion equation to show USCIS how you calculated your annual income.
Conversion Letter Sample
What is the difference between annual income and total income?
Annual income is the raw income that someone makes before any kind of deductions. Total income (reflected on the 1040 Tax Return and W-2 Form) is the net income that is calculated after all withholdings are accounted for. Please note that when listing your previous tax income history, you will use the total income amount from each tax return. However, for the current annual income, you will want to list your annual income, not your total income.
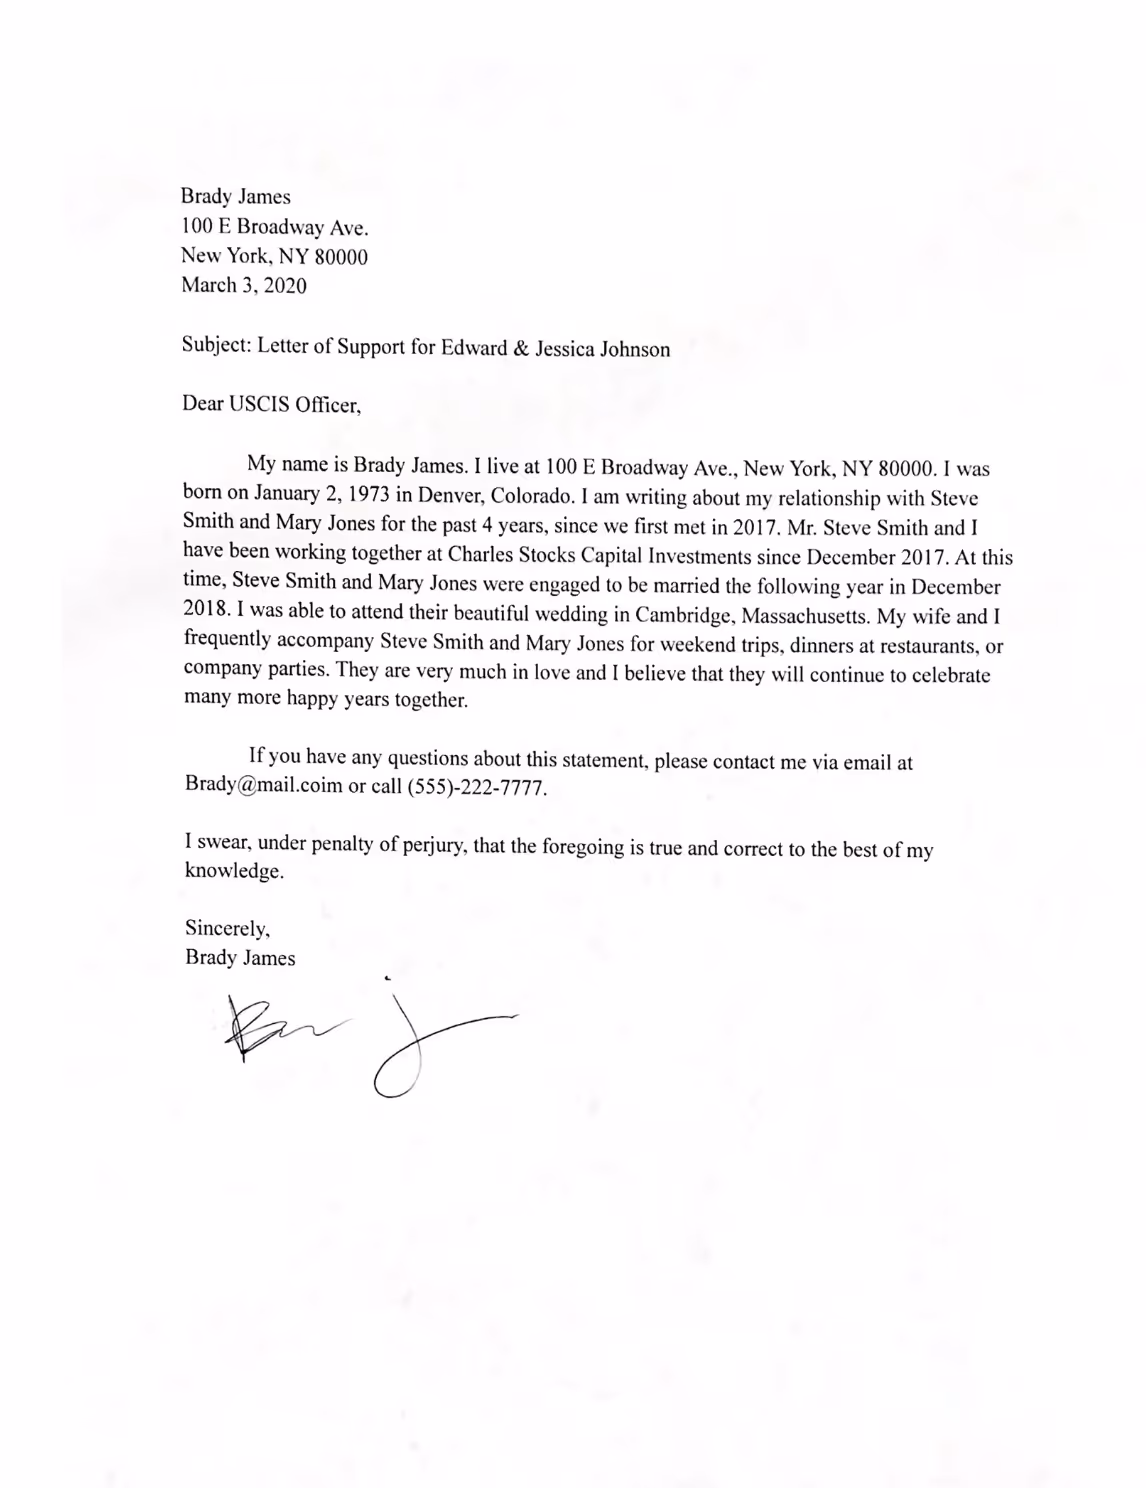
Letters of Support from Friends and Family
Letters of support are statements by friends and family that help support the validity of the marriage
Last Updated: December 28, 2025
What are letters of support and why do I need them?
In marriage-based green card cases, USCIS is looking for evidence of a bona fide marriage. A bona fide marriage is another way of saying a real marriage, entered into in good faith. It is important to prove to USCIS that your marriage is genuine since they are on the look out for fraudulent marriages. Essentially, they want to make sure that an applicant married the petitioner for love and not in pursuit of a marriage-based immigration benefit.
One type of evidence that USCIS allows you to include to help prove that your marriage is legitimate is Letters of Support. Letters of support are statements written by friends and family of the couple that help to demonstrate the validity of the marriage. While letters of support do not replace more concrete evidence such as joint assets or a shared address, they help build up the credibility of the marriage. For that reason, applicants can include some in the Relationship Evidence section of their application to further strengthen their application.
Who can write a letter of support?
A letter of support can be written by anyone who has known the couple from before marriage to present time. The writer should be familiar with the couple’s relationship. Examples of people who could write a letter of support include:
- Family members
- Friends
- Religious leaders
What should be included in letters of support?
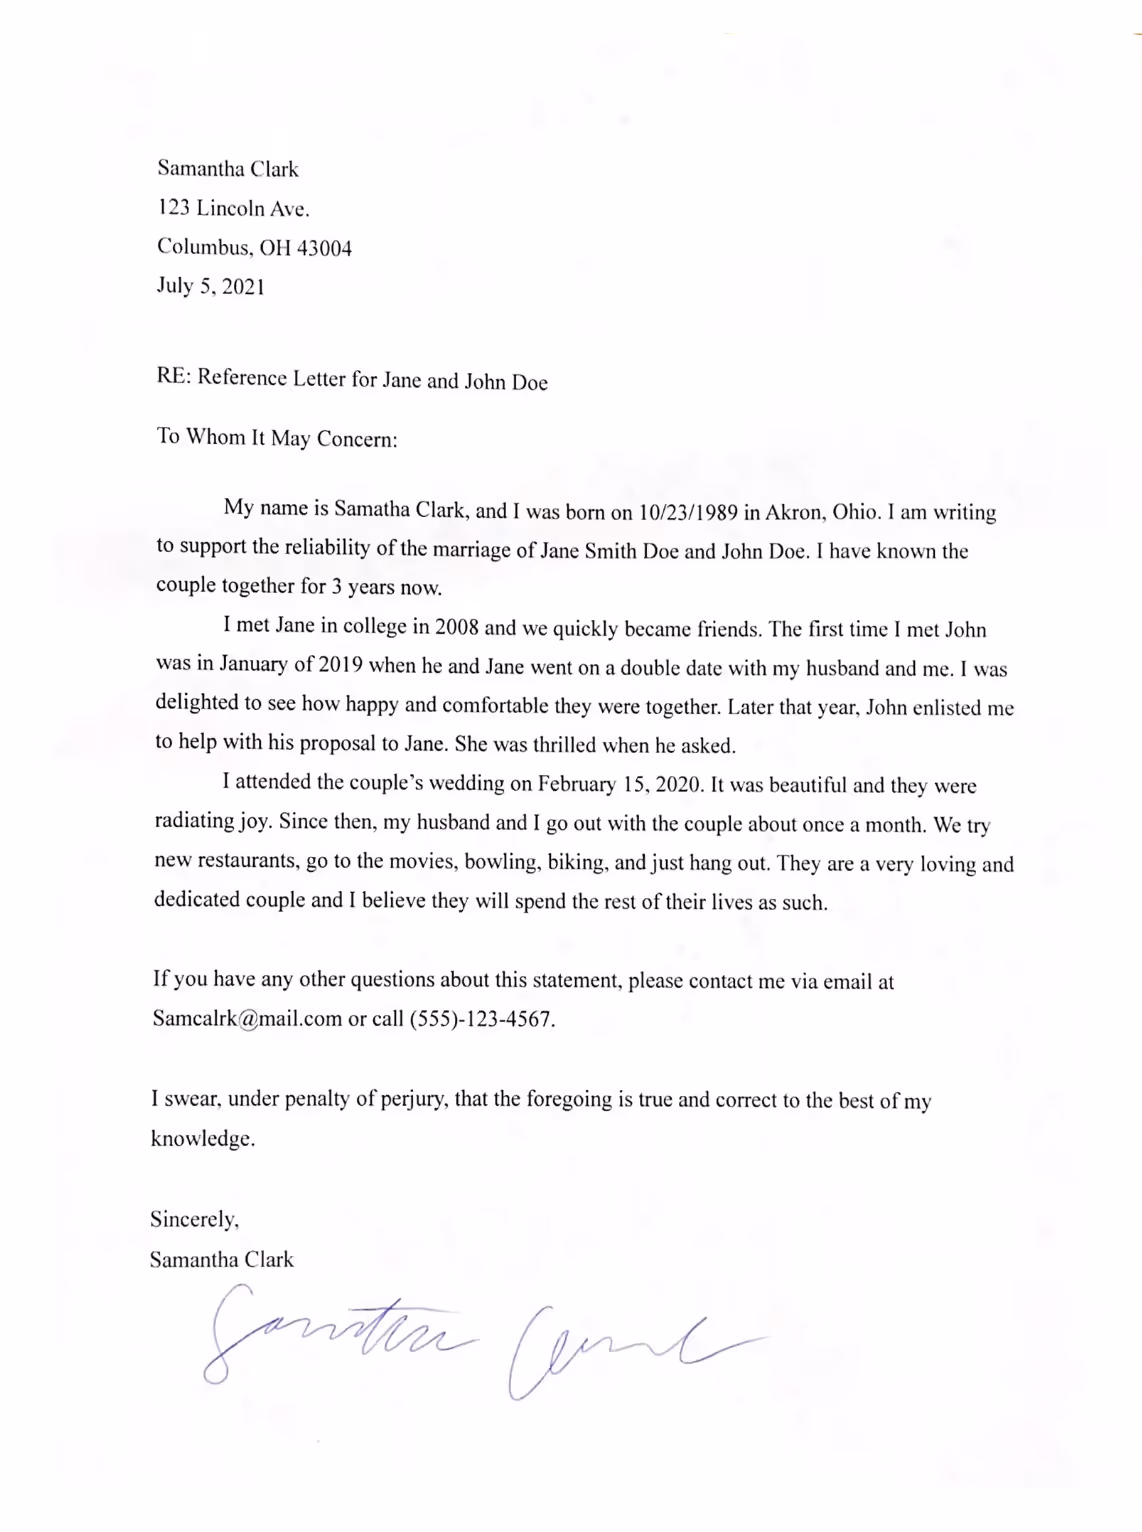
The letter is the writer’s opportunity to explain their experiences with the couple. Each letter of support should be unique. However, there are things that each letter should contain, such as::
- Full name and address of the person writing the letter.
- Date that the letter is being written.
- Date and place of birth of the writer.
- The writer’s experience with the couple:
- How long the writer has known the couple.
- The nature of the relationship between the writer and the couple.
- How often the writer interacts with the couple.
- Descriptions of the interactions or activities between the writer and the couple.
- A written statement that says, “I swear, under penalty of perjury, that the foregoing is true and correct to the best of my knowledge.”
- A copy of the writer’s I.D. on a separate sheet of paper.
- The wet signature of the writer.
Examples:
FAQs:
How many letters of support should be included?
Though USCIS has not officially stated how many letters of support should be included, our partner attorneys recommend that each case include around 3-5 letters of support. Each letter should be unique in both content and style of writing.
Do the letters need to be notarized?
The letters do not need to be notarized. However, it is helpful to include a statement that swears to the validity of the letter such as, “I swear, under penalty of perjury, that the foregoing is true and correct to the best of my knowledge.”
Does the writer need to be a citizen of the United States?
No, the writer does not have to be a U.S. citizen or even living in the United States.
Does the letter need to be translated into English?
If the letter is in a language other than English, you will need to include a translation of the letter into English along with the original letter. It does not need to be a certified translation, but the translator should include a signed, written personal statement that they are fluent in both languages and that the translation appropriately reflects the document. Here’s an example of what that could look like:
Translation Letter Sample:
Date
I (the translator’s full name), certify that I am fluent in English and have translated (list the specific documents here) from (language) into English as completely and accurately as possible. I’ve attached both the copy of the original document and the translation here.
Sincerely,
Full Name
Physical Mailing Address
Signature
Calculating Current Annual Income- Multiple Jobs in a Calendar Year
Calculating Current Annual Income- Multiple Jobs in a Calendar Year.
Last Updated: October 5, 2022.
When reviewing your annual income, USCIS will consider not just a sponsor’s current income, but also how long they have been with their current employer and how much they will make throughout the current year. Because of this, if a sponsor has had multiple employers during the current calendar year many people find the most success with USCIS when they report not just their current job’s income, but also their projected income for the calendar year based on both past and current jobs. This projected income should be as accurate as possible and should be supportable with evidence.
Note: When determining annual income, USCIS only considers an individual’s base salary. Overtime, bonuses, stipends, tips, commissions, or other irregular sources of income are not guaranteed to be paid and will not be considered by USCIS.
We know this can be complicated so we are here to help give you examples and guide you through the process.
How to calculate a sponsor’s projected annual income
To calculate their annual income the sponsor will list all jobs they have held throughout the current calendar year and determine what their year-to-date earnings were for each of their jobs. If they have multiple current jobs they can all be added in this list of jobs. Then, they will calculate how much they anticipate earning with their current job from their start date to the end of the year.
Let’s show an example to see what this could look like:
Sarah has had 3 different jobs during the current calendar year.
Job #1: Sarah was at this job from January - April: Her last pay stub showed a year to date income of $7,040.
Job #2: Sarah was at this job from June - August: Her last pay stub showed a year to date income of $5,600.
Job #3 (Current): Sarah started this job in September. She makes $15 an hour and works an average of 15 hours a week. From the time Sarah started her job to the end of the year there are 17 weeks in the year. Sarah can calculate her projected income at this job by multiplying her weekly average earnings ($15 x 15 hours = $225 weekly) by the 17 weeks she will work at this job in the year. This makes her project income $3,825.
To calculate annual income Sarah will then add those job positions together to calculate her current annual income.
$7,040 + $5,600 + $3,825 = $16,465
Sample Projection Letter
Here is a sample projection letter that can be used to clearly map out this income for USCIS so they can see how this income was calculated. At the bottom of this article there are links to PDF and a Docx versions of this template letter.
In addition to creating a letter that projects their income following the above sample, the sponsor can also add proof of income for all jobs added from the year.
Documentation
USCIS wants to see proof of the reported annual income. Here is what our partner attorneys recommend:
- Last 6 months of pay stubs. If the sponsor has changed jobs during that time it is recommended to add all pay stubs from that time period, even if from a previous employer.
- Final 2 pay stubs from any previous employers the sponsor has had in the calendar year. This is so USCIS can see their YTD earnings from those jobs and verify the annual income.
- Employer Letter from the sponsor's employer on company letterhead. It should state their title, start date, and annual salary. If they are paid hourly it is recommended that they report hourly rate, average weekly hours worked, and what that makes the sponsor's annual income. Many companies have automated processes for generating these letters. Often they can consult with their Human Resources Department to get that letter issued.
- If they have had multiple jobs, include a projected income statement following the template discussed above.
Interpreters at Your Interview
Understanding some of the basics for bringing an interpreter to USCIS interviews.
An applicant (also referred to as a "beneficiary") may not be fluent in English and may require the use of an interpreter at the adjustment interview.
At the adjustment interview, the interpreter should:
- Present their valid government-issued identity document
- Complete an interpreter’s oath and privacy release statement
- Translate what the officer and the applicant say word-for-word to the best of their ability without adding the interpreter’s own opinion, commentary, or answer
In general, a disinterested party should be used as the interpreter.
The USCIS officer conducting the interview may exercise discretion, however, to allow a friend or relative of the applicant to act as interpreter. If the officer is fluent in the applicant’s preferred language, the officer may conduct the examination in that language without use of an interpreter.
USCIS reserves the right to disqualify an interpreter provided by the applicant if the officer believes the integrity of the examination is compromised by the interpreter’s participation or the officer determines the interpreter is not competent to translate.
Translating Your Immigration Documents into English
Information about translations, certified and self-translated.
USCIS applications often require that the applicant submit documentation to support and verify information in their application. All documents submitted as part of an application must be in English, or, if in another language, translated into English.
The Code of Federal Regulations (8 CFR 103.2(b)(3)) states that any document containing a language other than English must include a full English translation by a certified translator. The translator must certify that the translation is complete and accurate, and that they are competent to translate from the foreign language into English.
Does this mean you need to hire a professional translator, or pay for a third-party translation service online? Not necessarily! The information below outlines which documents need to be translated and who can translate them, as well as explains the translation services offered by SimpleCitizen at no extra cost to customers.
Examples of documents that often require translation include:
- Birth certificates
- Death certificates
- Marriage certificates
- Divorce decrees
- Relationship Evidence
- Adoption certificates
- Military documents
- Police records
- Court dispositions
- Other evidence
Who can translate a document?
USCIS requires that your documents be translated by an individual or organization that is competent in both English and the language in which the document is written.
Some documents, like official government-issued documents required to be included with an application (e.g., birth certificates, marriage certificates, etc.), must include an official, certified translation. A company commonly used by SimpleCitizen customers is RushTranslate. However, feel free to shop around to find the certified translation service that best meets your needs, timeline, and budget.
Other documents, like relationship evidence (hand-written cards, text messages, social media posts, etc.) can be self-translated. This means that the beneficiary or the petitioner of an application may translate a document into English, as long as they include a signed certificate of translation as described below.
Certified self-translation letter requirements and template:
For self-translations, the person translating the document must certify that:
- They are fluent in both languages
- The translation is complete and accurate.
This can be done through a separate letter attached to the translation. This letter must include the translator’s full name, physical mailing address, signature, and the date the translator wrote the letter. It is recommended that this letter is typed, and not handwritten.
Applicants who need to translate their own documents (i.e, relationship evidence like text messages, cards from friends/family, travel itineraries, etc.) will need to certify that they are fluent in both English and the language the document is written in. Below is an example template of a certified translation letter. This letter can be included with the translation in order for the translator to certify that they are competent to translate the foreign language in the document to English.
Translation Certification Template
I, [translator’s name], certify that I am fluent (conversant) in English and [foreign language], and that the attached translation is an accurate translation of the attached document entitled [name of document].
[Translator’s Signature][Translator’s Typed Name][Date][Address]
Does SimpleCitizen offer translation services?
SimpleCitizen packages include translations of all official, government-issued documents required for your application (birth certificates, marriage certificates, final divorce decrees, police records, etc.) by an authorized translation service with an official certificate of translation. This service is offered with your application package at no additional cost!
Are there any document types that SimpleCitizen cannot translate?
SimpleCitizen’s translation service is able to translate official, government-issued documents that are required for your application. However, our translation service cannot translate relationship evidence (hand-written cards, text messages, social media posts, etc.) Please see the “Who can translate a document?” section above for information about how to self-translate relationship evidence documents!
Due to HIPAA regulation, SimpleCitizen is also unable to translate vaccination records and other medical documents for the Form I-693 (Report of Medical Examination and Vaccination Record). However, if your vaccination records are not in English, please note that they will need a certified, official translation in order to submit them for the medical exam. Reputable online translation services like RushTranslate are great resources for translating your vaccination records!
We’re happy you’re here!
Simple Citizen is here to help you achieve the American dream. Safely and accurately apply, submit, & stay on top of your immigration status, from your visa to your naturalization.
Click here to learn more about what we do, our application assistance timeline, and what customers say about SimpleCitizen’s services.
Click here to start your application.
Do you have a question about SimpleCitizen’s application packages? Let’s chat!
How to get the required vaccinations or file for an exemption
This article provides information about the basic vaccination requirements for immigrating to the USA.
Last Updated: March 20, 2025.
As you may already know, applying to immigrate to the United States requires a medical examination with a USCIS certified doctor. To learn more about this medical examination and it’s Form I-693, Report of Medical Examination and Vaccination Record, read our article here. It serves as a precursor to this article.
Part of the medical examination requires doctors to check that you are up-to-date on all vaccinations designated as mandatory by USCIS and CDC. This article provides information about the basic vaccination requirements for those hoping to immigrate to the United States as well as describes what actions are required to opt-out of these requirements. For further information on vaccination requirements, check out some of the FAQ’s on the USCIS website.
Overview
Which vaccinations are required?
Under US immigration law, all immigrants, including those seeking permanent resident status, are required to receive vaccinations to prevent the following diseases:
- Haemophilus influenza type B
- Hepatitis B
- Measles
- Mumps
- Pertussis
- Polio
- Rubella
- Tetanus and Diphtheria Toxoids
- Any other vaccine-preventable diseases recommended by the Advisory Committee for Immunization Practices
- Influenza
- Rotavirus
- Hepatitis A
- Meningococcal disease
- Varicella
- Pneumococcal disease
The influenza vaccination requirement is unique in that it is only required during the flu season since it is strain-specific and only available for a limited time each year. For the purposes of the Form I-693, the flu season is considered to be from October 1st - March 31st. If applying during this window, the influenza vaccination is required.
Going to your appointment
You should bring the following items with you:
- Official vaccination or immunization record.
- Form I-693, Report of Medical Examination and Vaccination Record. Print out and bring the form to your appointment. Fill out Part 1 of the form but do not sign it until the civil surgeon tells you to do so.
- Government-issued I.D., such as a valid passport or driver’s license.
- Medical insurance card. Check with the doctor’s office to see if they accept your medical plan.
- Payment. Check with the doctor’s office about acceptable forms of payment
Remember to bring your up-to-date vaccination history with you to your appointment.
If you have lost or misplaced your vaccination history, contact your doctor or public health clinic to see if they have a copy. You can also contact your state’s health department if you are living in the United States to see if they keep vaccination records. For children, check with previous schools or daycares as they may have a copy as well.
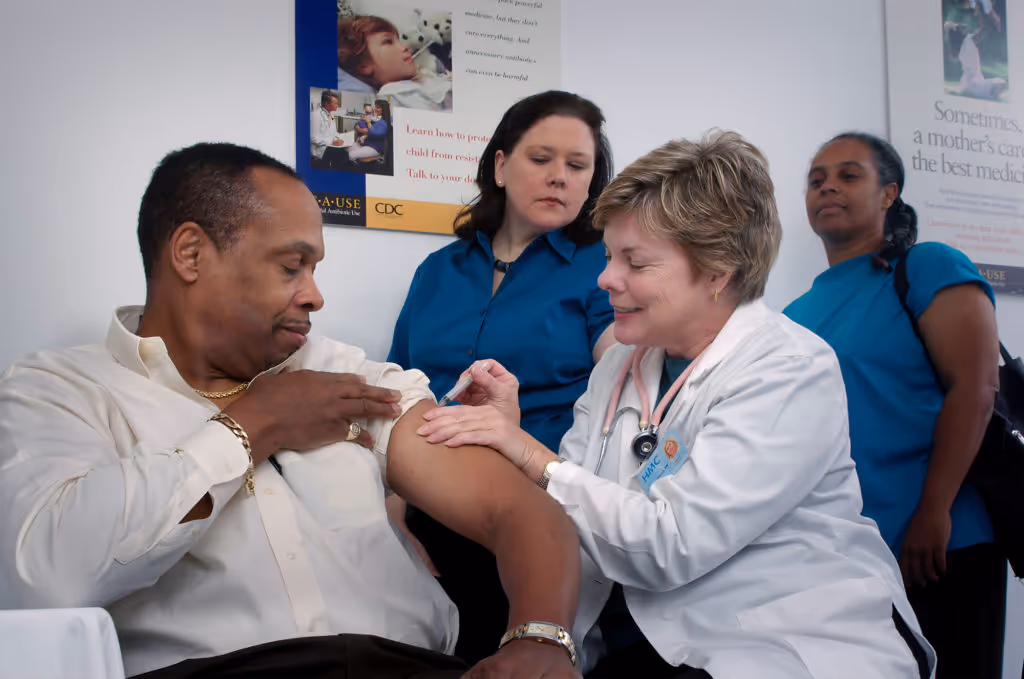
Vaccination Assessment
During your appointment, the civil surgeon or panel physician will review your vaccination history with you to determine whether or not you have received all of the required vaccinations. This is why it is so important to remember to bring an official record of your vaccination history with you to your appointment. The results of this evaluation will be recorded on your Form I-693.
If you are up to date on the required vaccines, no additional vaccines will be required at the time of the medical exam.
If you do not have the required vaccinations
If you are not up-to-date on all of the required vaccinations, don't worry! The civil surgeon or panel physician can often provide them and can help you determine which ones are appropriate for you. You also have the option to ask your family doctor to administer the required vaccines to you after your evaluation. If you choose the latter option, you will need to show the records of these vaccinations to the civil surgeon or panel physician to note on Form I-693 in order to complete the form prior to submitting it to USCIS.
Additionally, some of the required vaccine series require months to years to complete. This can make it difficult for applicants to receive all required vaccinations prior to adjustment of status or immigration. For many of these USCIS only requires that you have at least one dose of each age-appropriate vaccination listed as mandatory.
Talk to your doctor before you get vaccinated
Some people may not be able to get vaccinated — or may need to wait.
The day of your appointment, tell your doctor if you:
- Have any allergies
- Have had serious side effects from a vaccine in the past
- Are pregnant or planning to get pregnant
- Are sick
Vaccination Costs
While USCIS does not charge a filing fee for Form I-693, fees for the medical examination are set and charged by the doctor administering the test. Usually these examination fees range from $100 to $500. You can shop around to find the best price. In addition to the examination fee, you will also need to pay for any additional vaccinations needed to meet USCIS requirements.
As can be expected, the costs of these vaccinations will depend largely on how many and which vaccinations you need. It will also depend on the country in which you are getting vaccinated, the clinic you are attending, and what type of health-insurance you have. You can expect to pay anywhere from $25-$150 for each vaccination before insurance is factored in. Clinics often list which vaccinations they carry and how much they charge, so feel free to shop around for the best price!
Vaccination Exemptions
There are a wide variety of reasons why someone may not have or may not wish to receive certain vaccinations.
Individuals can be exempted from immunization requirements for reasons such as age, health, pregnancy, as well as their moral convictions and religious beliefs. To find a more detailed list of potential exemptions, check out this list from the USCIS.
Blanket Waiver - “Not Medically Appropriate” exemptions
Some people qualify for something called a “Not Medically Appropriate” exemption, often referred to as a blanket waiver. According to the USCIS website, this applies to:
- Vaccinations that would not be safe to receive due to a medical condition such as pregnancy, allergies, or a previous bad reaction to that vaccine.
- Vaccinations that are not required based on the applicant’s age at the time of the medical exam.
- Vaccinations that are administered as a series in intervals, but there is insufficient time to complete the entire series at the time of the medical examination. (The individual is often required to have at least the first round of the series)
- The influenza vaccine if it is not the flu season.
If you meet one or more of these criteria, the civil surgeon or panel physician will indicate this on the Form I-693 and USCIS can then waive that requirement.
A separate waiver application is not required for these specific exemptions. In other words, no additional form is needed for an officer to grant a blanket waiver for the vaccination requirement.
To learn more about vaccination requirements for pregnant women, see the CDC’s "Guidelines for Vaccinating Pregnant Women" page. For more detailed information regarding age-specific vaccinations, check out the CDC’s information on age requirements.
Moral or Religious Exemptions
For exemptions that do not meet the “Not Medically Appropriate” criteria, an individual must file a separate waiver application. This specifically applies to those who object to required vaccinations because of sincerely held moral convictions or religious beliefs. The required waiver is Form I-690, Waiver of Grounds of Inadmissibility. If you plan to apply for this waiver, inform your civil surgeon or panel physician.
Please note that I-690s have a higher rejection rate. If denied, USCIS will require you to complete the medical exam which could delay the approval of your case.
Form I-690, Waiver of Grounds of Inadmissibility
What is it?
This form is used to apply for a waiver of inadmissibility. It can be used by applicants for a number of reasons, including to waive the vaccination requirements. This waiver of the vaccination requirement is specific to those who wish to be exempted due to moral convictions or religious beliefs. For additional information on this form and its potential uses, refer to this USCIS web page. This link also provides you access to the PDF version of form I-690.
Cost
As of September 2021, the filing fee for this waiver form was $715.00 usd.
Waiver Requirements for Vaccination Exemptions
USCIS, in consultation with CDC, has established the following requirements that an applicant has to demonstrate through documentary evidence to qualify for this exemption:
- The applicant must be opposed to all vaccinations in any form. They cannot pick and choose which vaccinations they want. However, it is important to note that having some vaccinations but not others does not automatically result in the denial of the waiver. The officer should consider the reasons provided for getting certain vaccines and not others such as whether the individual’s moral convictions or religious beliefs have changed substantially since the date the vaccinations were given.
- The objection must be based on religious beliefs or moral convictions.
- The religious belief or moral conviction must be sincere. The focus of the waiver adjudication will be largely based on whether or not you can demonstrate that the religious belief or moral conviction is consistently applied in your life. This strict adherence is considered to be distinct from mere preference.
Evidence
Evidence of these religious beliefs or moral convictions may be established in two primary ways:
- Through the applicant’s sworn statement
- Through additional evidence that supports that sworn statement
The minimum requirement is that you include a personal statement describing the reasons behind your objection. Make sure you include enough information in your statement to adequately demonstrate that you meet the three criteria listed above.
An example of supporting evidence would be providing evidence of regular participation in a congregation by submitting affidavits from congregation members or evidence of regular volunteer work.
How to File Form I-690
When you file this form you must submit all evidence and supporting documentation required. You will also need to include the filing fee of $715.
Fill Out On a Computer
Download and view in a PDF viewer.
Print & Fill Out Paper Form
Print the PDF and fill by hand with black pen.
Hire a Legal Professional
Find a legal professional to complete the form.
Have questions about Vaccination Requirements and Exemptions?
For additional information on your medical examination and form I-693, refer to our article How to Complete a Medical Examination.
If you need help or have questions about vaccination requirements, exemptions, or Form I-690, please leave a comment or reach out to our team and we’ll get back to you shortly.
Perhaps it may be found within a different category.