Frequently Asked Questions
Find answers to some of our most Frequently Asked Questions
Do You Meet the Requirements To Be a Sponsor?
Learn about the requirements for sponsoring a green card applicant here.
Last Updated: Feb. 7, 2020.
Do you have a family member that is applying for legal permanent residency?
Are you going to be the sponsor? Do you meet all the requirements to be a sponsor?
This guide will help you figure out if you meet the requirements for being a sponsor.
What is a financial sponsor?
Being a financial sponsor to an immigrant means the U.S. Government will consider your income and assets (such as checking and savings accounts, stocks, bonds, or property) as available to support the potential immigrant.
Who can sponsor? Who needs a sponsor?
You may sponsor a relative, an employee, or a prospective or currently adopted child wishing to immigrate to the United States. If you filed an immigrant visa petition for your relative, you must be the sponsor.
Anyone applying to be a permanent resident through a family member must have a financial sponsor. A sponsor is also required for a family member coming to work for a relative, or for a company in which a relative owns 5 percent or more of the company.
Am I eligible to become a sponsor?
To qualify to be a financial sponsor for a green card applicant, you must meet the following requirements:
- You must be at least 18 years old and a U.S. citizen or permanent resident.
- You must have a domicile in either the U.S. or a U.S. territory or possession (i.e. you must live there).
- You must prove an income level at or above 125 percent of the Federal poverty level (100 percent for active duty military personnel).
- You must submit an affidavit of support, which can be done by submitting Form I-864.
Income requirement to be a financial sponsor?
You must prove an income level at or above 125 percent of the Federal poverty level. (For active duty military personnel, the income requirement is 100 percent of the poverty level when sponsoring a husband, wife, or children.) Federal poverty levels are updated each year by the Department of Health and Human Services.
You can check current minimums at their website at www.aspe.hhs.gov.
What is Form I-864?
Form I-864 acts as an affidavit of support, which is a document an individual signs to accept financial responsibility for another person, usually a relative, who is coming to the United States to live permanently. The form proves that the immigrant has the financial means to live in the United States without needing welfare or financial benefits from the U.S. government. The person who signs the affidavit of support becomes the sponsor of the relative (or other individual) coming to live in the United States. The sponsor is usually the petitioner of an immigrant petition for a family member.
As the sponsor, you should fill out Form I-864 when your relative is about to submit an application for adjustment to permanent resident status with the USCIS or with an Immigration Court in the United States.
What if I don't meet the financial requirements?
If your income alone does not meet the requirement, your assets (such as checking and savings accounts, stocks, bonds, or property) may be considered in determining your financial ability. You may also submit the I-864 as a joint sponsor or a substitute sponsor.
What is a joint sponsor?
A joint sponsor is someone who is willing to accept legal responsibility for supporting your immigrating family member with you. A joint sponsor must meet all the same requirements as you; however, the joint sponsor does not need to be related to the immigrant.
The joint sponsor (or his or her household) must reach the 125% income requirement alone. You cannot combine your income with that of a joint sponsor to meet the income requirement.
Does a joint sponsor also need to fill out I-864?
Yes, a joint sponsor must also fill out Form I-864. Additionally, if you are using the income of other household members to qualify, then each household member must complete a separate Form I-864A.
What documentation do I need to fill out Form I-864?
You must provide the following documentation to fill out Form I-864:
- Your U.S. federal income tax return for the most recent tax year.
- Proof of current employment.
How do I submit Form I-864
Upon completing Form I-864, compiling the necessary documentation, and having the affidavit (or form I-864) notarized in the United States or before a U.S. consular or immigration officer, you should provide this packet of information to your relative to submit with his or her application for permanent resident status. If you are given specific instructions to file your affidavit of support directly with the National Visa Center, you should follow those instructions.
What is the cost to submit Form I-864?
There is no filing fee. However, the National Visa Center (NVC) does send the sponsor a processing fee before the case will be processed.
How long am I responsible for the immigrant?
The sponsor's legal financial responsibility usually lasts until the immigrant either becomes a U.S. citizen, can be credited with 40 quarters of work (usually 10 years), leaves the U.S. permanently, or dies.
Do I need to inform USCIS if I move or change addresses as a sponsor?
Yes, by legal requirement. If you change your address, you will need to file a Form I-865, Sponsor’s Notice of Change of Address, within 30 days after the date of your move.
What if I fail to provide financial support?
An affidavit of support is legally enforceable against a sponsor. If a sponsor does not provide basic support to the immigrants they sponsor, the individuals sponsored may receive “means-tested public benefits.” If the individual you sponsored receives any of these public benefits, you are responsible for repaying the cost of those benefits to the agency that provided them. If you do not repay the debt, the agency or sponsored immigrants can sue you in court to receive the money owed. When the immigrant sues, he or she can collect enough money to bring his or her income up to 125% of the amount listed in the U.S. government’s Poverty Guidelines.
Additionally, bankruptcy does not necessarily terminate a sponsor’s I-864 obligations. While most debts and contractual obligations are dischargeable in bankruptcy, “domestic support obligations” are not dischargeable. Such obligations are defined as alimony, maintenance, or support owed to or recoverable by one’s spouse, former spouse, or child. By United States court decisions, these also include I-864 support obligations.
Forms for Financial Sponsorship
- Form I-864 | Affidavit of Support Under Section 213A of the INA
- Form I-864A | Contract Between Sponsor and Household Member
- Form I-864EZ | Affidavit of Support Under Section 213A of the Act
- Form I-864P | HHS Poverty Guidelines for Affidavit of Support
- Form I-864W | Request for Exemption for Intending Immigrant's Affidavit of Support
Additional Facts and Data
- Of all 2015 accepted Green Card applicants, 44% were immediate relatives of U.S. citizens, 20% were other family members of citizens and lawful permanent residents, 14% were individuals in employment-related cases, 11% were refugees, and 3% were individuals granted asylum, according to a Pew Research Center study.
- Each year, the USCIS receives and processes about 6 million immigration applications from individuals and employers. According to the Department of Homeland Security (DHS), the United States issued green cards to nearly 1 million applicants in 2013. This number has remained relatively constant throughout the following years.
What is “Good Moral Character?”
Learn what "good moral character" means for U.S. citizenship and how it can affect your application.
Last Updated: January 15, 2020.
What does good moral character mean?
Congratulations on working toward becoming a citizen of the United States! In addition to meeting residency requirements as a legal permanent resident and other elements of the Form N-400 Application for Naturalization, the United States Citizenship and Immigration Services must deem you a person of “good moral character” (or GMC) to be granted citizenship. According to the USCIS Policy Manual, good moral character means that a person’s conduct “measures up to the standards of average citizens of the community in which the applicant resides.” The goal is to assure that only law-abiding, productive members of society receive the benefits and responsibilities of U.S. citizens.
How to become a United States Citizen
Rather than sit down to dinner with you to discuss your moral convictions, the USCIS has its own system, which mostly defined in the negative (like proving that you haven’t committed crimes and don't lie). Your good moral character is based on USCIS officers’ assessment of your personal legal record, your application for naturalization and your oral interview, according to laws that Congress has passed. This article answers some key questions about how GMC is determined.
What time period is good moral character based on?
5 years (or 3 years if you are applying under the special rules as a spouse of a U.S. citizen) immediately before filing for citizenship. This is the “statutory period.” It is the same as the number of years as you were required to live as a legal permanent resident with a green card before filing for citizenship. This is the time period that the USICS will thoroughly examine any immoral conduct that could threaten your citizenship application. However, the USICS has the freedom to examine activities during your entire life. The time between filing for naturalization until your oath of citizenship can also affect eligibility.
What doesn’t help to prove good moral character?
Past crimes and other negative activities can set up “bars” to your naturalization process. These bars can delay or permanently block naturalization, depending on the seriousness of the crime. Many of these have to do with “crimes of moral turpitude,” or crimes that demonstrate a lack of moral character. Some more serious ones are also grounds for deportation. Here are several to be aware of:
- Any crime against a person with intent to harm
- Fraudulent green card activity or false testimony for the purpose of obtaining an immigration benefit
- Violation of controlled substance (drug) laws
- Habitual drunkenness
- Gambling offenses
- Shoplifting or theft
- Prostitution
- Failing to pay court-ordered child support or alimony payments,
- Failing to complete any probation, parole, or suspended sentence before applying for naturalization.
- Smuggling aliens into the U.S.
- Not registering with the U.S. Selected Service System while between the ages of 18 and 25 if you are male.
- Two or more of any crimes for which 5 or more years were spent in jail
- Jail time of 180 days or more during the past 5 years
People who have been convicted of murder at any time cannot become U.S. citizens. The same goes for those convicted of another aggravated felony (including drug trafficking and armed bank robbery, as well as lesser crimes like bribery or counterfeiting) after November 29, 1990. These are permanent bars.
What does help to prove good moral character?
- Honesty. Tell the truth in your answers on the N-400 application and when asked any questions by USCIS personal, especially regarding your history with law enforcement. Be thorough in reporting even incidents like a simple traffic ticket. Failure to tell the truth can become a much more serious concern than the violation itself. Lying shows a lack of moral character.
- This is optional, but it may be useful to provide letters from people such as neighbors, church or other religious leaders, and employers who can vouch for your good moral character. Letters should positive examples of how you live your life and contribute to U.S. society.
Concerned about your GMC?
- Remember that you don’t need to be a saint to be considered “of good moral character.” Your moral character and personal standards likely exceed the necessary qualifications. If you don’t have criminal convictions, and are generally a law-abiding member of your neighborhood, it shouldn’t be too difficult to show good moral character. Just be sure to honest in all of your descriptions.
- If a minor crime or activity that may show a lack of good moral character applies to you, you may consider waiting until the statutory 5 years have gone by with a “clean” record before applying. You should also be prepared to prove solid employment and family and community involvement within those 5 years to show reformed character and conduct.
- Seek additional help from legal experts or attorneys before submitting your application for naturalization if you have more concerns.
What is the I-797 Form?
The I-797 Form is a document the USCIS uses to communicate with applicants.
Last Updated: December 2022.
The Form I-797 is a document the United States Citizenship and Immigration Services (USCIS) uses to communicate with applicants.
The most common reason we see form I-797s be sent to our customers is when USCIS is issuing them receipt notices for their application. USCIS will send applicants Form I-797 approximately 4-6 weeks after the applicant submits an application to them. The purpose of this form is to notify the applicant that USCIS has received the application and has started processing it.
Please Note: Make sure to keep a copy of all I-797 forms for your personal records. They can commonly be used as evidence for other USCIS forms you may fill out.
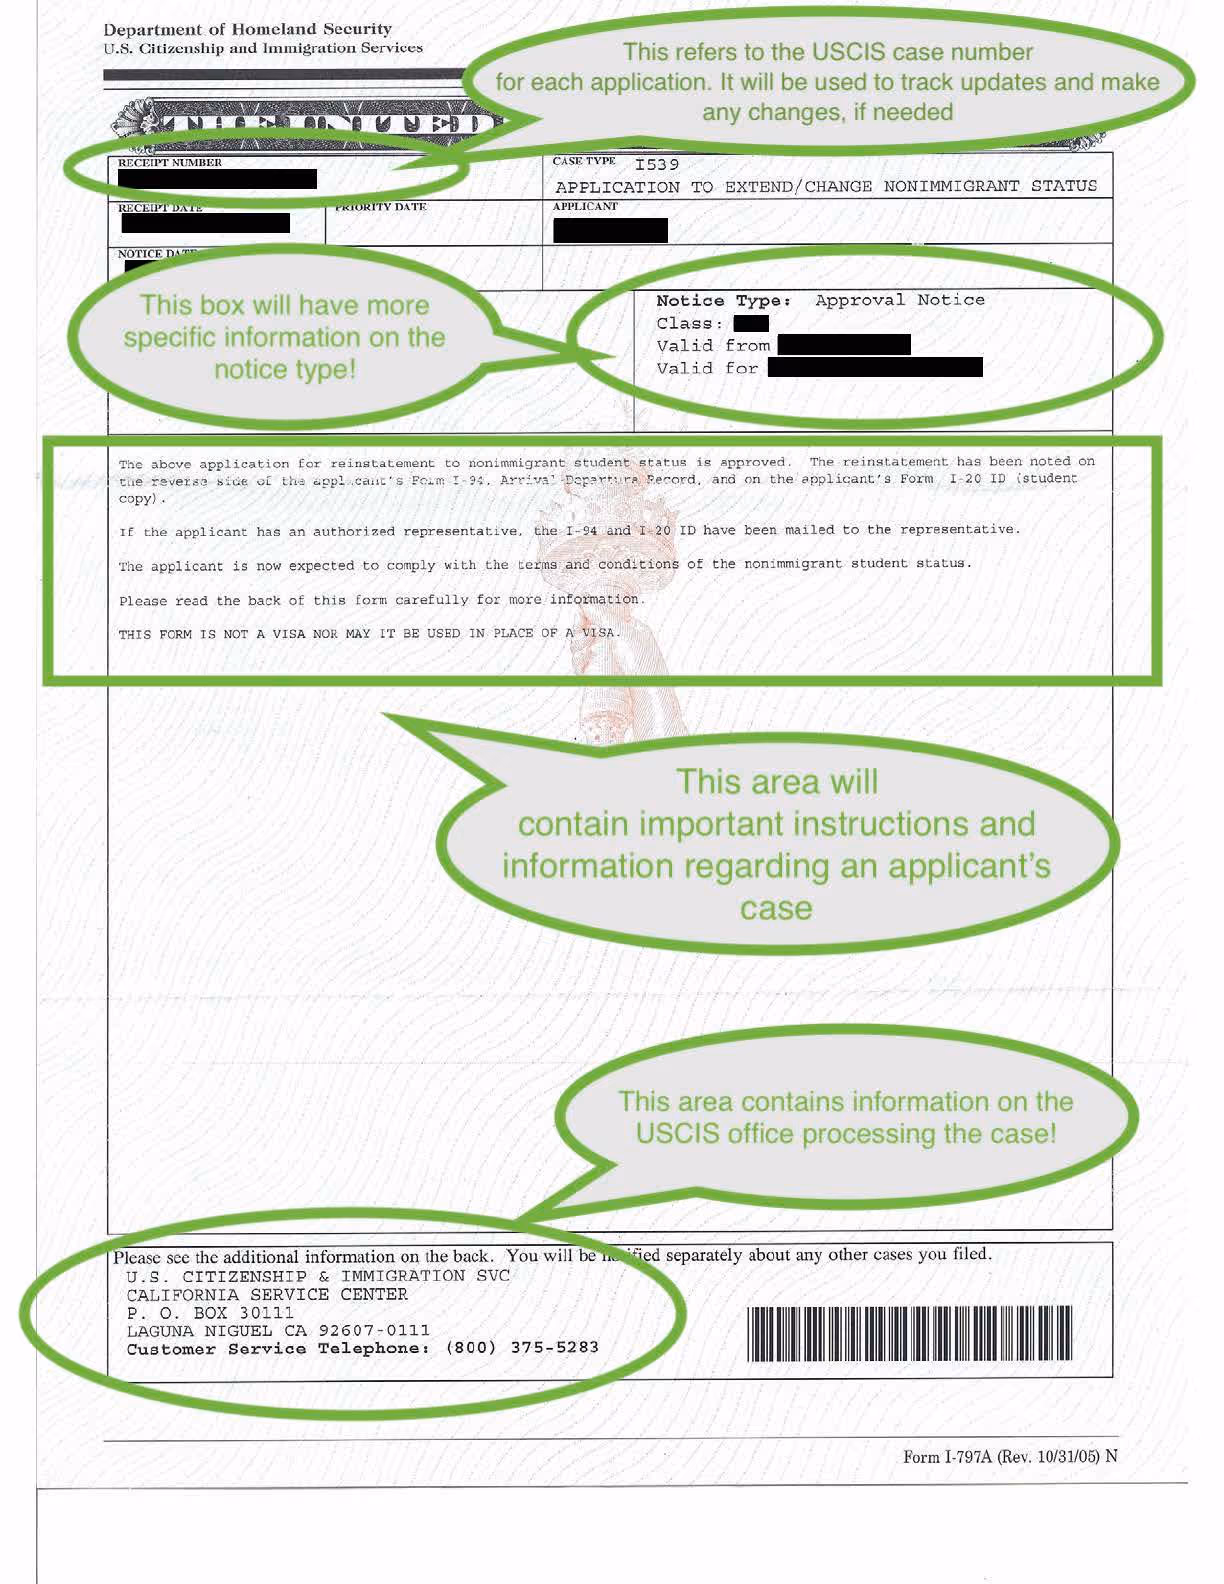
How to Read an I-797 Form?
This is what an I-797 Form looks like:
Here are some general areas to look for when reading your receipt notice:
There are seven different I-797 forms and each serve a different purpose as outlined in this article:
- Form I-797, Notice of Action: Receipt Notice
- Form I-797A, Notice of Action: Replacement for an I-94 Form
- Form I-797B, Notice of Action: Form I-140, Petition for Alien Worker
- Form I-797C, Notice of Action: Important Information
- Form I-797D: Includes a Benefit Card
- Form I-797E, Notice of Action: Request for Evidence
- I-797F, Transportation Letter: Travel Permit
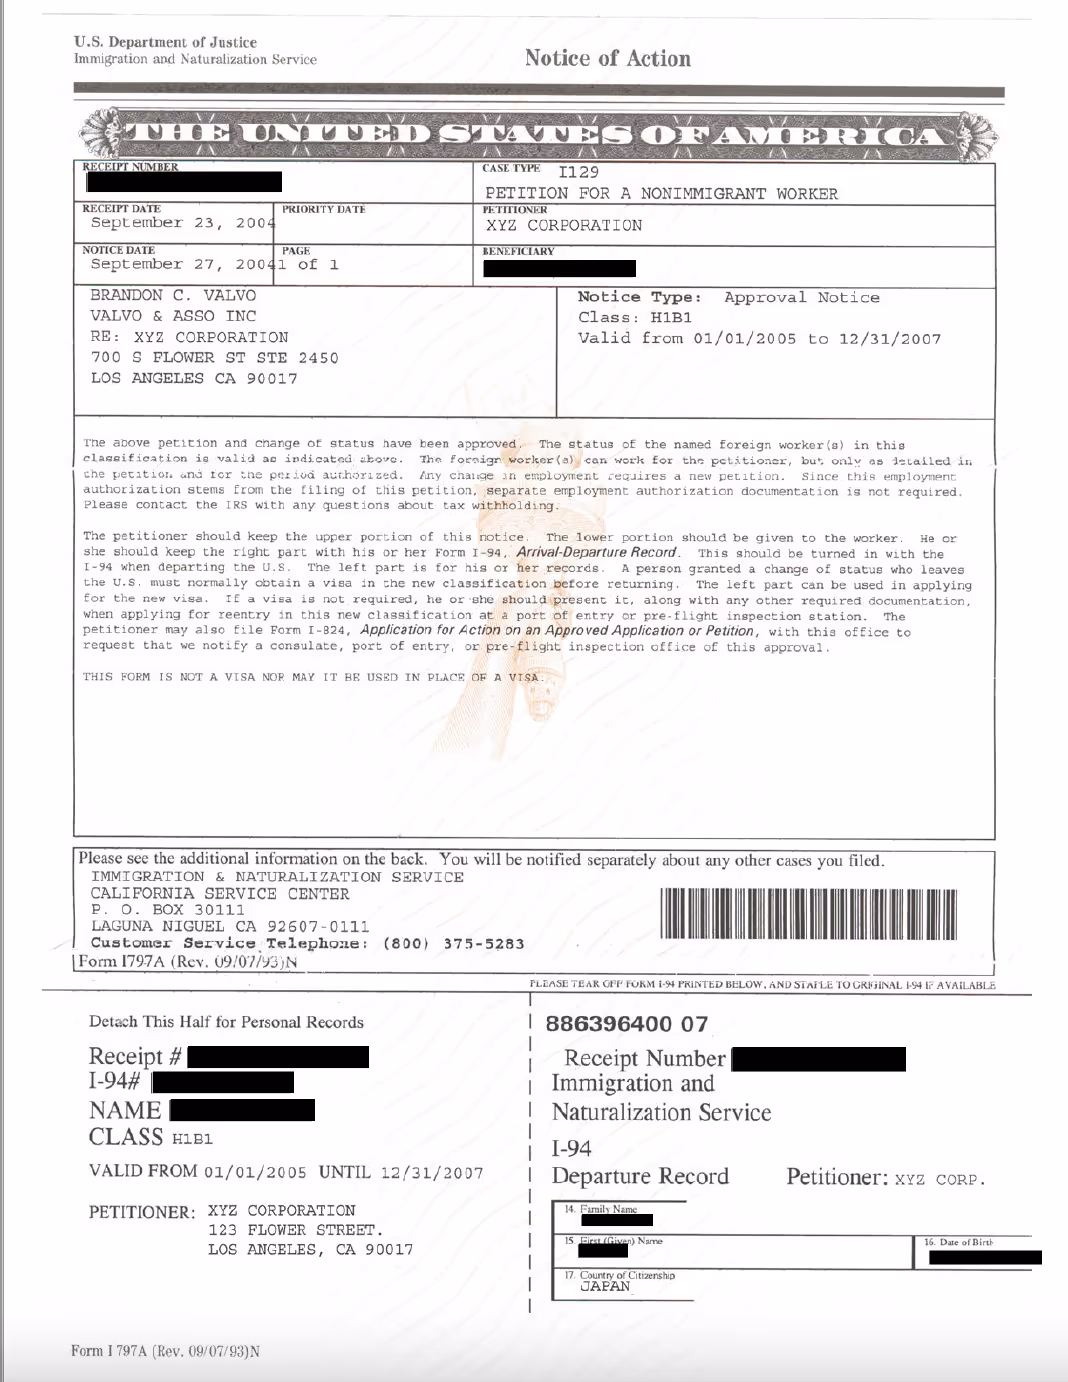
1. Form I-797, Notice of Action: Receipt Notice
This I-797 form is simply a receipt informing you that the application or petition has been received or approved. Note that this is just the receipt, not the official document. Therefore this document cannot be used to work or travel.
However, the form is still very useful. It gives you information about your application, including your receipt number. Your receipt number is a 13-digit-long code you can use to track your case online. Simply use this USCIS Case Status Checker.
If you lose your receipt number, you can schedule an InfoPass appointment where you’ll meet with a USCIS officer who can provide you with information about your case. USCIS will require that you bring valid identification to the appointment. You may also request this information through USCIS’s live chat option, or call USCIS directly at 1(800) 375-5283.
For many cases, USCIS also sends out a separate notice that will have instructions for setting up your Online USCIS Account.
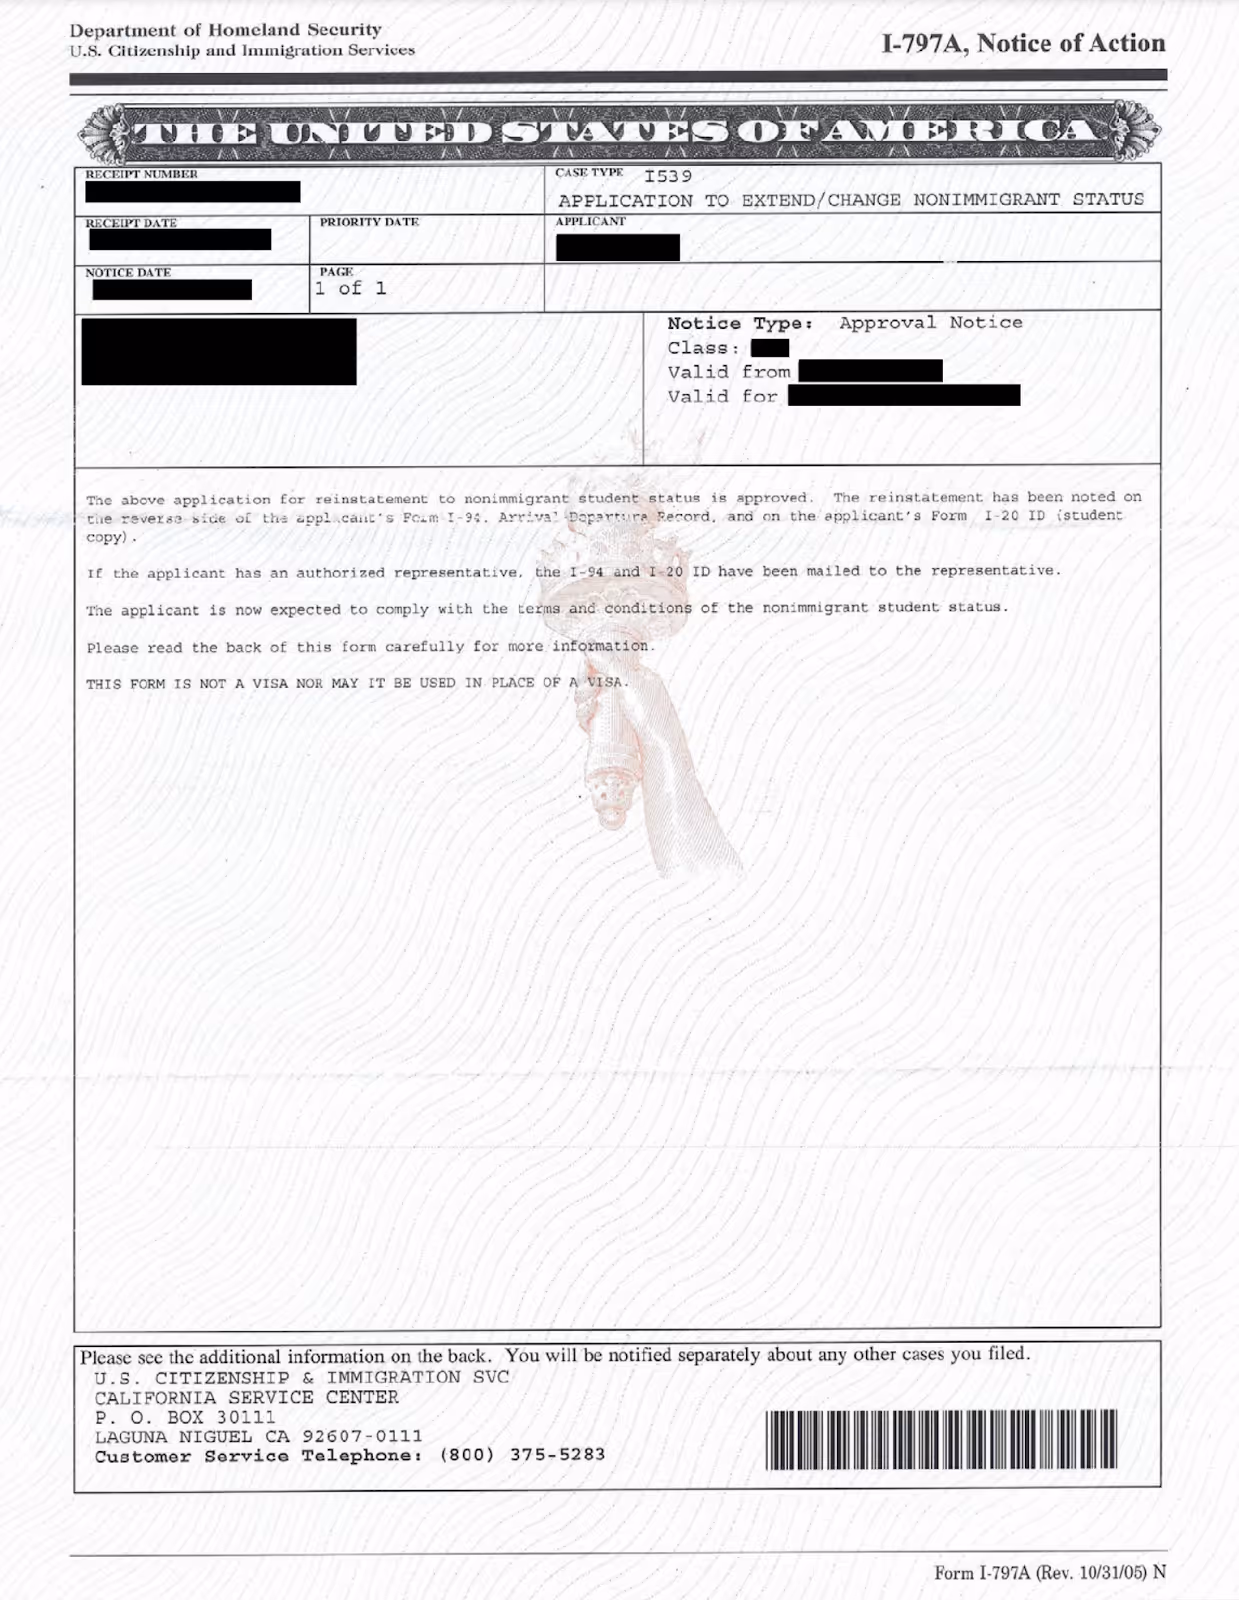
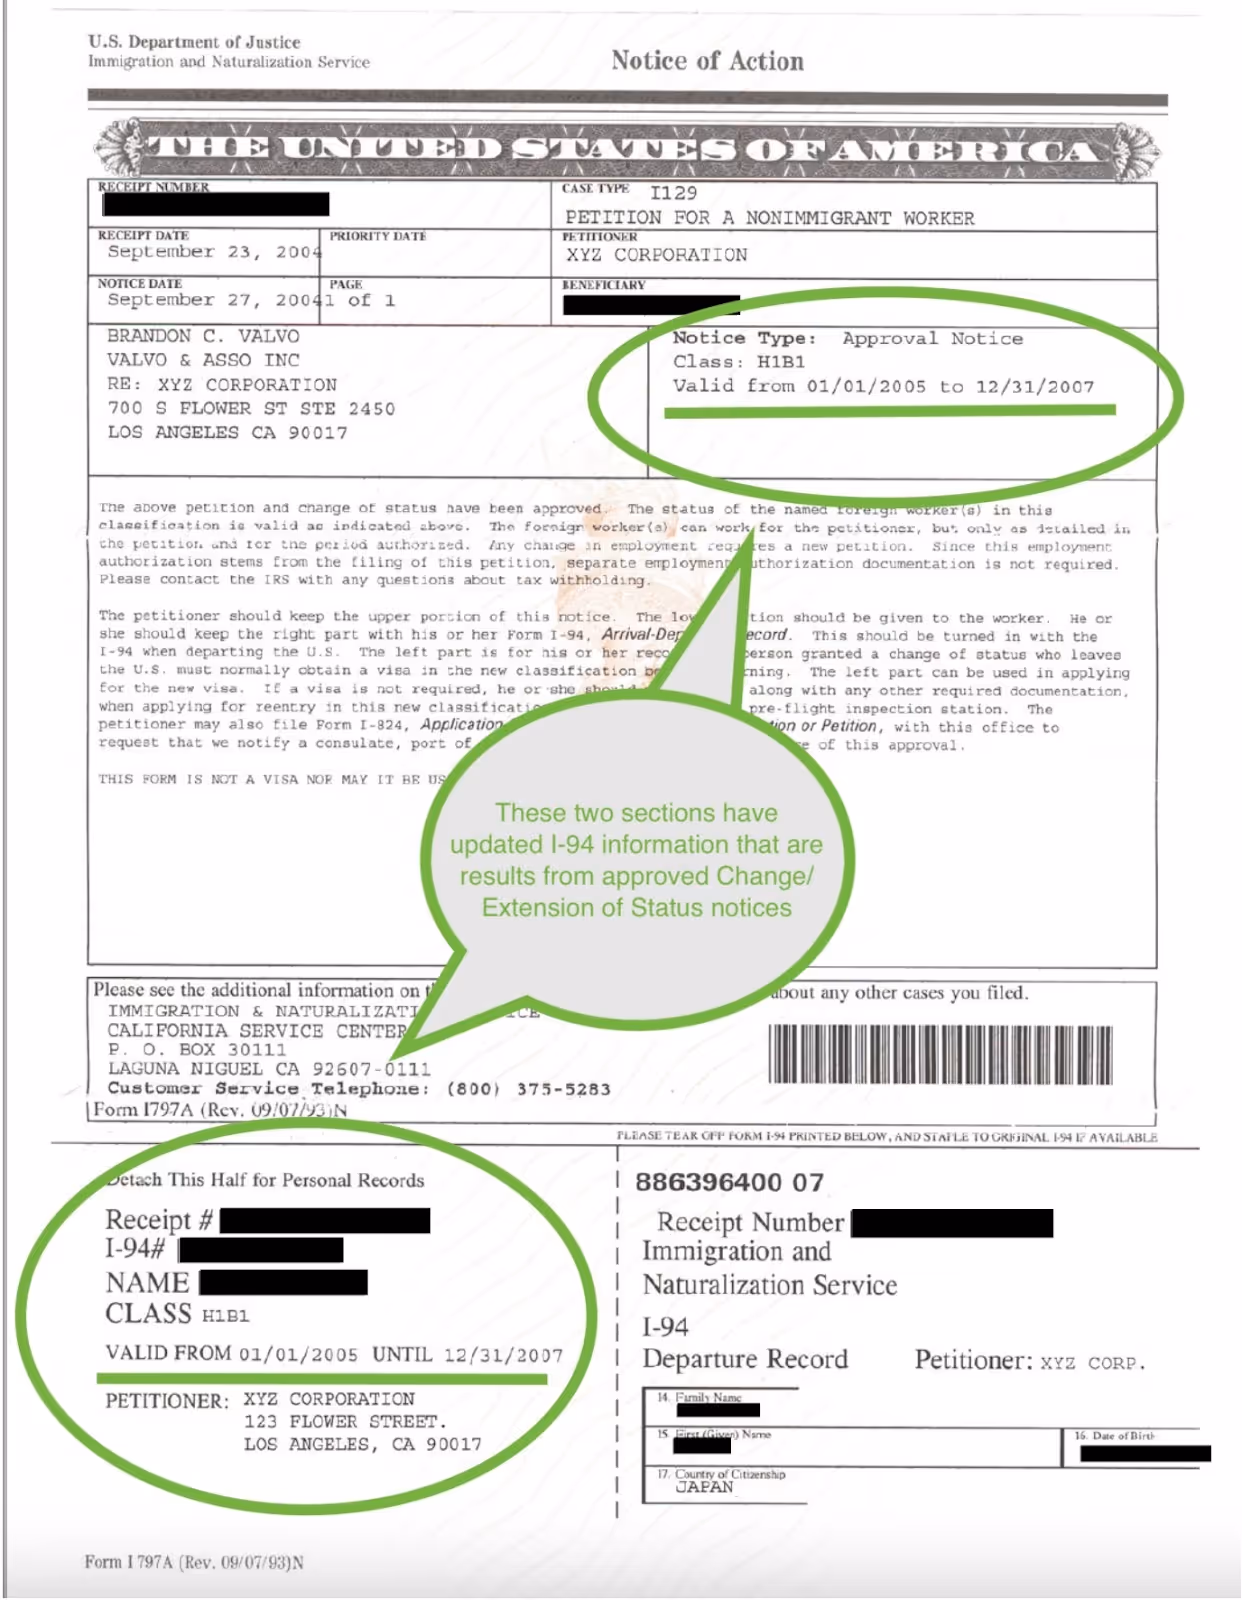
2. Form I-797A, Notice of Action: Replacement for an I-94 Form
Form I-797A Notice of action is sent as a replacement for the Form I-94 for applicants already in the U.S. This typically means that a change of status application has been approved and the immigrant is legally able to stay in the U.S. up until their new I-94 expiration date. The Form I-94 can be found at the bottom of Form I-797A and functions as the official document. The body of the document will provide additional guidelines. This form includes the date of admission, the class of admission, and the date to which they are admitted to stay.
Here is what an I-797A, with the replacement I-94 Form looks like. It includes an I-94 number, which is usually the same number as your original I-94, new VALID FROM and ADMIT UNTIL dates, and the new, or extended Class of Entry description.
To find the new I-94 portion, you can check in the following spots of the form:
Please note: If you have not filed for a change or extension of status within the U.S., you will need to obtain your I-94 directly through the U.S. Customs and Border Protection website. To increase efficiency, reduce operating costs, and streamline the admissions process, U.S. Customs and Border Protection (CBP) has automated the I-94 Form. The paper document is only given in limited circumstances. If you need a copy of your Form I-94, you may request it here.
Please note: If you originally received a paper I-94 before the CBP automated them online, and it has since been lost, you may need to submit a Form I-102 with USCIS in order to receive a replacement. For more information on this, please see here.
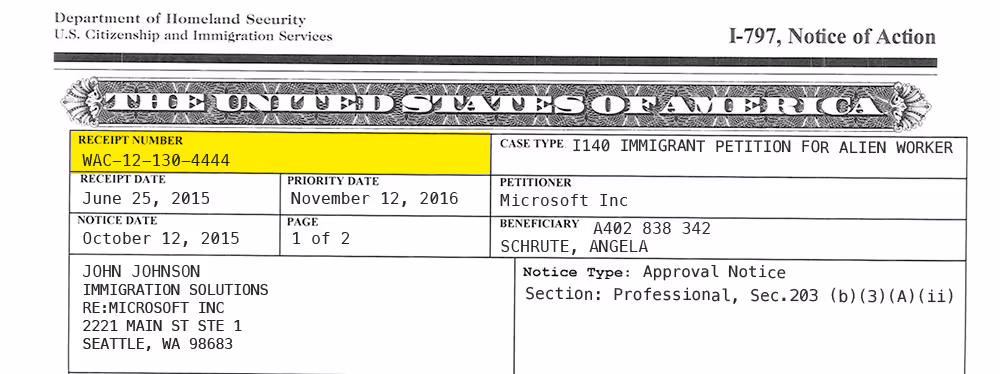
3. Form I-797B, Notice of Action: Form I-140, Petition for Alien Worker
Form I-797B is issued when the applicant submits Form I-140, Immigrant Petition for Alien Worker. The body of the document will include instructions. The bottom section will include important information for admission to the U.S. depending on the applicant’s circumstance, like all I-797 forms, this form will include details about your application.
Please note: The I-797B Form is required for any Employment-Based Adjustment of Status Applications.
4. Form I-797C, Notice of Action: Important Information
This is perhaps the most common I-797 form. It is very important that you read this document carefully as it usually tells you the next step in the application process. In addition to the regular information, the Form I-797C will inform the applicant of a rejection, transfer, re-opening, or scheduled/re-scheduled appointment.
Form I-797C is also the form that will come separately, at the same time or a few weeks after, the initial receipt notices that will include instructions for setting up your Online USCIS Account. For more information on this, please go to USCIS’s website here.
Typical appointments include a biometrics appointment or an interview with a USCIS officer. If you receive a Form I-797C, pay close attention to what it says. Ignoring or misreading the instructions can delay your case.
5. Form I-797D, Notice of Action: Includes a Benefit Card
The Form I-797D will generally include a benefit card. This could be a green card or another official document such as an Employment Authorization Document (EAD) or Advance Parole. Like the regular I-797 form, you will not need to do anything with this form. However, it is still important to keep a copy for your personal records.
6. Form I-797E, Notice of Action: Request for Evidence
Many USCIS forms require additional evidence. This is called a Request for Evidence (RFE). If the USCIS does not receive all the required evidence in an application, they will send the form I-797E. In this form, they will explain the issues with the evidence already provided or simply state that no evidence was included.
If you receive this form, make sure to read it carefully! The Form I-797E will often include a time limit and specific instructions. If you never respond to a request for evidence, your application will most likely be denied.
When responding to a Request for Evidence: Only submit photocopies of official documents unless original documents are specifically requested because the USCIS will not return evidence to you and will most likely destroy it after the case is closed.
Click here for more information about responding to Requests for Evidence.
7. Form I-797F, Transportation Letter: Travel Permit
This is the only I-797 form that is not a “Notice of Action.” This document allows overseas applicants to travel. If you receive Form I-797F, simply follow the guidelines provided in the document as they are specific to your case type.
What to do if you lose an I-797 Form and want, or need, a replacement?
If your I-797 has been lost or stolen, you will need to reach out directly to USCIS to help obtain your receipt number. To do so, you can schedule an appointment with them online here, or call them directly at 1-800-375-5283.
Submitting Form I-485: What's Next?
This guide will help you understand the steps that follow submitted Form I-485 with USCIS.
Updated: Feb. 10, 2020.
So you've mailed your green card application and are anxiously waiting for whatever comes next. What happens now?
After you submit the Form I-485, along with all the other required forms, there are still a few more steps to take before you become a permanent resident in the United States. This guide will help you understand each one of those steps.
Have not submitted your application yet? Here's a guide on how to prepare your application.
1. Receipt of Application
Approximately 30 days after filing
Once USCIS has received your application, they should send you a receipt within approximately 30 days.
If you attached a Form G-1145, E-Notification of Application/Petition Acceptance along with your Form I-485, you will also receive a confirmation email or text message within 24 hours of your application being accepted.
Both the physical receipt and the e-receipt will have a receipt number on them. You can use this number to check your case status and see how far along your case is in the application process.
Note: If you submit the Form I-485 without a signature or without the correct filing fee, USCIS will send you a notice that your form is incomplete. You may then fix the problem and re-submit it. If they need more evidence, USCIS may request (RFE) originals of the copies you provided them. These original documents will be returned to you when they are no longer needed.
2. Biometrics Services Appointment Notice
Approximately 3-5 weeks after filing
After your I-485 is filed, you will receive a notice in the mail about your biometrics services appointment, which will be held at a local Application Support Center (ASC). The notice will tell you the date, time, and location of your appointment. At this appointment, you will provide your fingerprints, photograph, and/or signature, which will be used to verify your identity and run background checks. Sometimes this can happen within 3-5 weeks, but the timeline varies considerably.
You should review your Form I-485 information before the biometrics appointment. Your signature at the biometrics appointment will indicate that your application was complete, true, and correct. When you go to your appointment, take with you:
- Your ASC appointment notice.
- Valid photo ID (such as a passport, driver's license, or state-issued photo ID card).
- A translator if you cannot understand spoken English.
3. Interview Notice
Approximately 4-10 months after filing
You will probably be requested to appear at a USCIS office to answer questions about your Form I-485. You will receive a notice that will tell you when and where the interview will take place. Bring with you original:
- Passports
- Official Travel Documents
- Form I-94
- Copy of your Form I-485
- All other originals of the documents that you submitted with your Form I-485, even if the documents are now expired.
It is best to appear at all USCIS appointments (including interviews and biometrics appointments) on the scheduled date. However, if you are sick, you can follow the instructions on your appointment notice to reschedule.
4. Receive Permanent Residence
Approximately 8-14 months after filing
After your interview, the USCIS will send you a written notice of their decision. If you are approved, you will receive your green card in the mail soon after. If your application is denied, the decision notice will explain why. It will also state whether you can appeal the decision or not. Even if it says that you cannot appeal the decision, you may still be able to file a motion to reconsider. To file an appeal or a motion you will use Form I-290B, Notice of Appeal or Motion.
Other Tips
Avoid leaving the United States while your application is pending.
If you plan to leave the US while your application is pending, even if it a short trip to Mexico or Canada, make sure that you have the right documentation to leave and re-enter the US. You will probably have to file Form-131 to obtain either an Advanced Parole Document or a refugee travel document. You will not need to file Form-131 if you are an H, L, V, or K3/K4 nonimmigrant who is maintaining lawful nonimmigrant status, and you return with a valid H, L, V, or K3/K4 nonimmigrant visa. If you leave the country without proper documentation, your Form I-485 may be denied, or you may not be able to lawfully re-enter the US.
Moving & changing your address.
If you move, it is important to promptly inform the USCIS so that you do not miss any mailed notifications about your application. Update your address with the USCIS within 10 days of moving. In most cases, you can do this online at the USCIS website.
Ask for help.
If you have questions or need help with any part of your application, please feel free to reach out to our support team. We're here to help!
How Do I Find My Form I-94?
Instructions on how to access your Form I-94, Arrival/Departure Record
As a foreigner, upon entering the United States you will receive the Form I-94, Arrival/Departure Record. This document, issued by a Customs and Border Protection (CBP) Officer, provides you basic information about your stay such as your arrival date, visa status, and the date you are required to leave the U.S.
There are now two formats in which you may receive your Form I-94 - paper and electronic - but as of April 30, 2013, most Arrival/Departure Records are created electronically. In this case, you will be given an annotated stamp in your passport instead of a paper form. If you are provided a paper Form I-94, a CBP officer attaches it to your passport and stamps your departure date on the form.
Although an electronic version cuts down on paper and drastically decreases the possibility of losing your document, it can be slightly more complicated to access, especially if it's your first time locating your record. Don't worry though - here's a guide on how to access your electronic Form I-94, along with a few useful tips and tricks.
How to Access Your Form I-94
To access your I-94 record, go to CBP's website. Once there, click on the Get Most Recent I-94 button. A page will then pop up requiring you to agree to the following terms before continuing: "By accessing this website, you understand and acknowledge that: You are declaring under penalty of perjury pursuant to 28 U.S. Code § 1746 that you: (1) are only seeking records about yourself, (2) are seeking records about someone for whom you are the legal guardian, or (3) you have the consent of the person whose records you are seeking. You are not authorized to access this website to retrieve records of another person unless you are the person's legal guardian or you have the person's consent." After consenting, you will see a page similar to the screen shot below. Enter the required information.
I-94 Website Travel Records for U.S. Visitors - U.S. Customs and Border Protection
[caption id="attachment_2080" align="aligncenter" width="800"]
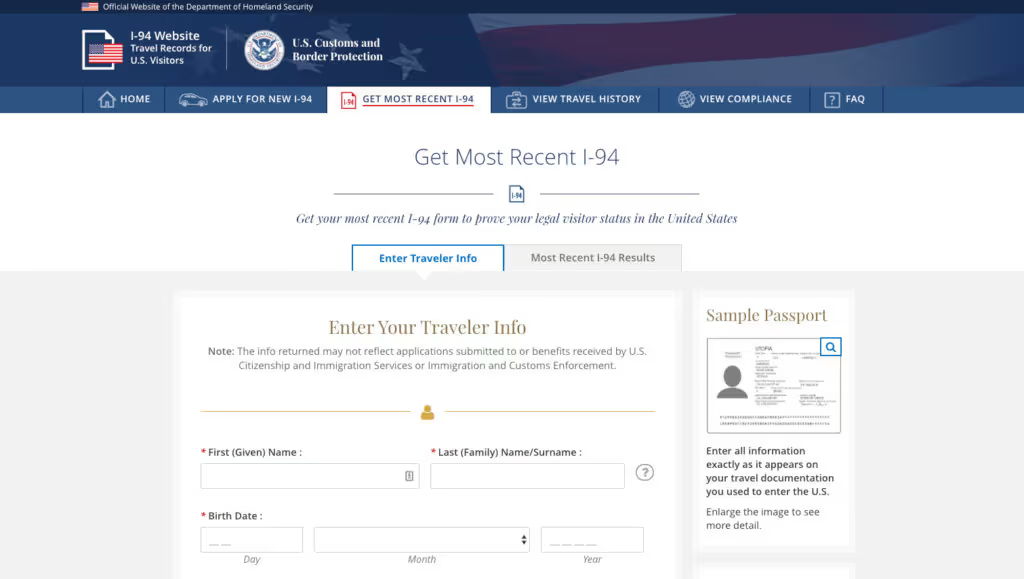
I-94 Website Travel Records for U.S. Visitors - U.S. Customs and Border Protection[/caption]
Entering the data in the required fields, if done correctly, will allow you to access your electronic Form I-94. However, all information must be entered accurately; even one simple misspelling or formatting error will prevent you from accessing your record. If you're having trouble accessing your record, try the following troubleshooting tips.
Enter your name exactly as it is written on your passport. If this does not work, attempt to enter your name in a different format.
- Check your visa, airline ticket, boarding pass, or your submitted Form DS-160, Online Nonimmigrant Visa Application (if available) for any variations in the spelling of your name. If there are differences, try entering each one as they appear on these documents.
- In some countries, the first name may be written as the last name on the passport. If this is the case, try switching the order of your names.
- Your passport may include both your first and middle name, but your electronic Form I-94 may list these both as your first name. It's also possible that your middle name is not included in the electronic record. Pay attention to these details.
- If your name is hyphenated, and you cannot gain access to your electronic I-94 by entering your name as it appears, remove the hyphen and try again. Likewise, if you have two first or last names with a space between them, such as "Mary Anne," try entering them without a space as "Maryanne."
- Each name field has a 25-character limit. If your name exceeds 25 characters, try entering it without any spaces as far as it will allow you.
Check Your Passport
Consider multiple entry options for your passport number.
- If both letters and numbers appear in your passport number, try entering a space after the letter(s). For example, if your passport number appears as LR573892 on your passport, try entering it as LR 573892.
- If the date your passport was issued is part of the passport number, try removing these digits when you enter it in.
- If you have a Mexican passport, try entering your passport number without the first two digits. You can also try removing the last two digits.
- If the valid visa is in an expired passport, try entering the old passport number instead of the new one used for entry.
- Sometimes the passport booklet number differs from the number listed on your bio page. Try both.
If You Still Can't Access Your Form I-94
If you still cannot access your electronic Form I-94 after trying the above tips, the next step is to call or visit your local CBP deferred inspection office. Some offices can solve most problems over the phone, but others may require an in-person visit.
What to do if you have lost your Passport
For information on how to replace your passport and visa, follow the steps outlined below.
Passports and visas are official travel documents that all foreign citizens coming to the United States must have to show one's country of citizenship and legal status in the U.S., as well as to enter and leave the country. Losing these important documents can be very stressful - here's a short guide to help relieve some of that stress and move forward.
First of all, don't worry. Your visa is needed only to enter the United States; it has no relevance to your stay here after entry. In other words, if you happen to lose your visa while already in the country, you may remain the entire length of your authorized stay (as shown on your admission stamp or Form I-94, Arrival/Departure Record) without any problems. You will, however, need a valid passport to depart the United States and enter another country. For information on how to replace your passport and visa, follow the steps outlined below.
Search
Make sure your passport/visa are actually lost and not just misplaced. Search your home, luggage, wallet/purse, and anywhere else you may have stored them. Ask family members and travel partners if they have any knowledge of the documents' location.
File a Police Report
If you still cannot find your passport/visa, go to your local police station and report your document(s) lost or stolen. If you have copies of the original documents, bring them with you. You will then be issued a police report detailing the incident. Make a copy of the report for your own records.
Report Loss of Your Passport
Contact or visit your country's embassy or consulate in the U.S. to notify them of your missing passport and for instructions on how to obtain a new one. If you think your passport has been stolen, reporting this will help guard against fraudulent use. It is extremely important that you perform a thorough search before you report it lost or stolen, because once reported, your passport is no longer valid for travel. However, if you find your passport after having reported it lost or stolen, it may still be used as a valid form of personal identification.
- If you do not have another form of photo identification, contact your country's embassy/consulate to find out what alternate documents you may need.
Report Loss of Your Visa
To report your visa lost or stolen, email the U.S. Embassy or Consulate outside the United States that issued your visa. Go to the U.S. Embassy or Consulate website to locate the corresponding email address and contact information. Be sure to include your full name, date and place of birth, current address in the United States, and your email address. Clarify whether your visa was lost or stolen, and if you have a copy of it include it in the email. If you know the category of visa you have or your passport number, include these too.
Like your passport, if you have already reported your visa as lost or stolen to the U.S. Embassy or Consulate but later find it, your visa will be invalid for future use, and you will have to apply for a new one.
Applying for a Replacement U.S. Visa
For future travel into the United States, you will need a new visa. Unfortunately, lost or stolen visas cannot be replaced in the United States. For replacement, you must apply in person at a U.S. Embassy or Consulate abroad. When you apply for a visa replacement, you will need:
- A written account documenting the loss of your passport and visa
- A copy of the police report
A Few Things to Keep in Mind
- Again, you won't have any problems remaining as long as originally authorized, but you will need a new passport before you return home. The replacement process can take time, so begin as soon as possible to ensure that you have a new one in time for your return trip.
- Some embassies and consulates may offer faster processing procedures, so ask if them if there is a way to process the new passport quickly.
- Traveling while you wait for your new passport can be risky, so try to postpone travel plans until you receive your new passport.
- If you need to complete an I-9 for employment (employment verification form), wait until you have your new passport before processing the form.
One Last Tip
We recommend making copies of all travel documents in your possession as soon as possible after arriving in the United States. These include your passport biographic page, visa, and admission stamp or Form I-94. That way, if you do lose one or all of these important documents, the recovery/replacement process will be that much easier. Remember to stay calm, follow the procedures outlined here, and respond to all questions and embassy/consulate employees honestly and accurately - before you know it, you'll be along your way as if nothing ever happened. Safe travels!
What happens at the Biometrics Appointment?
An overview of what to expect during your USCIS biometrics Appointment.
Last Updated: January 15, 2020.
The biometrics appointment sounds technical and is often intimidating for people, but it's usually a very straight-forward appointment! In order to confirm your unique identity, the USCIS collects data for many reasons, one is to ensure that whenever YOU sign a document in the future, it really is you! It also helps deter people with criminal records from applying for USCIS benefits for which they are not eligible. Here are some of the most common questions about the appointment, as well as some common problems and how to prepare for them.
What exactly does “biometrics” mean?
Biometrics is the process of capturing your unique features by putting your fingerprints, photograph, and signature on file so that the USCIS can confirm your identity in the future.
Who has to attend the biometrics appointment?
The USCIS can require biometrics from any applicant, sponsor, or beneficiary living in the US for any immigration or naturalization purposes. After filing your application, petition, or request you will receive a notice telling you where and when you need to go for the appointment.
If you are under the age of 14, you may choose to sign if you are able to, or a parent or legal guardian may sign on your behalf.
How should I prepare for the biometrics appointment?
It is a good idea to make copies of your application, petition, or request. You may bring a copy (as the USCIS will not provide you with one), but you should also do this to keep for your records and to review your forms before the appointment. Your personal appointment notice will include specific instructions on what you need to bring. Everyone MUST bring the ASC appointment notice (Form I-797C) and a valid photo ID (like a green card, passport, or driver’s license).
For most people, the biometrics appointment is nothing to be worried about! If you think you have a criminal background, you may want to contact a lawyer for further advice.
What should I expect at the biometrics appointment?
You will first be asked to reaffirm the following “Acknowledgement of Appointment at USCIS Application Support Center” statement:
I declare under penalty of perjury that I have reviewed and understand my application, petition, or request as identified by the receipt number displayed on the screen above, and all supporting documents, applications, petitions, or requests filed with my application, petition, or request that I (or my attorney or accredited representative) filed with USCIS, and that all of the information in these materials is complete, true, and correct.
If you cannot reaffirm that this is true, your appointment will be rescheduled until you can refile your paperwork.
Given that everything you submitted was true, the USCIS will capture your fingerprints (either 2 or all 10, depending on the type of ASC notice you received), your photograph, and your digital signature.
What if I am applying from outside the United States?
The process is a bit different in this case. When you file your Application for Naturalization (Form N-400) you have to include your completed fingerprint cards (Form FD-258) and two passport style pictures. For specific instructions and details regarding those, look here and here, respectively.
If you are active duty military or are applying under sections 328 or 329 of the Immigration and Nationality Act and you live outside the U.S., look here for more information.
What if I require assistance?
Many people require assistance for the appointment. Here are some of the common issues people may have, and the solutions provides by the USCIS to make this process as easy as possible.
Common Concerns
I can’t speak English.
You may bring someone with you who can translate for you.
I can’t read English.
For the “Acknowledgment of Appointment” statement, you should go here to select the language you can read and review the translation before your appointment.
I have a disability that prevents me from signing my name.
They will accept any mark (such as an “X”) as a signature. If you cannot provide this, there are other procedures in place to capture your biometrics.
I have a disability that will require further assistance.
You may bring a family member, attorney, or accredited representative to assist you.
I have a disability that will require further accommodation.
As soon as you arrive you should speak to the ASC immigration services officer for help. There are tons of accommodation services available, but you will likely need to request them in person. You can also try contacting your local Application Support Center before the appointment. Their contact information should be on your appointment notice.
Why might I have additional biometrics appointments?
Because biometrics data is only considered valid for 15 months, you may be required to attend more than one if your application is pending for longer than 15 months. You will also have to attend a new appointment should you apply for a different USCIS benefit.
What if I am uncomfortable with the government having my fingerprints and other personal data?
Unfortunately, if you refuse to provide anything that is asked of you during the biometrics appointment, your application will more than likely be refused. Biometrics are being used increasingly around the world and seem only to be gaining popularity by international law enforcement and immigration services, so you will likely be asked to provide similar levels of data to obtain a visa or green card in most countries.
Request for Evidence (RFE)? What To Do
What is a Request for Evidence and what does getting a letter of Request for Evidence mean for you?
Updated: October 1, 2021
What is a "Request for Evidence?"
What is a Request for Evidence and what does getting a letter of Request for Evidence mean for your application?
The letter means USCIS needs more information to process your application. RFEs are fairly common but are serious in nature. They must be responded to in order to keep your application on track. But don't worry, getting an RFE does not mean your case is denied and preparing a response can be fairly simple. Keep reading to learn what to do if you receive an RFE.
What happens if I get a Request for Evidence?
USCIS will send a letter to the address you've provided that explains what additional information they need from you in order to move forward with your case. For tips to avoid an RFE click here.
The RFE will have a deadline. You must respond by the deadline. This deadline is usually in the first paragraph and in BOLD. The typical time to respond is about 87 days, but USCIS will sometimes give a specific date or timeframe for you to respond.
Example: An RFE may say something like, “you must submit the information within 87 days”. Treat this timeline seriously and do not delay submitting the necessary information or evidence that they are requesting.
When you are getting ready to send in the requested information indicated in the RFE, make sure to review the letter carefully. You must respond to all information requested at one time. USCIS will not allow you to send more evidence later. You only get one response. Make sure that you attach a cover letter explaining what you are sending in, why you are sending it in and any other information that might be helpful.
The RFE will include instructions for where to send the response. In some cases you'll need to include the original RFE letter with your response, while in other cases USCIS only requests a copy of the RFE letter. Whether you are required to send the original or the copy, attach it to the very top of your response. Make sure that it is the first page and the first thing that the USCIS officer sees when they open your application.
The RFE should include an address for you to send the response packet to. Make sure that you send the RFE response to the address listed. It will be different than the original USCIS address that you sent your application to.
Let us know
Immigration issues can be tricky. If you have any questions about your specific Request for Evidence or your immigration case, there are experienced professionals that can help.
If you are a customer of SimpleCitizen and you've received an RFE please reach out to us via live chat, email or phone. RFE responses are included with the Professional package we offer. Do not hesitate to reach out and ask for help.
Self-Employed Sponsor and USCIS Form I-864, Affidavit of Support
What you need to know about having a Self-Employed Sponsor fill out Form I-864.
Last Updated: January 15, 2020.
Self-Employed Sponsor and Form I-864
What you need to know about having a Self-Employed Sponsor fill out Form I-864. One of the requirements to get a green card is having a financial sponsor file the I-864, Affidavit of Support. This USCIS form is basically a contract between the financial sponsor, the immigrant applicant and the US government. As part of the contract, the sponsor must meet certain income requirements to qualify as a financial sponsor for the immigrant. Like every form on the green card application, several documents must be submitted as supporting evidence for the information provided in the application.
Submitting supporting evidence for a sponsor that is currently employed is fairly straightforward. The sponsor needs to attach their most recent federal tax return, a letter from their employer and pay stubs for the past 6 months. These requirements become useless when the sponsor is either self-employed or retired.
Self-Employed Sponsors & Form I-864 Supporting Documents
The USCIS actually has a few guidelines when it comes to proving an income amount for a sponsor that is self-employed or a business owner. The USCIS suggests that self-employed sponsors should attach the following photocopies of documents to their I-864, Affidavit of Support:
- Total and Complete Tax Return: All schedules associated with the federal return including Schedule C (Profit/Loss from Business), Schedule D (Capital Gains/Loss), Schedule E (Supplemental Income/Loss) and Schedule F (Profit/Loss from Farming).
- Business Licenses and registrations.
- Signed and dated statement about the nature of the business and the sponsors involvement.
- Bank Statements for the previous 6 months.
Retired Sponsors & Form I-864 Supporting Documents
If the sponsor that is submitting the Form I-864, Affidavit of support is retired, a similar problem exists. Again, the goal for a retired financial sponsor is to simply provide independent evidence that establishes a steady flow of income matching the amount reported in the Form I-864. This can be accomplished by providing the following documents:
- Recent Pension Statements and Current Pension Payment Receipts
- Social Security Documents that indicate payments
- Complete Tax Returns
- Bank Statements for the previous 6 months
As you are working to complete your green card application and fill out a correct Form I-864, make sure that you are avoiding some of the other pitfalls of the financial sponsor for a green card. Making sure that you are calculating the household size correctly or including the accurate income amounts are a few of the important things to remember when working on this application. SimpleCitizen is a do-it-yourself tool to help you avoid these common mistakes. We are the only truly comprehensive service, guiding users from signup to citizenship while ensuring their application is correct and complete at every stage.
Can I Travel While My Green Card is Processing?
This article explores travel limitations that may exist while a green card application is pending.
Last Updated: January 18, 2023.
When applying for a Green card, an applicant also has the opportunity to apply for Travel Authorization by filing Form I-131, Application for Travel Document. When filed along with the green card, this travel authorization–commonly also called “Advance Parole”–may take between 9-12 months, on average, to be adjudicated by USCIS. Due to this processing time, you may wonder what limitations there are on traveling while your green card application is pending. This article will explore some of those limitations.
The purpose of this article is NOT to provide legal advice but rather to provide legal information regarding the Travel Authorization/Advance Parole document. Anyone seeking legal advice on whether or not they should travel while their green card is pending is encouraged to discuss it with a licensed immigration attorney.
Before Travel Authorization is Granted
Traveling inside the US Before Travel Authorization is Granted
Before USCIS grants the Travel Authorization/Advance Parole document, an immigrant can typically travel within the continental US while their green card application is still pending.
However, something to keep in mind is that until an applicant has received their receipt notices from USCIS confirming that USCIS has started processing their application, an applicant will not have proof of their pending green card application. This means that if they are traveling inside the US without a valid visa or status, they may not have proof of having legal status in the United States. Because of this, any interactions with US immigration while traveling presents the potential for issues.
Additionally, an applicant will want to be very cautious if traveling outside of the United States to non-continental US territories or states (such as Hawaii or Puerto Rico). In the case of an emergency landing or layover in a non-US territory or country, USCIS would consider that applicant as having left the United States, and the green card application would be considered abandoned.
Traveling outside the US Before Travel Authorization is Granted
After submitting a green card application, an applicant may only be authorized to leave the country and reenter the US once they have received the Travel Authorization/Advance Parole document. While this does not apply to certain dual-intent visas (such as the H1B or L1 visas)*, this does not apply to green card applicants whose non-immigrant visas previously allowed for travel. Non-immigrant visas (such as F1, TN, or B1/B2) are not authorized to travel outside the United States until their Form I-131, Application to Travel, has been approved. Doing so would result in the green card application being denied and could lead to misrepresentation investigations.
*NOTE: While some dual-intent visas allow for continued travel while a green card application is pending, traveling on a dual-intent visa before the Advance Parole/Travel Authorization is approved likely means that USCIS will deny Form I-131 and will not grant Advance Parole.
Overall, it can be beneficial for an applicant wishing to travel internationally to wait until USCIS has granted them Travel Authorization before they travel outside the United States. If this travel authorization is pending, an applicant would need to consider whether they have a valid document that will allow for their re-entry into the US and whether they accept the potential repercussions of abandoning their pending application and subsequent denial of the Green Card.
Navigating Travel after Travel Authorization/Advance Parole is Granted–But While the Green Card application is Still Pending
Currently, the average wait time for the Travel Authorization/Advance Parole document adjudication is around 9-12 months, while the Green Card application itself may take anywhere from 12-24 months to be approved. Due to these timelines, USCIS will likely grant an applicant’s travel authorization while the Green Card application is still pending approval.
When USCIS issues the Travel Authorization/Advance Parole document, an applicant is essentially authorized to travel in and out of the US while their green card is still being processed. However, after this travel authorization has been approved, there is still some risk that an applicant could experience difficulties re-entering the US or miss important USCIS notices while they are out of the country. This article will discuss these potential risks in greater detail below.
Risks of traveling While a Green Card application is pending
Risks During Re-entry
After international travel, re-entry into the United States is ultimately at the discretion of the US Customs and Border Protection agent, who inspects upon arrival. This means that even if someone has been granted Advanced Parole and has a valid travel authorization document, US Customs and Border Protection can still technically deny their re-entry. Thus, travel authorization does not guarantee entry into the United States.
While generally, there are no issues re-entering, there is always a risk. These cases are not typical, and you can diminish risk by following laws and regulations and not committing crimes that could jeopardize your ability to reenter the United States.
Risks of missing time-sensitive USCIS notices while traveling
The Biometrics Appointment
In the weeks after someone submits a green card application, USCIS will mail them a notice with a scheduled biometrics appointment at a local Application Support Center (ASC). The appointment notice (Form I-797C, Notice of Action) will include the date, time, and location for the ASC appointment. It is recommended that this appointment is attended whenever possible, as it can be challenging to reschedule.
If you are traveling abroad on a dual-intent visa when you get the notice for the biometrics appointment, it could be challenging to return to the United States in time to make the appointment.
Notices for Requests for Evidence
When USCIS needs more information for a case, they issue a “Request for Evidence” (commonly called an RFE). The RFE letter comes in the mail, and USCIS typically outlines what documentation must be submitted and issues a deadline by which they must receive that information. They specify that the applicant must submit the requested documents to them before that deadline. Cases that do not respond to the RFE by that deadline will have their green card application denied.
Applicants wishing to travel abroad while the green card application is pending will want to be aware that if they receive an RFE while they are away, they will need to respond to the RFE before the deadline or risk having their application denied.
The Green Card Interview with USCIS
In the months after completing your biometrics, USCIS will schedule an interview with a USCIS officer. This interview is conducted in person and is arguably the most important moment in the process of getting a green card. USCIS will mail you an appointment notice (Form I-797C, Notice of Action) which will include the date, time, and location for your interview. It is critical that applicants don’t miss this appointment. Be aware that, in some cases, USCIS can schedule the appointment within weeks of issuing the notice. If you are traveling abroad when you get the notice for the interview appointment, it could be challenging to return to the US in time to make the appointment.
Partner Immigration Attorneys Can Help You Plan
Navigating Travel while a Green Card application is pending presents many nuanced situations. If you have any questions about this topic or how this applies to your specific situation/visa, consider signing up for SimpleCitizen’s Professional Package–which allows you to discuss your questions and concerns with one of our independent partner Immigration Attornies.
Learn more about what this package includes here: https://www.simplecitizen.com/pricing/
FAQ
Can I use my dual intent visa (H1B or L1) to travel while my green card is pending?
If someone has proof of a valid dual-intent visa, they can travel while the green card is pending without the risk of USCIS deeming their case as abandoned. However, this does not apply to the O visa. Please refer to this article for more information about travel with an H1B visa.
Can I travel using my K-1 visa?
The K visa serves as a single entry visa, meaning that once someone enters the US, they cannot use that visa again to leave and reenter the US. Instead, they would need to consider waiting for the travel authorization or the green card to be granted.
Since an O-1B visa is considered dual intent, can someone use it to travel while they wait on travel authorization through their adjustment of status application?
The O-1 visa is a dual-intent visa in the context of visa approval but not in the context of travel authorization. As such, USCIS will consider that someone traveling abroad on an O visa while the green card application is pending (and before the travel authorization has not been granted) has abandoned the green card application, and this application will be denied.
Perhaps it may be found within a different category.