Frequently Asked Questions
Find answers to some of our most Frequently Asked Questions
The Biometrics Appointment Explained — Start to Finish
USCIS biometrics appointment guide explaining fingerprints, photos, who must attend, and what to expec
When you apply for a U.S. immigration benefit—such as a green card, certain visas, or U.S. citizenship—you will often be scheduled for a biometrics appointment. For many applicants, this step is required, routine, and expected. It’s not a test, not an interview, and not a sign that something is wrong with your case.
A biometrics appointment is simply a short visit where U.S. Citizenship and Immigration Services (USCIS) collects basic identifying information, like your fingerprints and photo. Understanding who needs biometrics, why USCIS requires it, and what actually happens during the visit can take a lot of stress out of the process—and help you avoid delays.
This guide walks you through everything, step by step, from receiving your appointment notice to what happens after you leave the office.
1. What Is a Biometrics Appointment?
A biometrics appointment is a scheduled visit to a USCIS Application Support Center (ASC) or, in some cases, a USCIS-approved partner location. During this visit, USCIS may collect:
- Fingerprints
- A digital photograph
- A digital signature (for some applications)
USCIS uses this information to:
- Confirm your identity, making sure the person who applied is the same person showing up
- Run required background and security checks through government databases
- Create secure immigration documents, such as work permits or green cards, if your application is approved (this is less common)
USCIS is authorized by U.S. immigration law to collect biometrics from many, but not all applicants. Importantly, a biometrics appointment by itself does not mean approval or denial. It’s simply a required processing step.
2. Who Is Asked to Attend a Biometrics Appointment?
Not every immigration applicant needs biometrics, but many do. You may be scheduled for a biometrics appointment if you are applying for things like:
- A green card (inside the U.S.)
- A work permit (EAD) or travel document (Advance Parole)
- Naturalization (U.S. citizenship)
Certain temporary or humanitarian benefits
Some applicants do not need a new appointment because USCIS may reuse biometrics from a previous case. If that happens, USCIS will notify you.
What about children under 14?
- Children under 14 may still be scheduled for biometrics, especially in green card cases.
- Younger children often do not give fingerprints, but USCIS may still take a photograph or collect other identifying information.
- A parent or legal guardian should attend with the child and bring the child’s appointment notice and identification (such as a passport).
Always follow the instructions on the appointment notice—even for infants or young children.
3. When Do You Receive the Appointment Notice?
After USCIS accepts your application for processing, they typically mail a Biometrics Appointment Notice (Form I-797C). This usually arrives a few weeks after filing, though timing can vary.
The notice includes:
- The date, time, and location of your appointment
- Instructions on what to bring
- A clear reminder that attendance is required
- Instructions for rescheduling, if absolutely necessary
If you created a USCIS online account, the notice may also appear there.
If several weeks pass and you haven’t received a notice:
- Check your USCIS online account
- Contact the USCIS Contact Center to confirm whether biometrics are required for your case
4. Rescheduling a Biometrics Appointment (and the Risks)
USCIS assigns you a time and place to attend the biometrics appointment and attendees are sometimes only given a few weeks to prepare. If you are unable to attend during your assigned appointment time, USCIS does allow you to request a reschedule. However, this should be a last resort since rescheduling can create potential delays or complications.
When rescheduling might be appropriate:
- A medical emergency
- Serious travel conflicts
- Events outside your control
Important risks to know:
- Rescheduling often adds weeks or months to your case
- USCIS errors can occur during rescheduling, including missed or lost appointments
- Some applicants experience long delays before receiving a new notice
- If your reschedule request has not been approved, USCIS may deem the original appointment time “missed” and the application abandoned
If you must reschedule, follow the instructions on your notice exactly and keep copies of everything. Reschedule as far in advance as possible as USCIS typically must approve the reschedule request before it is considered acceptable to miss your appointment. Whenever possible, try to attend the original appointment.
5. What Happens If You Miss the Appointment Entirely?
Please keep in mind that failing to attend your biometrics appointment without proper rescheduling can have serious consequences for your application.
If you do not show up:
- USCIS may pause or delay your case
- USCIS may deny your application for abandonment
- You may be required to refile and pay fees again
If you missed an appointment due to an emergency, contact USCIS immediately to explain the situation. Do not ignore a missed appointment and act as quickly as you can to remedy the situation.
6. How to Prepare for the Appointment
Bring the Right Documents
You’ll need:
- A valid, unexpired government-issued photo ID (passport, driver’s license, green card, or state ID)
- Your biometrics appointment notice (Form I-797C)
Be sure to bring the original ID documents. Photocopies alone are not sufficient.
Dress Comfortably but Mindfully
There’s no dress code. You are free to wear comfortable clothes and you may want to avoid large accessories that could interfere with fingerprinting. Keep in mind that any photos taken at this appointment may be used on future immigration documentation (such as a green card) and will be connected to your USCIS record. Be sure to dress in a way that reflects how you would like to represent yourself.
Expect Security Screening
Most locations require security screening, such as a metal detector. Avoid bringing restricted or weapon-like items. Attendees are usually required to remove their shoes, belts, watches, etc. to go through the security screening. Please keep this in mind when choosing your outfit and footwear that day.
Arrive Early
Plan to arrive 15 minutes early. Sometimes attendees must wait in line when they arrive, both to go through security and to check in. Arriving early gives you time to find parking, locate the office, and go through the necessary check-in steps and still be in your seat in time for your scheduled appointment. Arriving late can result in your appointment being canceled, which can result in delays or even more serious consequences for your application.
7. What Happens During the Appointment?
Most biometrics appointments take 15–30 minutes, though wait times vary.
Security Screening
As mentioned above, you may be required to go through security screening before entering the USCIS office. This is common and normal and is designed to help keep people in the office safe.
Check-In
Once you have completed the security screening, if any, find the check in counter. Staff will review your ID and appointment notice and may confirm basic details like your name and address. They will then tell you where to sit and wait for your scheduled appointment time.
Waiting Room
Some waiting is normal, especially on busy days. Make sure you’re in the correct room and are carefully listening for your name.
Fingerprinting
A staff member will guide you through providing your finger prints. Your fingerprints are captured electronically—no ink. The staff member will often need to physically guide your hand so that your fingerprints are properly captured by the electronic device. It can take a few tries to get adequate fingerprints. If needed, staff may ask you to wash and dry your hands and try again. This process typically only takes a few minutes.
Photograph
The staff member will also take your photo to attach to your immigration record. A digital photo is taken against a plain background. This process is similar to getting a passport photo taken. This photo may later appear on official documents such as green cards, travel documents, or naturalization certificates.
Digital Signature (if required)
Some applicants sign electronically to confirm the information collected is accurate.
Once they tell you that you are finished, you’re free to leave. There is no interview or decision made at this appointment.
8. After the Appointment: What Happens Next?
After your visit, USCIS uses your biometrics to:
- Verify your identity
- Complete background and security checks
- Continue processing your application
Your case status may update to show biometrics were taken or reused. The next step—and timing—depends on the type of application and USCIS workload.
9. Common Issues That Can Cause Delays
Please keep in mind that delays during or after your appointment can happen if:
- Your ID is expired or doesn’t match your application
- You miss or reschedule the appointment
- Fingerprints are unclear and require a second visit
- Background checks raise follow-up questions
Attending as scheduled and bringing correct documents helps avoid most problems. If you are worried about what the background check could raise, you may want to consider speaking with a licensed immigration attorney as early as possible to get their guidance.
10. Tips for a Smooth Experience
11. How SimpleCitizen Can Help
Biometrics are easier when the rest of your application is already solid. SimpleCitizen helps applicants prepare immigration forms accurately and confidently before filing.
SimpleCitizen can:
- Guide you step by step through your application
- Ensure forms are complete and consistent
- Connect you with licensed immigration attorneys for review
Once your application is filed, USCIS schedules biometrics—but SimpleCitizen helps you reach that stage without unnecessary errors.
Ready to get started?
We’re happy you’re here! Learn more about our services at SimpleCitizen and take the next step toward your future.
Understanding RFE’s and Tips for Responding to Them
An RFE is a USCIS request for more evidence—not a denial—and requires one clear, on-time response.
What Is an RFE?
When you apply for an immigration benefit—such as a green card, work permit, or visa—USCIS reviews your application to decide whether it meets all requirements. Sometimes USCIS cannot make a decision because something is missing, unclear, or needs more documentation. When that happens, they may issue a Request for Evidence (RFE).
An RFE is not a denial. It means USCIS is giving you an opportunity to fix issues or provide additional proof so they can continue reviewing your case.
It’s important to remember that it is the responsibility of the applicant to prove to USCIS that they meet the requirements. Based on the information provided, it is then USCIS’ job to determine if the requirements have been met.
This content is for informational purposes only and does not constitute legal advice. For advice about your specific situation, consult a licensed immigration attorney.
What’s Inside an RFE Notice?
Most RFE notices follow a structured format designed to tell you exactly what USCIS needs. You’ll typically see sections that explain:
- The rule or requirement USCIS is applying.
- What evidence you already submitted.
- What is missing, incomplete, or unclear (this is the most important section).
- How and when to respond, including the deadline and submission method.
A strong response directly addresses each request, in the same order USCIS lists them.
Why RFEs Matter
RFEs are common, but how you handle them matters a lot. Responding on your own can be risky if:
- You misunderstand what USCIS is asking for.
- You leave out required documents or explanations.
- You send a "piecemeal" response: USCIS generally only allows one response. If you send documents separately, they may ignore the second mailing and deny your case based on the first incomplete package.
- You miss the deadline (Note: Pandemic-era extensions have ended; deadlines are now firm).
- You send disorganized or incomplete materials.
Any of these issues can lead to a denial—even if the underlying case might otherwise be approvable. For people who are unsure how to respond, getting structured support can help reduce mistakes and stress. SimpleCitizen offers optional RFE support for existing customers who want guidance through this step.
Quick Reference: RFE Dos and Don’ts
How to Respond to an RFE (Best-Practice Overview)
This section explains general best practices and is meant to help you understand how RFEs are commonly handled. As a reminder, this is not legal advice. If you have questions or concerns for how to respond to your own RFE, please consult a licensed immigration attorney.
1) Read the RFE Carefully
Read the notice more than once. Pay close attention to exactly what USCIS is requesting and whether they want documents, explanations, or both. Look for specific formatting or submission instructions. Remember, small details matter!
2) Create a Clear Checklist
Break the RFE into a checklist of individual requests. This helps ensure nothing is overlooked and makes it easier to organize your response in a way USCIS can quickly review.
3) Prepare a Written Response Letter
In addition to gathering documents, you should include a written response letter (cover letter).
This letter typically:
- Identifies your case (names and receipt number).
- Lists each RFE request in order.
- Briefly explains what you are submitting for each item.
4) Include Only Relevant, Certified Evidence
Submit the specific evidence USCIS asked for. If a document is in a language other than English, you must include a certified translation. This includes a statement signed by the translator verifying that the translation is accurate and they are competent to translate.
5) Organize the Packet Clearly
A common organization approach includes:
- The original RFE notice on top (USCIS uses the barcode on this sheet to route your file).
- Your response cover letter.
- Evidence grouped and labeled to match each request.
6) Meet the Deadline Exactly
If USCIS does not receive your response by the deadline, they may deny the case. Build in time for mailing delays and always keep your tracking number and proof of delivery. Remember that USCIS will typically act based off of the day the shipment arrived, not the date the shipment was sent.
Common Mistakes to Avoid
- Sending an incomplete response: Forgetting one item can lead to an immediate denial.
- Skipping a request: If a request is confusing, provide a written explanation rather than ignoring it.
- Standard translations: Failing to include the "Certification by Translator" statement for non-English documents.
- Waiting until the last day: Mail delays are common; aim to have your packet arrive at least one week before the deadline.
- Sending a response to the wrong place: The RFE letter includes strict instructions on how, when, and where to send the RFE response. This can be a physical USCIS location or an online location. Pay closer attention and make sure you submit your response the correct way.
Final Thoughts
An RFE is USCIS saying: “We can’t finish reviewing your case yet—please show us exactly what we asked for.” Handled well, an RFE is often just a detour. Handled poorly, it can lead to a denial that creates delays, added costs, or long-term immigration complications.
If you’re an existing SimpleCitizen customer and feel unsure about how to respond, SimpleCitizen offers optional RFE support you can purchase to help you organize, understand, and respond to the notice correctly and on time.
If you’ve received an RFE and want extra guidance, explore SimpleCitizen’s RFE support options to get help preparing a clear, complete response—before the deadline. We’re happy you’re here!
How it Works Webinar: SimpleCitizen Immigration Support and Pricing Explained
How it Works Webinar: SimpleCitizen Immigration Support and Pricing Explained
Get a guided look at how SimpleCitizen supports your immigration journey from start to finish. In this webinar, our team walks through how the platform works, what to expect at each step of the process, and how our pricing and services are structured—so you can move forward with clarity and confidence.
Your immigration journey is personal—and having clear guidance can make all the difference. Now that you’ve seen how the SimpleCitizen process works, you’re one step closer to starting your application. If this webinar helped you better understand your options, we invite you to take the next step: begin your case or reach out to our Live Chat team with any additional questions.
We're happy you're here!
I Got My Green Card! What Happens Now?
Learn about your rights and responsibilities as a new U.S. Lawful Permanent Resident.
You have your green card, congratulations! Learn about your rights and responsibilities as a new U.S. Lawful Permanent Resident to help maintain your status.
Your New Rights and Responsibilities
Congratulations! Receiving your green card (officially called a Permanent Resident Card, Form I-551) is a life-changing milestone. It means you have been granted permission to live and work in the United States permanently.
Now that you're a Lawful Permanent Resident (LPR), it's important to understand both the new rights you've gained and the key responsibilities you must follow to maintain your status. This guide breaks down what you need to know as you start your new life in the U.S.
Your Rights as a Green Card Holder
As a Lawful Permanent Resident, you now have many of the same rights as U.S. citizens.
Here’s what you can now do:
- Live Permanently in the U.S.: You have the right to live anywhere you choose in the United States.
- Work Legally in the U.S.: You can work at almost any job without needing a special work permit (EAD). (Note: Some federal jobs may be restricted to U.S. citizens only).
- Own Property: You have the right to own a house, car, and other property in the United States.
- Be Protected by Law: You are protected by all federal, state, and local laws of the United States.
- Apply for a Driver's License: You can apply for a driver's license in your state or territory.
- Attend Public Schools and Colleges: You are eligible to attend public schools and colleges.
- Travel Outside the U.S.: You can travel internationally. However, there are important rules about how long you can be outside the U.S. without risking your permanent resident status (more on that below).
- Sponsor Relatives: You can file immigrant petitions (using Form I-130) for certain immediate family members, like your spouse and unmarried children, to get their own green cards.
- Receive Social Security Benefits: If you meet the requirements (usually by working and paying taxes for a certain number of years), you can receive Social Security retirement, disability, and survivor benefits.
- Apply for U.S. Citizenship: After meeting certain requirements (like living in the U.S. for three or five years), you can apply to become a U.S. citizen.
Your Responsibilities as a Green Card Holder
Maintaining your permanent resident status means following certain rules. These responsibilities are very important.
Here’s what you are required to do:
- Obey All Laws: You must obey all federal, state, and local laws. Committing certain crimes can put you at risk of being deported and losing your green card.
- File Your Taxes: You must file income tax returns with the Internal Revenue Service (IRS) and your state's tax department every year, just like U.S. citizens.
- Carry Your Green Card: It's generally recommended to carry proof of your permanent resident status with you. While you don't always need the physical card in your pocket every minute, you should have it available as your official government-issued ID.
- Update Your Address with USCIS: This is a critical responsibility. If you move, you must report your new address to USCIS within 10 days of moving. The easiest way to do this is by using the official USCIS Online Change of Address tool.
- Support the U.S. System of Government: You must support the democratic form of government and not try to change it through illegal means.
- Register with the Selective Service (if required): If you are a male between the ages of 18 and 25, you must register with the Selective Service System.
A Note on Maintaining Your Residence
Your green card gives you the right to live permanently in the United States. USCIS expects you to make the U.S. your primary home.
- Traveling Abroad: You can travel, but if you stay outside the U.S. for more than one year, USCIS may determine that you have "abandoned" your residency.
- For Long Trips: If you know you need to be outside the U.S. for one year or more, you should apply for a Re-entry Permit using Form I-131, Application for Travel Document, before you leave the country. This shows USCIS that you don't intend to abandon your status.
The Path to U.S. Citizenship
For many, getting a green card is a major step toward becoming a U.S. citizen. Being a Lawful Permanent Resident is a requirement before you can apply for citizenship through the process called "naturalization."
After you meet the eligibility requirements—which typically include holding your green card for a certain number of years (usually five years, or three if married to a U.S. citizen), demonstrating good moral character, and passing English and civics tests—you can choose to apply to become a full U.S. citizen.
Welcome to your new life as a U.S. permanent resident! Understanding these rights and responsibilities is the key to successfully living in the United States and, if you choose, eventually becoming a citizen.
What to Do if Your Green Card Gets Lost or Will Soon Expire
Learn when and how to file Form I-90 if your Permanent Resident Card is lost, stolen, or expiring.
A guide to replacing or renewing your green card. Learn when and how to file Form I-90 if your Permanent Resident Card is lost, stolen, or expiring.
How to Replace or Renew Your Green Card: A Simple Guide
As a Lawful Permanent Resident, your Green Card (officially Form I-551) is your most important document for proving your identity and your right to live and work in the United States. But what happens if it gets lost, stolen, damaged, or is about to expire?
Don't panic! There is a clear process for replacing or renewing your card. This guide will walk you through when you need to file, what form to use, and the basic steps involved.
When Do I Need to Replace or Renew My Green Card?
You must apply for a replacement card if your current one was:
- Lost, stolen, or destroyed: If your card is gone for any reason, you should apply for a replacement as soon as possible.
- Expiring or Expired: If you have a 10-year green card, you should apply for renewal if it expires within the next 6 months. Please note that 2-year green cards must be renewed by filing Form I-751 up to 90-days before the cards’ expiry date.
- Incorrect: If the card has incorrect information due to a USCIS error or a legal change (like a name change).
- Never Received: If USCIS mailed your card but it never arrived at your address.
- You turned 14: If you have a green card issued before your 14th birthday, you typically need to get a new one after you turn 14.
Very Important Distinction: This process outline below is for renewing a 10-year green card. If you have a 2-year conditional green card (usually from a recent marriage), you do NOT use this process. You must file Form I-751, Petition to Remove Conditions on Residence, to remove conditions and get your 10-year card.
Form I-90: The Key to Replacing Your Green Card
The application to replace or renew your green card is Form I-90, Application to Replace Permanent Resident Card. This is the main form you will need to complete and file with USCIS.
How to File Form I-90: A Step-by-Step Guide
Filing Form I-90 is a relatively straightforward process, and for most people, it can be done online.
Step 1: Complete Form I-90
- The easiest and often fastest way to file is through a myUSCIS online account. The online form guides you through the questions to make sure you complete it correctly.
- If you prefer to file by mail, you can download the latest paper version of Form I-90 from the USCIS website.
Step 2: Gather Your Supporting Documents
- You will need to provide a copy of your current green card (if you have it).
- If your card was lost or stolen, you might include a copy of a police report (if you made one).
- If you are replacing your card because of a legal name change, you'll need to provide a copy of the official name change document (like a court order or marriage certificate).
- If you are correcting a USCIS error, you'll need to provide evidence of the correct information and show that the error was not yours.
Step 3: Pay the Filing Fee
- There is a filing fee and a biometrics (fingerprinting) fee for Form I-90. The total cost can change, so it's critical to check the current amount on the official USCIS Fee Schedule before you file.
- If you file online, you can pay the fee electronically.
Step 4: Submit Your Application
- If filing online, you can submit everything through your myUSCIS account.
- If filing by mail, send your form, supporting documents, and fee to the correct USCIS Lockbox address listed in the Form I-90 instructions.
Step 5: Attend Your Biometrics Appointment
- After you file, USCIS will schedule you for a biometrics appointment at a local Application Support Center. They will take your fingerprints, photo, and signature. This is a standard step to verify your identity and conduct background checks.
Step 6: Receive Your New Green Card
- Once your application is approved, USCIS will produce and mail your new green card to you. You can track the status of your case online using the receipt number USCIS sends you after you file.
What About Traveling While My I-90 is Pending?
Waiting for your new green card can take several months. What if you need to travel internationally during this time?
- If your card is expired or lost: Once you file Form I-90, your I-797 receipt notice (which typically includes proof of a temporary green card extension), combined with your expired green card can provide temporary evidence of your status for a certain period. However, for international travel, reentry into the US is not always guaranteed. Please proceed with caution and consider speaking with a licensed immigration attorney before leaving the country. .
- Getting temporary proof: You may be able to schedule an appointment at a local USCIS office to get a temporary stamp in your valid passport, known as an Alien Documentary Identification and Telecommunication (ADIT) stamp. This stamp serves as temporary evidence of your permanent resident status for travel and work purposes while you wait for your new card.
It's always best to resolve your need for travel proof before you leave the United States to ensure a smooth return.
Green Card Wait Times: What to Expect and Where to Find Them
Discover what impacts green card wait times and how to find current estimates.
Average green card wait times explained. Discover what impacts your timeline and how to find current estimates.
One of the biggest questions on any green card applicant's mind is: "How long is this going to take?" It's a fair question, however, there's actually no one-size-fits-all answer. Green card wait times can vary wildly, from a few months to many, many years.
This guide will help you understand what "average wait times" really mean, what makes them change, and where you can look for the most current estimates for your specific situation.
Why Are Green Card Wait Times So Variable? Key Factors at Play
Think of the green card process like different lines at a big, government-funded amusement park. Some lines move fast, some slow, and sometimes new lines open up or old ones get longer. Here are the main things that influence how long you might wait:
- Your Green Card Category:
- Are you an "immediate relative" of a U.S. citizen (like a spouse, parent, or unmarried child under 21)? These cases often move faster because there's no annual limit on the number of visas.
- Or are you in a "family preference" category (like siblings or adult children of U.S. citizens, or spouses/children of green card holders)? These have annual limits, which often mean longer waits tracked by the Visa Bulletin.
- The same goes for employment-based green cards – different preference categories (Priority Workers, Professionals with Advanced Degrees or Exceptional Ability, etc.) have different demands and potential backlogs.
- Your Country of Chargeability (Usually Your Birth Country):
- There are per-country limits on how many immigrant visas can be issued each year. If you're from a country with a very high number of applicants (like India, China, Mexico, or the Philippines), you might face a longer wait than someone from a country with fewer applicants, even if you're in the same preference category. This is also tracked in the Visa Bulletin.
- Applying from Inside or Outside the U.S.?:
- Adjustment of Status (Form I-485): If you're already in the U.S. and eligible to apply for your green card here.
- Consular Processing: If you're applying for your immigrant visa from your home country through a U.S. embassy or consulate.
- Processing times can differ between these two paths.
- USCIS Service Center or Field Office Workload:
- Different USCIS offices handle different types of cases and have varying backlogs. The office processing your specific application can impact your wait time.
- How Well Your Application is Prepared:
- A complete, accurate application with all the necessary supporting documents is more likely to be processed smoothly.
- Mistakes, missing information, or insufficient evidence can lead to Requests for Evidence (RFEs), rejections, or even denials, which can add significant delays.
- Interviews:
- Some applications require an interview, which can add to the processing timeline.
- Major Events or Policy Changes:
- Things like pandemics, new government policies, changes in immigration law, etc. can unexpectedly affect processing capacities and wait times.
What Does "Average" Wait Time Really Mean?
When you see "average" wait times published (either by USCIS or other sources), it's important to understand what that means:
- It's an Estimate, Not a Guarantee: These are just general guidelines. Your specific case could be faster or slower.
- Based on Past Data: USCIS processing averages are usually calculated based on how long it took to process similar cases that were recently completed. They don't perfectly predict the future.
- USCIS Provides Ranges: USCIS often gives a time range (e.g., "80% of cases are completed within X to Y months"). This shows the variability and does not guarantee that all applications will be processed in that same time range. .
So, while averages can give you a rough idea, don't make plans based on them. Focus on filing a strong application and then using the official tools to track estimates for your specific situation.
How to Check Estimated Green Card Wait Times: Your Go-To Tools
Here’s how you can find the most up-to-date estimates:
- USCIS "Check Case Processing Times" Webpage:
- This is your primary tool for applications being processed by USCIS (like Form I-130, Form I-485, etc.).
- How to use it check average process times:
- Select the form type you're interested in (e.g., I-130, I-485).
- Select the specific USCIS Field Office or Service Center that is (or would be) handling your case. You can find this on your receipt notices if you've already filed.
- The tool will then show you an estimated time range for that form at that location.
- The Visa Bulletin (for Preference Categories):
- If your green card category is subject to annual limits (most family preference and employment-based categories), you also need to watch the monthly Visa Bulletin from the U.S. Department of State.
- As we discussed in our "Visa Bulletin Explained" guide, this tells you when a visa number is available based on your priority date, category, and country. Your case can't be finalized until your date is "current" on the "Final Action Dates" chart (or you're eligible to file based on the "Dates for Filing" chart, as per USCIS guidance).
- So, your total wait time will be a combination of:
- The USCIS processing time for your petition (e.g., I-130).
- Plus, if applicable, the wait time for your priority date to become current on the Visa Bulletin.
- Plus, the USCIS processing time for your final application (e.g., I-485 or immigrant visa through a consulate).
Quick Checklist for Finding Your Estimated Wait:
- [ ] Know your green card category (e.g., Immediate Relative, F1, EB-2).
- [ ] Know your Priority Date (if applicable).
- [ ] Know your country of chargeability.
- [ ] Check the USCIS Processing Times tool for your specific form and office.
- [ ] If in a preference category, check the latest official Visa Bulletin.
- [ ] Also check the USCIS page for which Visa Bulletin chart (FAD or DFF) to use for I-485 filing.
What If My Wait Time Seems Longer Than Expected?
It's natural to get anxious if your case seems to be taking longer than the published estimates. Here are a few things to consider:
- Are You Looking at the Right Estimate? Make sure you're checking the correct form, category, and office for your specific case.
- Is Your Case "Outside Normal Processing Times"? The USCIS tool will often tell you a date when you can submit an inquiry if your case is taking longer than expected.
- Check Your Case Status Online: Use your receipt number on the USCIS website to see if there are any updates, RFEs you might have missed, or other notices.
- Respond Promptly to RFEs: If you get a Request for Evidence, respond as quickly and completely as possible.
If your case is significantly outside the normal processing times and you haven't received any updates, you might be able to submit a case inquiry to USCIS.
Navigating green card wait times requires patience and staying informed. By understanding the factors involved and knowing where to find official estimates, you can better manage your expectations throughout your immigration journey. Always rely on official government sources for the most accurate and up-to-date information.
Your USCIS Online Account Number: What It Is and Why It Matters
USCIS Online Account Number: what it is, how to get one, and its role in managing immigration forms
Understand the USCIS Online Account Number: what it is, how you get one, and its role in managing your online U.S. immigration forms.
If you've filed certain immigration forms online with USCIS (U.S. Citizenship and Immigration Services) recently, you might have noticed a new number: your USCIS Online Account Number.
This guide will explain what a USCIS Online Account Number is, how you get one, and why it's becoming an important part of managing your immigration journey online.
What is a USCIS Online Account Number?
Think of your USCIS Online Account Number as a unique ID for your personal online account with USCIS. When you create an account on the official USCIS website to file forms online, pay fees, or track your cases, USCIS assigns you this number.
It’s a way for USCIS to link all your online activities and applications filed through that specific account. It's different from:
- Your A-Number (Alien Registration Number): This is your individual identification number if you are a foreign national seeking a visa or immigration Benefit in the United States.
- Your Receipt Number (e.g., IOE..., MSC..., EAC...): This number is specific to each application or petition you file. You'll get a new receipt number for most forms filed.
- Your Online Access Code: This is a separate code USCIS might mail you to link paper-filed cases to your online account.
The USCIS Online Account Number is purely for your online account itself.
How Do You Get a USCIS Online Account Number?
It's pretty straightforward:
- Create an Account: You get a USCIS Online Account Number when you first register for an online account on the my.uscis.gov website.
- Find It in Your Profile: Once you've created your account and logged in, your USCIS Online Account Number is usually visible on your profile page.
If you file a paper form first and then create an online account to link that paper case using an Online Access Code mailed to you by USCIS, you'll also see your USCIS Online Account Number in your online profile once it's set up.
Why Does USCIS Use This Online Account Number?
USCIS is trying to make things more digital and streamlined. This Online Account Number helps them:
- Organize Online Filings: It connects all the different applications and requests you might file through your single online account.
- Consolidate Information: It acts as a central identifier for your online interactions with USCIS, separate from your individual A-Number or case-specific receipt numbers.
- Improve Customer Service (Potentially): In the future, it might help USCIS representatives quickly pull up your online account history if you contact them.
Where Will You See Your USCIS Online Account Number on Forms?
As USCIS transitions more forms to online filing and updates paper forms, they've started adding a dedicated spot for the "USCIS Online Account Number."
- Online Forms: If you're filling out a form directly through your USCIS online account, the system may automatically populate this number, or it might be associated with your filing behind the scenes.
- Paper Forms: Many newer editions of paper forms (like Form I-130, Form I-765, Form I-485, etc.) now have a specific field where you can write in your USCIS Online Account Number if you have one.
Is It Mandatory to Have or Use a USCIS Online Account Number?
- If you file forms online: You will automatically have one, and it will be associated with your filings.
- If you file paper forms:
- Currently, providing your USCIS Online Account Number on paper forms is often optional, but highly recommended by USCIS if you have one.
- Including it can help USCIS link your paper-filed case to your online account more easily, allowing you to see case updates, send secure messages, and respond to RFEs online for that case.
What if I don't have one when filing a paper form? If you're filing a paper form and don't have a USCIS online account yet (or don't know your number), you can generally leave that field blank. You won't be penalized for not having one if you're filing by mail and haven't used the online system before.
However, creating an online account and then using that number can be beneficial for managing your cases.
Do I Need to Memorize My USCIS Online Account Number?
You don't necessarily need to memorize it, but it's a good idea to write it down someone secure and easily accessible.
- In your USCIS online account profile page.
If a form asks for it and you have an account, it's best to look it up and include it.
Key Takeaways About Your USCIS Online Account Number:
- It's an ID for your personal USCIS online account, not for a specific case or for you as an individual immigrant (that's what A-Numbers and Receipt Numbers are for).
- You get it when you create an online account with USCIS.
- It helps USCIS organize your online filings.
- It's optional but recommended to include on newer paper forms if you have an online account.
- It's part of USCIS's move to more digital and streamlined processing.
As USCIS continues to improve its online systems, this Online Account Number will likely become an even more integral part of how you interact with them. For now, just know it’s there to help connect your online activity!
Changing Your Name: During or After Divorce
Changing Your Name During Divorce as a Non-U.S. Citizen

Last Updated: March 26, 2025.
Learn about name change procedures, court approval, filing fees, and updating legal documents with step-by-step instructions for restoring a maiden name or adopting a new one.
One way to reclaim your identity and move forward after divorce is by restoring your pre-marriage name. Whether you want to restore a maiden name, revert to a previous name, or adopt a completely new one, there are specific legal steps to follow. This guide provides a comprehensive overview of the process, including legal requirements, documentation, and potential challenges.
Restoring Your Maiden Name During Divorce Proceedings
Many jurisdictions allow individuals to request the restoration of their maiden name as part of the divorce process. This request is typically included in the initial divorce petition or response and must be approved by the court in the final divorce decree. If granted, this provision only allows for the return to a prior legal name and does not permit adopting a completely new name without additional legal steps. Rules can vary by state.

Steps to Restore Your Maiden Name During Divorce:
- Include the Name Change Request in Your Divorce Petition or Complaint: When filing for divorce, there should be a place on the petition or response to request to restore your maiden or former name. If you are the respondent, you may need to file a separate motion or request to include this change.
- Get Court Approval: The judge must formally accept the name change request and include it in the final divorce decree.
- Obtain Certified Copies of the Divorce Decree: Certified copies of the final decree are required before you can update things like personal records and IDs.
- Notify Government Agencies and Institutions: Once you have a certified copy of your decree, you should promptly update your name with entities including:
- Social Security Administration (SSA) to update your Social Security card.
- Department of Motor Vehicles (DMV) to update your driver’s license or state ID.
- Banks, credit card companies, and financial institutions.
- Employers and payroll departments.
- Passport office for international travel documentation.
- Insurance providers, utility companies, and other service providers.
Legal Name Change After Divorce
If you did not request a name change during your divorce or decide you want a completely different name after your divorce has been finalized, you will need to follow a separate legal name change process.
Most courts require filing a formal petition, undergoing a background check, and obtaining a court order to finalize the name change. The process may vary depending on where you live.
Steps for a Legal Name Change After Divorce:
- File a Petition for Name Change: Submit a petition to your county court. This document includes your personal details, the requested new name, and a reason for the name change.
- Pay Filing Fees: Most courts require a filing fee, which ranges from as low as $25 to as high as $450. Fee waivers may be available based on financial hardship.
- Complete a Background Check (if required): Some jurisdictions require fingerprinting and background checks to ensure the name change is not being pursued for fraudulent purposes, such as avoiding debts or criminal history.
- Publish a Notice of Name Change (if required): Sometimes a legal name change must be published in a newspaper or other public forum as a legal notice. This ensures transparency and allows objections to be filed if necessary.
- Attend a Court Hearing: The court may require you to appear before a judge to confirm your request. If there are no objections or legal issues, the judge will approve the request and issue an official court order granting the name change.
- Obtain Certified Copies of the Court Order: Once approved, request multiple certified copies of the court order to update all legal and personal records.
- Update Identification and Records: Use the certified court order to change your name on all official documents, including:
- Social Security card (update with SSA)
- Driver’s license or state ID (update with DMV)
- Passport (update with the U.S. State Department or equivalent agency in your country)
- Bank accounts, credit cards, and loan documents
- Employment records and professional licenses
- Health insurance, auto insurance, and other policies
- Utility bills, leases, and property records
Changing Your Name During Divorce as a Non-U.S. Citizen
If you are not a U.S. citizen, changing your name during or after divorce may require additional legal steps depending on your immigration status and country of origin.
It's possible to do a name change while going through immigration processes; however, you should have copies of your name change documentation in hand and ready to submit to USCIS, in case the reviewing immigration officer gets confused about a petitioner or beneficiary's identity. If an immigrant or their spouse can't prove who they say they are with the documents to back their name change up, that could cause delays and will likely cause them to receive a request for evidence (RFE).
Immigration Documentation Updates
If you are a visa holder or lawful permanent resident (green card holder), you must update your name with the U.S. Citizenship and Immigration Services (USCIS) using the appropriate form (e.g., Form I-90 for green card updates).
If you are in the process of naturalization, you may be able to request a name change as part of your citizenship application.
Passport and National ID
You may need to update your name on your home country’s passport and other national identification documents through the respective embassy or consulate. Some countries may have specific rules about recognizing name changes made abroad, requiring additional legal steps.
Work and Visa Sponsorship Considerations
If you are on a work visa, notify your employer and update records with the U.S. Department of Labor or other applicable agencies. Sponsored visas may require notification to the petitioner (e.g., a spouse or employer sponsoring your visa).
International Travel Restrictions
Ensure your travel documents match your updated name to avoid complications at border controls. If you have dual citizenship, you may need to update both sets of documentation to ensure consistency when traveling.
Legal Recognition in Your Home Country
Some countries require a separate legal process to recognize a name change made in the U.S. Consult your home country’s embassy or consulate to determine the necessary steps.
Changing a Child’s Name After Divorce
A parent’s name change does not automatically extend to their children. If you want to change a child’s last name after a divorce, you must go through a separate legal process. Courts generally prioritize the best interests of the child and require consent from both parents, unless there are extenuating circumstances such as parental abandonment or safety concerns.

Steps to Change a Child’s Name:
- File a Petition: Submit a formal request to the court in the county where the child resides. The petition must include the reason for the name change and details about both parents.
- Notify the Other Parent: Most jurisdictions require that the non-petitioning parent be formally notified. If the other parent does not consent, they may have the right to contest the name change in court.
- Attend a Court Hearing (if required): Some courts require a hearing, where the judge evaluates whether the name change is in the child’s best interests.
- Obtain a Court Order: If approved, the court will issue a legal order granting the name change.
- Update Official Records: Once the name change is granted, you must update the child's records, including:
- Birth certificate (through the vital records office)
- Social Security Administration (to update the Social Security card)
- School and medical records
- Passport and immigration documents (if applicable)
Considerations for Children with Immigration Status:
- Visa and Green Card Holders: If the child has a visa or green card, the name change must be updated with U.S. Citizenship and Immigration Services (USCIS). This often requires submitting the court order along with Form I-90 (for green card holders) or a visa amendment request.
- Dual Citizenship: If the child holds citizenship in another country, you may need to update their foreign passport and records through the appropriate embassy or consulate.
- Naturalization Applicants: If a child is in the process of applying for U.S. citizenship, a legal name change must be documented in all immigration filings to ensure consistency.
Additional Considerations for Name Changes
If you are changing your own or your child’s name, here are some things to keep in mind.
Legal and Financial Implications
Changing your name can have implications for financial accounts, property ownership, tax filings, and legal documents. Ensure all relevant institutions are notified to prevent complications.
Professional and Business Considerations
If you hold professional licenses, own a business, or have contracts under your previous name, ensure that all legal documents reflect the change to avoid issues with employment or ownership rights.
Travel and International Name Changes
As noted in the section about immigration status, if you have international ties, be aware that name changes may need to be recognized in other countries through additional legal steps, including updating visas, citizenship documents, and travel records.
Seeking Legal Assistance
While many name changes can be handled without an attorney, consulting a legal professional can provide valuable guidance, especially in cases involving minor children, name changes across different jurisdictions, or if complications arise. Legal aid services and self-help resources provided by government websites can also offer support and step-by-step instructions tailored to your location. Navigating a name change during or after divorce involves multiple steps and legal considerations. Understanding these processes in advance can help ensure a seamless transition and prevent future complications. Whether restoring a previous name or choosing a new one, following the proper legal channels will help you move forward with confidence.
SimpleCitizen adds Payment Integration with Klarna
Pay as you go with our new Klarna integration!
You asked and we listened! SimpleCitizen has recently released an exciting new integration that allows customers to “Buy Now, Pay Later” using Klarna. Klarna is a third-party provider that allows customers to make purchases and then pay them back using a variety of payment plans.
How it Works
Signing up for Klarna is easy and can be done in just a few short steps. If you select Klarna as your payment method at your SimpleCitizen checkout, you will be directed to their website to set up the ability to pay for your SimpleCitizen application in installments. Klarna has different payment plans with interest rates based on your credit profile and the payment plan you select. Please note that SimpleCitizen’s Klarna integration cannot be used to pay for any USCIS filing fees at this time. Rather, it can only be used for SimpleCitizen’s application preparation services.
Who can Use It
In order to use their services, Klarna requires that the account holder meet the following requirements:
- Be a resident of the United States or its territories
- Have a valid bank card/ bank account
- Be at least 18 years of age
- Have a positive credit history
- Be able to receive verification codes by text
The ability to use Klarna is dictated exclusively by Klarna’s eligibility criteria. It may require a soft credit check (conducted by Klarna), depending on which payment plan you want to use. You can learn more about Klarna’s eligibility criteria here.
Payment Options
Klarna offers four different payment plans which offer incredible flexibility to consumers:
1. Pay in Full at Checkout
2. Four interest-free installments paid automatically every 2 weeks
3. Pay in up to 30 days
4. Pay over time with small monthly payments
All Klarna payments and payment plans can be managed in the Klarna app.
Other Great Klarna Features:
In addition to flexible payment options, Klarna has many other great features that can help make life easier! These include, but are not limited to:
- Easy checkout
- Buyer Protection
- Extensive retail partnerships
- User-friendly app
Things to Remember:
As a friendly reminder, Klarna is a third-party service and is separate from SimpleCitizen. Financing terms are offered by Klarna and it's banking partners. Any questions regarding their account services, eligibility, payment plans, making the payments, etc. should be addressed via their customer service team.
How to look up your Form I-94
This article will detail what an I-94 is, where to request an I-94, and more.
Many immigration applications require proof of a visitor’s last entry into the United States. A few different documents can show this, one of them being Form I-94. Form I-94, which used to be issued as a paper version, is now issued primarily electronically. Sometimes, navigating how to find the I-94 can be overwhelming, but we will guide you through the process. This article will detail what an I-94 is, where to request an I-94, and what to do if your I-94 is unavailable.
What is an I-94?
Form I-94 is the arrival/departure record of a nonimmigrant visitor’s most recent stay in the US. This document is issued by the Department of Homeland Security (DHS) upon arrival and is connected to the individual’s passport used for that arrival. In addition to recording a visitor’s most recent arrival, this document also designates until what date that individual is legally permitted to stay in the US. This date is called the “date of authorized stay” on Form I-94.
Form I-94 used to be provided on paper during a visitor’s entry into the US. The visitor would present the Form to US Customs and Border Protection (CBP) and be issued a paper stub indicating their arrival and authorized departure record. However, to streamline this process, CBP has automated Form I-94 to include a stamp in a visitor’s travel document/passport. This stamp will show the date of arrival and the date of authorized stay (the date when a visitor must exit the US). Additionally, CBP keeps an online record of the I-94 but does not present the visitor with that record. Suppose an immigration application requests a copy of Form I-94. In that case, it is requesting a copy of the electronic record (or the paper record if the last entry was prior to the issuing of electronic records). However, for immigration purposes, applicants typically include copies of the passport stamp from their recent arrival and the electronic I-94 record.
Who receives an I-94, and what is it used for?
The DHS may issue an I-94 to the following individuals:
- Visitors who are admitted into the US
- Visitors who are changing their status while inside the US
- Or visitors who are extending their stay while inside the US
Visitors may sometimes need a copy of their I-94 to verify their immigration status, alien registration, or employment authorization. Visitors who need a copy of their I-94 can request it from the US Customs and Border Protection (CBP) website.
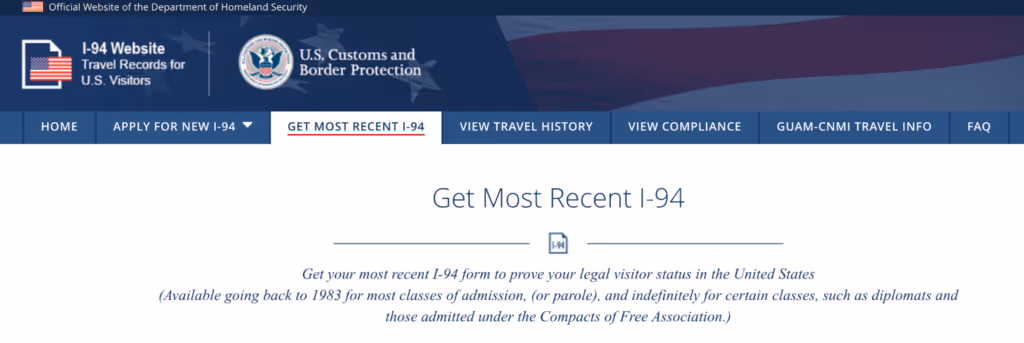
The CBP website
The CBP website allows visitors to apply for a new I-94, request the I-94 from their most recent entry, and view their travel history (showing all of their most recent entries into the US). Additionally, since the I-94 records a visitor’s authorized stay, visitors can use it to see to what date they are legally allowed to remain in the US until.
How to request an I-94 using the CBP Website
Please follow these steps when requesting an I-94 from the CBP website:
- Visit the CBP’s “Get Most Recent I-94” page
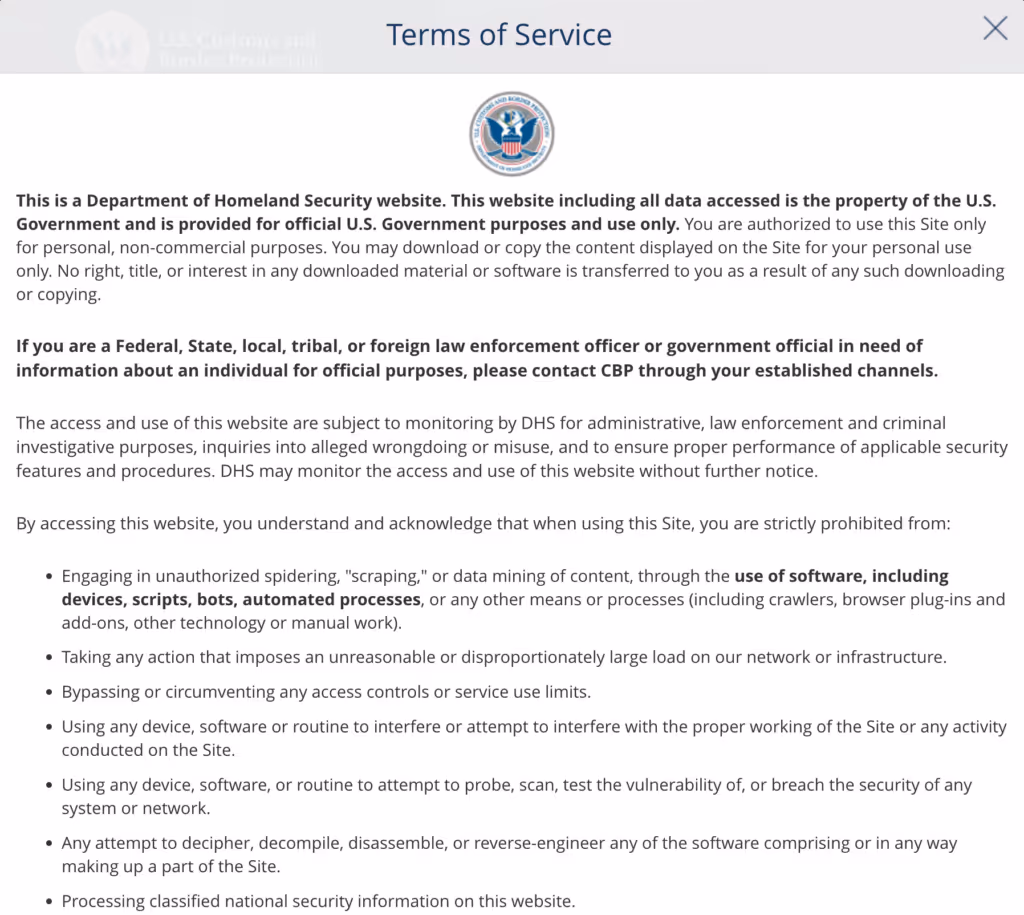
- Accept the “Terms of Service” by reading through them and indicating whether you “Acknowledge and Agree.”
- Enter your traveler info: this page will request the first and last name of the visitor, their birth date, document number, and country of citizenship. Ensure that this information is entered EXACTLY as it appears on the visitor’s passport used for their most recent entry.
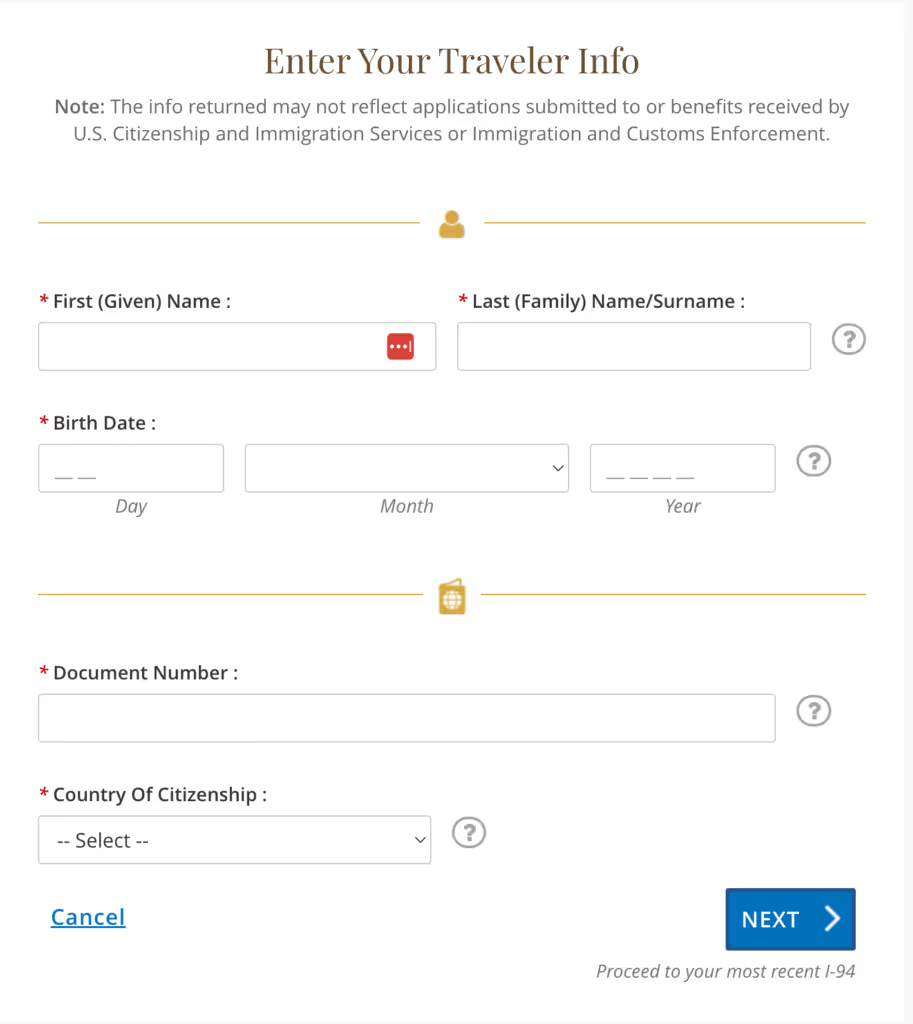
- Then click “Next” to generate your most recent I-94.
You can print this page if you need the I-94 to verify immigration status, alien registration, or employment authorization or to keep it for your records.
What can I do if my I-94 record is not available?
In some cases, visitors may be unable to request their I-94 from the CBP website. The following steps may help:
- Try verifying that your personal information was entered EXACTLY as it appears on the passport used for your most recent entry.
- If needing to show verification of the most recent entry, requesting the Travel History from the CBP website may help.
- If you cannot get Form I-94 from the CBP website, you may file Form I-102, Application for Replacement/Initial Nonimmigrant Arrival-Departure Record, with USCIS.
What can I do if my I-94 record shows errors?
At times, the I-94 record available on the CBP website may be from a former entry (but not from the most recent entry into the US) or may have some errors on it. Here are a few options for how to proceed in these situations:
- If the I-94 generated on the CBP website shows a previous, older entry, you may keep that I-94 record and also add an explanation explaining that the I-94 of the most recent entry was not available on the CBP website. In the explanation, provide the date of your most recent arrival in the US. In addition, you could request the CBP Travel History or add a scan of the passport stamp received as evidence of this most recent entry.
- If the I-94 record shows any information on it that appears to be incorrect (such as the wrong date of entry or incorrect class of admission, etc.,), it may be helpful to reach out to the CBP of the airport used for your most recent entry to see if they can correct the record from their end.
Using SimpleCitizen
The I-94 record serves as a log of a nonimmigrant’s most recent entry into the US. It also specifies the immigrant’s date of authorized stay. If an immigrant needs a copy of their I-94 record, they may visit the CBP website to request their I-94. If someone cannot obtain their I-94, they may also file Form I-102, Application for Replacement/Initial Nonimmigrant Arrival-Departure Record, with USCIS.
We’re happy you’re here! If you are applying for an adjustment of status, SimpleCitizen wants to help! We can help you simplify the process of applying for a green card with the help of immigration professionals for a fraction of the cost. Learn more here to get started!
Additional Websites:
Perhaps it may be found within a different category.